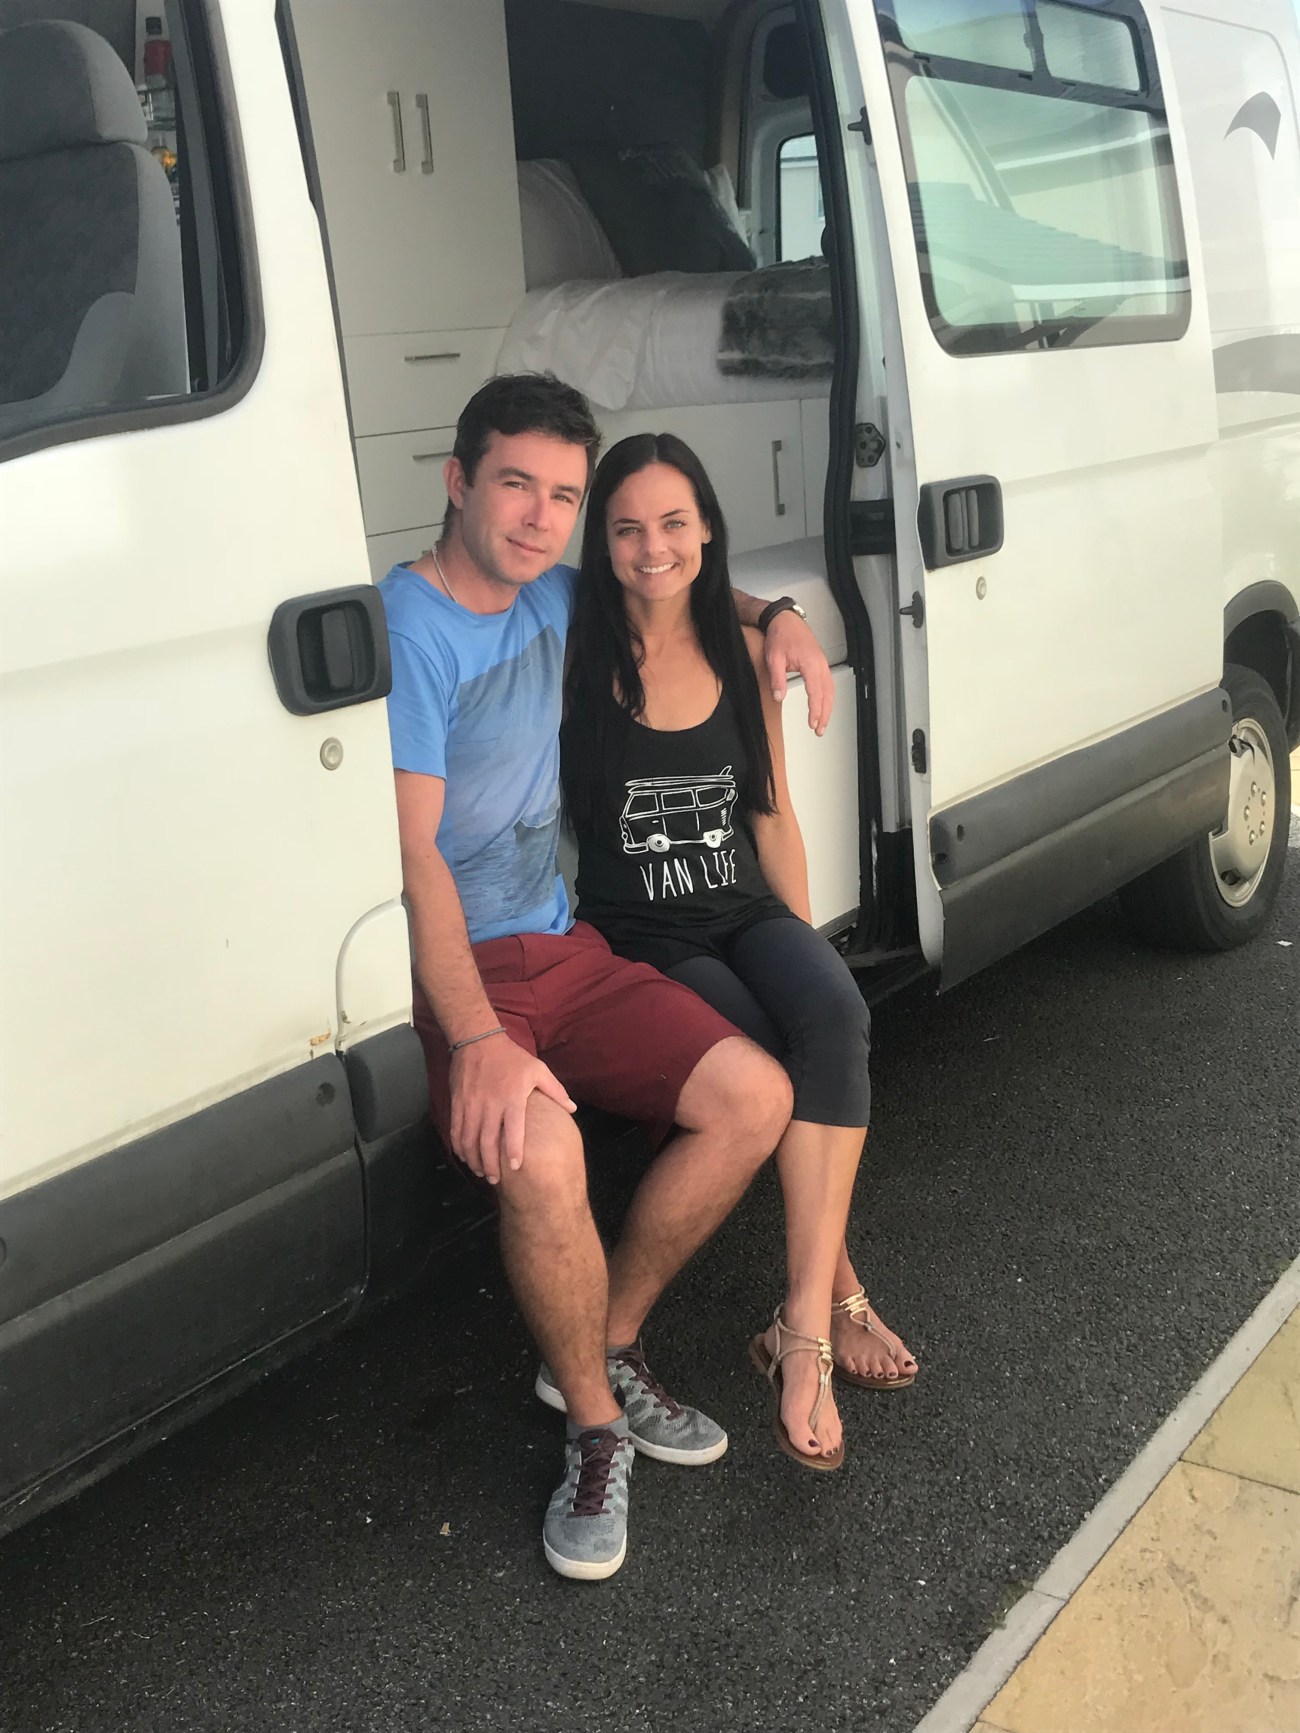
 It has always been a dream of mine to build out/live in a van for the freedom to be able to travel anywhere, and this year that dream finally came true. It is our first van. One we bought on a budget, built on a budget, and live in on a budget. But it is our happy place nonetheless. In our heads we are already planning out how we’d build our next “bigger and better” van.. but right now we are appreciative to be truly enjoying life in our bright little van kave (yes, spelled like that on purpose). I get asked a lot of questions about structural aspects of it.. so this blog is to answer all questions related to how we built out our first tiny space with our own hands! (our first HOME!)
I could write multiple blog posts about the way we built it with specific questions on each detail such as types and sizes of vans, choosing a layout, insulation, electrical, power options (solar, propane, batteries, etc), carpentry and building the structure, materials used, bathroom options, kitchen options, bed options, organization, window coverings, time spent building, costs, must haves, etc etc etc…. But I’m going to write a quick general overall description of how we built it ALL. I will type each topic in bold if you want to scroll to a specific topic. And I’ll be more than happy to answer more specific questions about anything if you send me an email at KellyNicoleTravel@gmail.com or a message on Instagram @KellyNicoleTravel
How long does it take to build? We built out the interior of our van in just 2 and 1/2 WEEKS. Granted, we literally worked our butts off all day everyday on it during that time.. but it is possible it build it out quickly if you want to. I know other people spend a few months or even a year building theirs out.. but it all depends how much time you have, how dedicated you are to building it, and of course the amount of elements and details included in your layout. (Edit in 2019: Our second build took us 3 months because we started from scratch. All builds are different)
even painted indoors when it rained just to keep building

constant hard work for a few weeks straight
Choosing Type of Van: We built our van on a budget (as opposed to some other vanlifers who spend a shit ton of money building theirs out). Because of this, we opted to purchase an older year van, a 2005, especially since we knew we’d be rebuilding the interior of it ourselves anyway. We have a high roof, long wheel base, Vauxhall Movano. (Honestly, as an American I hadn’t ever heard of that make or model until I started searching for vans here in England.. but they are popular over here in the UK). My dream van, and next van, will be a Sprinter, because they seem to have the best reviews. But there are so many brands of vans….Mercedes, Ford, Dodge, Vauxhall, Iveco, Volkswagen, etc. My best advice is to do your research for your specific size needs and budget and then take your time choosing one. We looked at A LOT of vans before choosing one. I think the mileage and engine is obviously most important factor.. but they all vary in cost and have slightly different bodies with varying widths lengths and heights. Most have options of a short wheel base, medium wheel base, or long wheel base (and even extended base longer than that) as well as short or high roofs. We have a high roof and a long wheel base for more space, but that is our personal preference for the layout that we wanted.
Insulation: Pretty much the first step in any van build. Line the floors walls and ceiling with insulation to keep the heat/cold out and to prevent moisture from staying on the van walls. Because we bought a van that was previously used as a camper van (that we gutted to rebuild), the insulation and walls are 2 things we did NOT build ourselves on this van. We left them as they were. I am familiar with the insulation process but I did not do it myself on this build. (Edit 2019: We DID do the insulation process on our 2nd van build, which can be found in detail by clicking here).
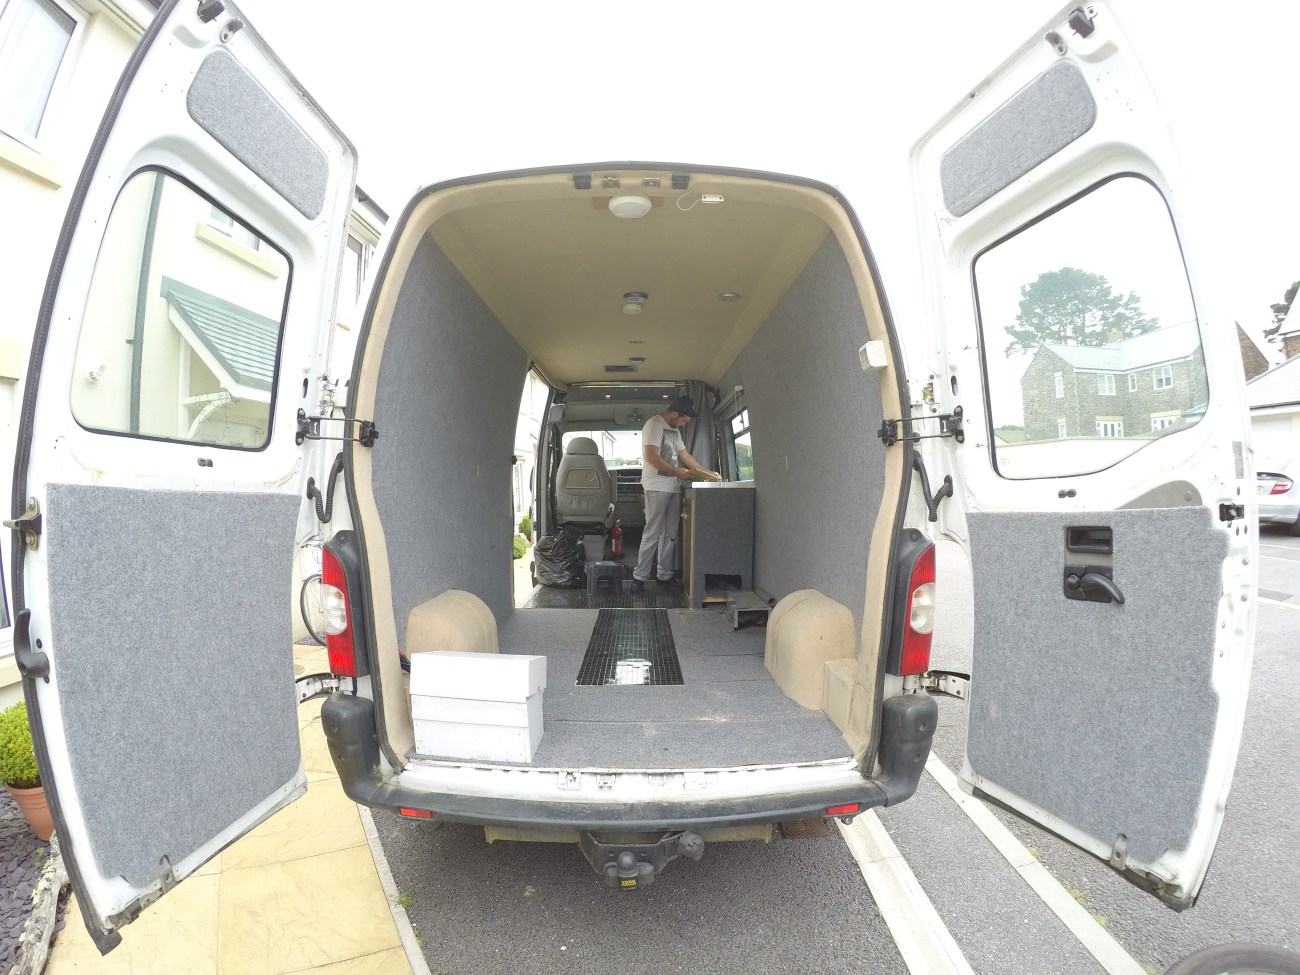
the interior before we started the build! only thing we kept from previous owner was insulation and walls
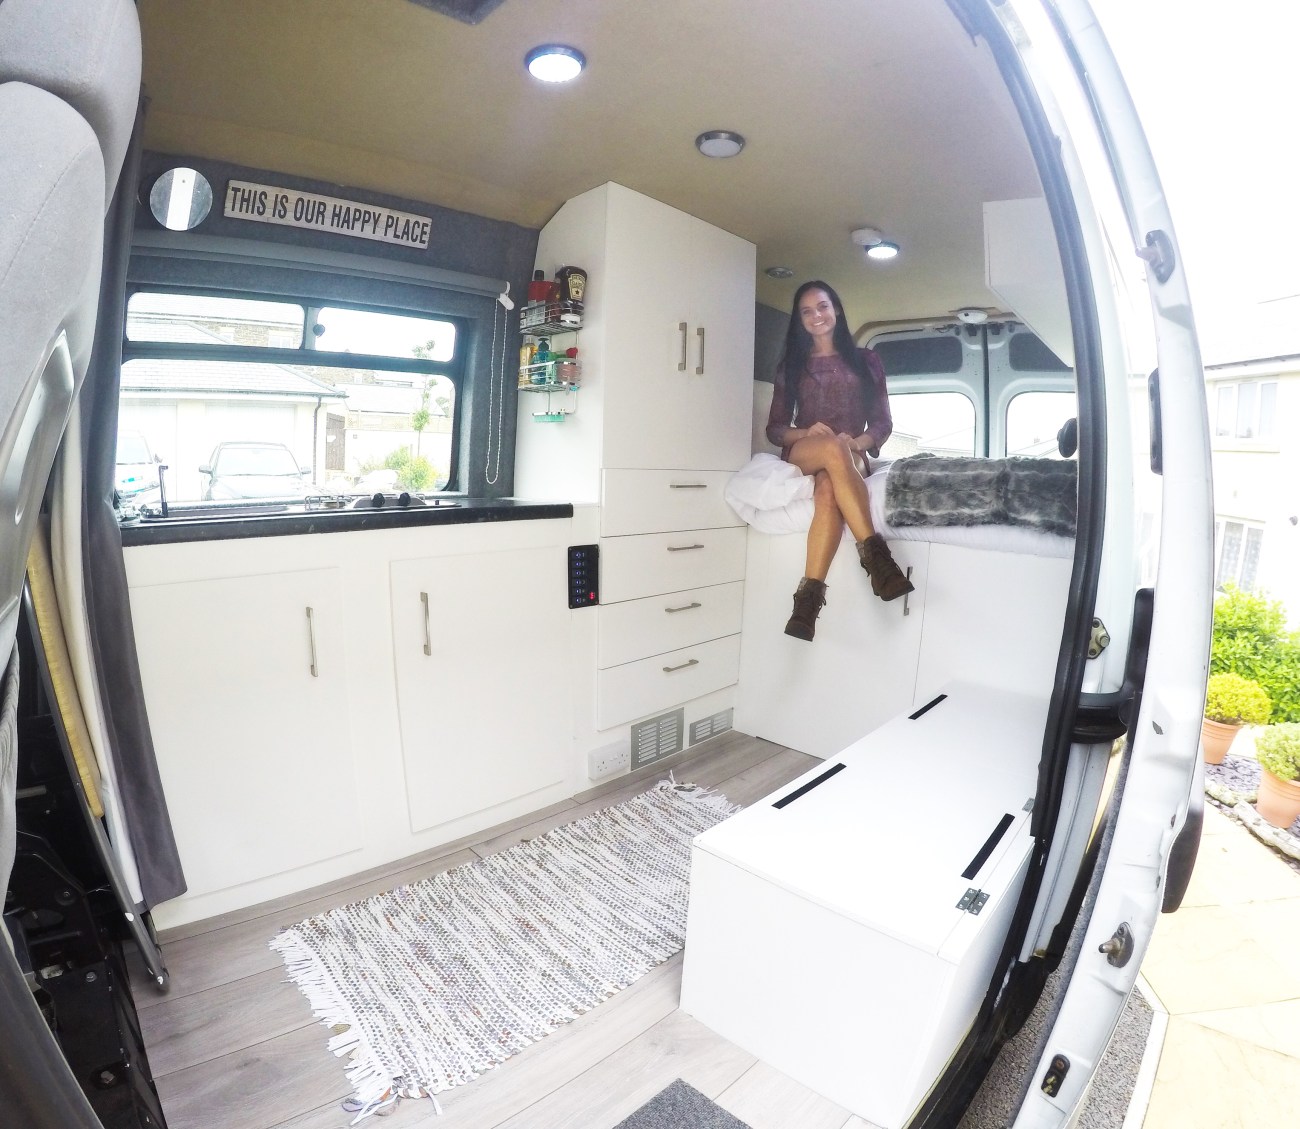
Choosing Layout for Interior: Our layout was carefully chosen based on things that were most important to us. Before we built, I said I needed a lot of storage space (because I hate clutter), room to stand and move around, and I wanted it to feel light and bright. I didn’t want to feel like I was confined in the tiny space and I wanted windows for natural light. I noticed a lot of other vanlifers make 2 bench seats and a table that can then fold down and transform into a bed at night time.. but the idea of having to set up and take down my bed any time I preferred sitting on a seat didn’t appeal to me, so I wanted a full mattress (plus full bed meant more permanent storage space underneath it). I didn’t need a huge garage under there (aka big storage area in the back), I could live without a full bathroom (but we do have a hidden toilet), but I couldn’t reiterate storage space enough.
If you have a lot of “toys” (skis, bikes, surf, etc) a large garage may be important to you. If you don’t want to shower outdoors, a full bathroom may be important. If you have kids, a 3rd seat and a 2nd bed may be a necessity. If you have smaller van, skip the kitchen indoors and cook outside instead. A big change we made was the direction of our bed. Neither of us are very tall so were able to gain a LOT of space by turning the bed sideways instead of longways. This allowed the area up front to be MUCH more open for other elements (Ex: bed and a bench separate instead of only having 1 at a time). But we did also combine other stuff from 2 things into 1 to save space (example: putting toilet inside the day bench). This works with a lot of stuff, so be creative!

Example: large storage area in rear under the bed.. for outdoor seats, skateboards/toys, spare tires, tools, anything outdoor or garage related (and notice the orange wire.. thats our external electrical hookup option if desired).
After knowing our preferences, we drew a few different layout options down on paper with measurements and dimensions, while looking at a lot of other peoples’ van layouts on Instagram for ideas and inspiration (SOOO helpful! Search #vanlife hashtag on Instagram for pages and pictures for ideas). Remember you are going to be living in such a small space so make sure it is suitable for YOU and YOUR needs. Many people don’t have much of anything in their vans except a bed and a few cabinets and that’s all they need. So think of YOU.

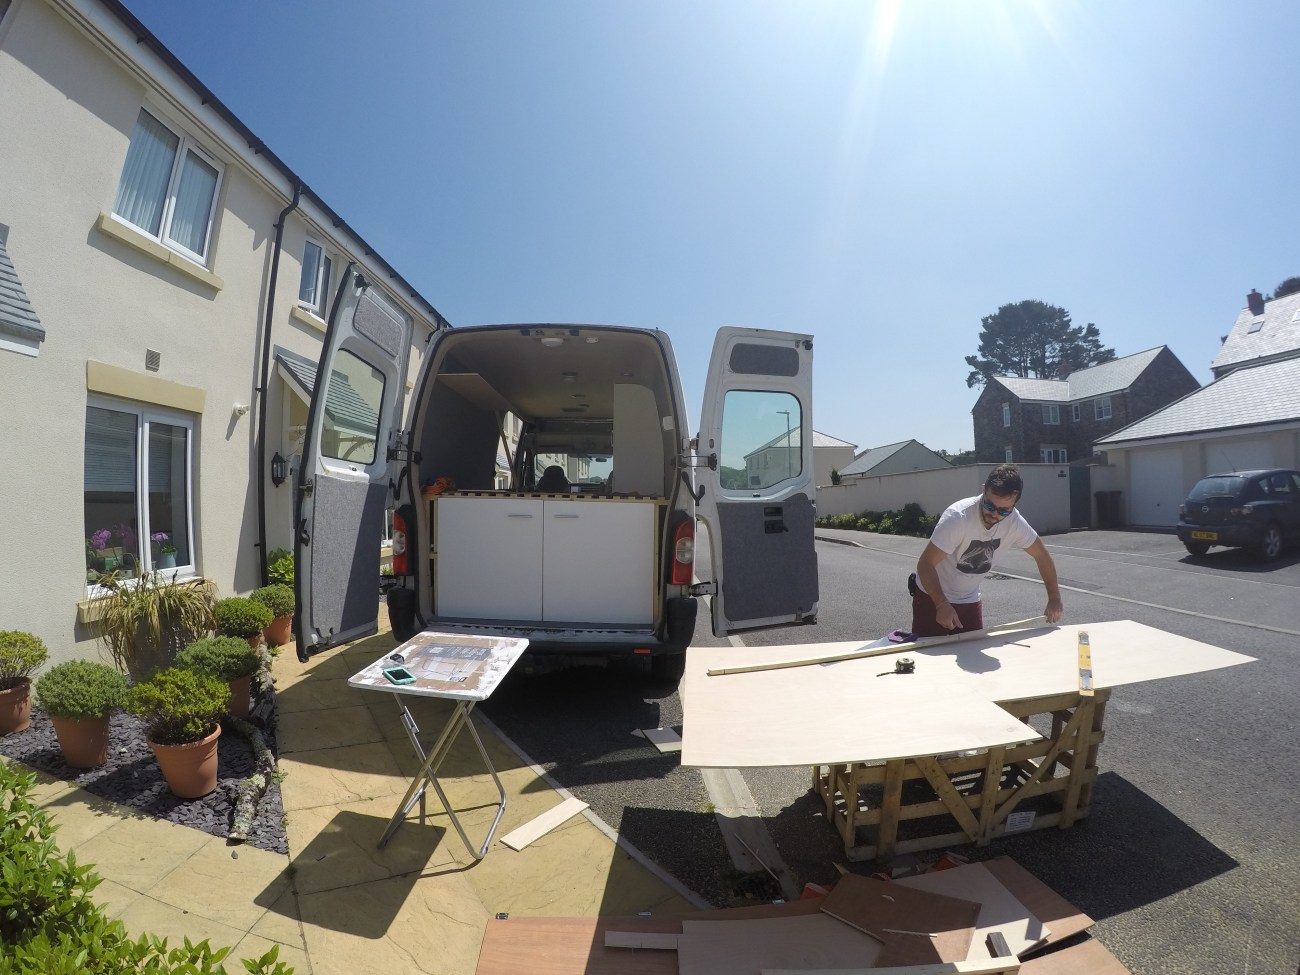
writing down dimensions and layouts before the endless trips to the hardware store

the first days of building the structural layout
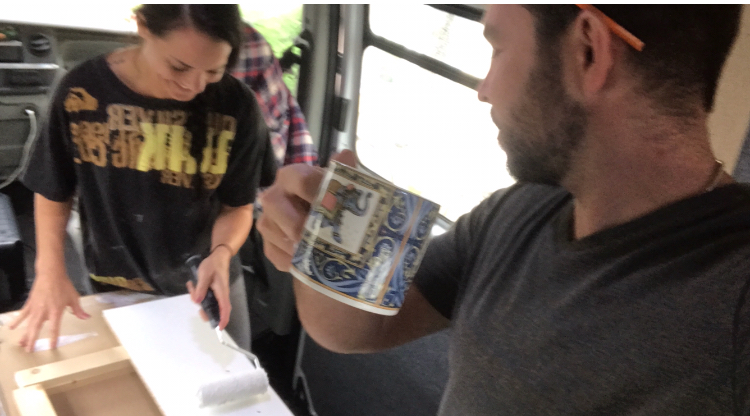
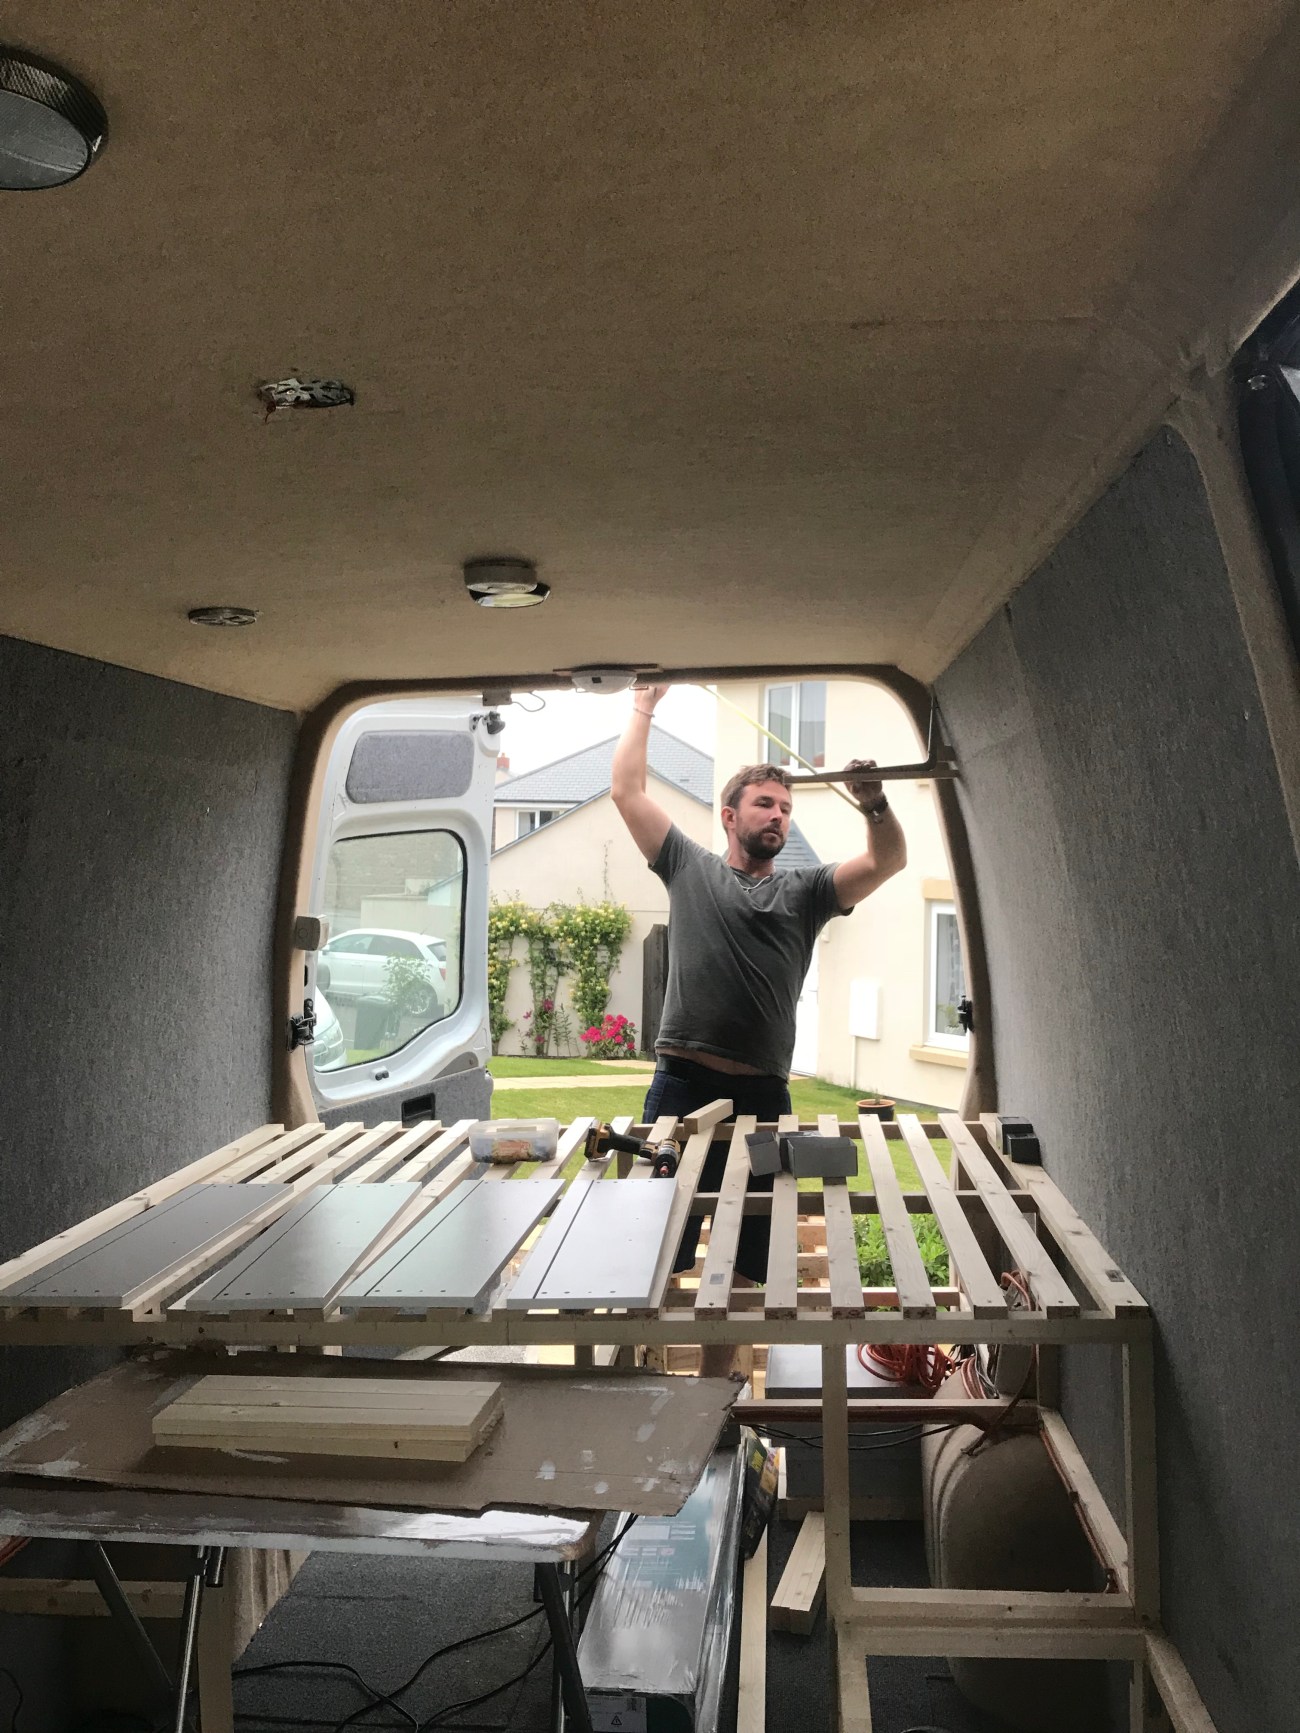
Carpentry/Structure: The most time-consuming part of our build. No matter what type of material you are using (we used wood for almost all structures), cutting it and fitting it to the custom sizes and layout took up the majority of the time we spent on our build. Again mentioning that we built our van on a budget, we may not have used the most professional and most expensive materials out there.. but it certainly looks and holds just as well as they would have 😉 VERY basics of it below:

bed in rear, bench on the right, floor to ceiling storage on the left
The bed frame and bench frame were made using 2×2” wood, strategically placed for plenty of support. Brackets were used to further the support. 1×2” wood was used to make the bed slats that hold the mattress. MDF was used and cut to make all the shelving and cabinet doors. Plywood was used for some cabinetry walls and underneath flooring. (Random side note: we have an electric saw to cut all this, but Dave is nuts and chose to use his hand saw to cut alllllllllll the pieces of wood we used, and did an amazing job.. isn’t that crazy?)
measuring upper storage cabinet placement while I painted
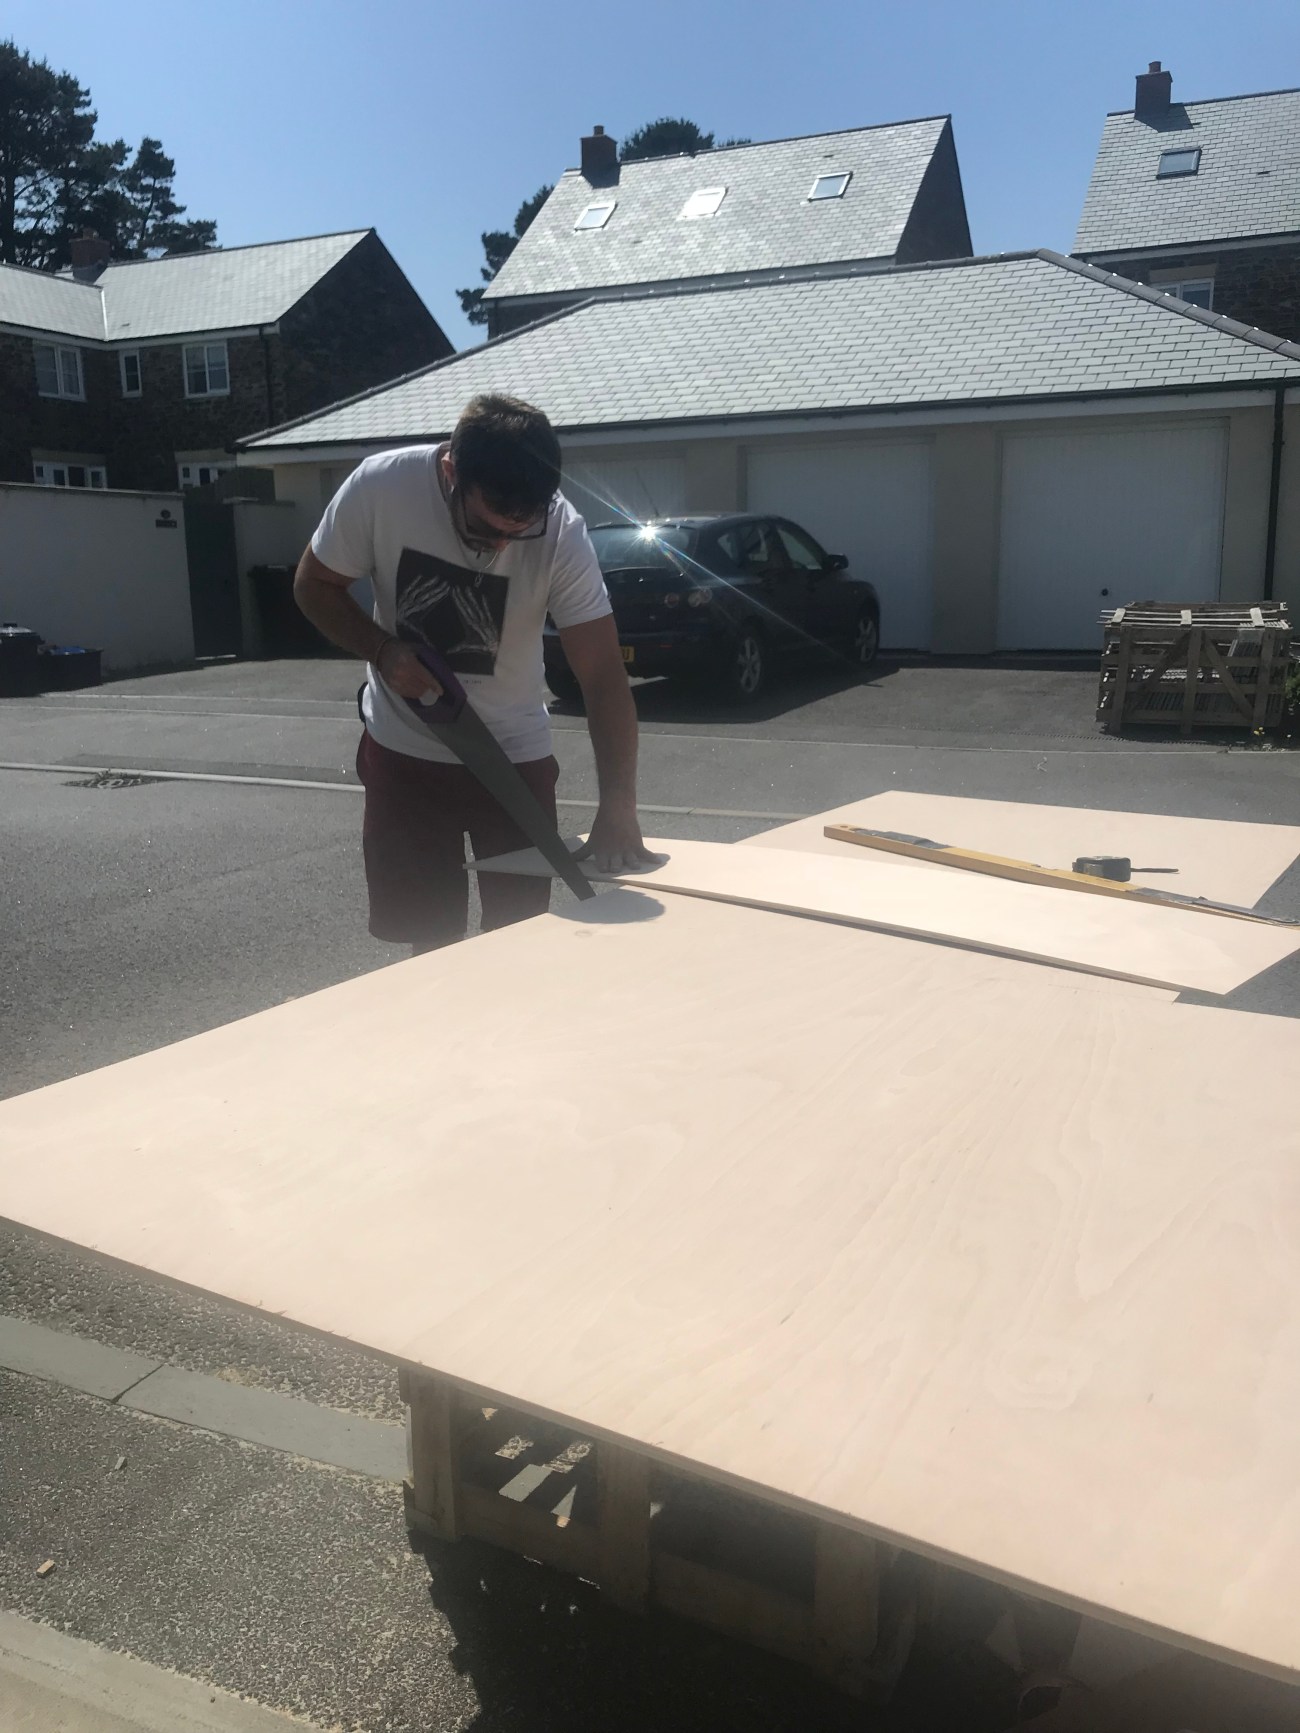
he chose to cut everything with a handsaw instead of his power saw!
Other important details for homes that MOVE:
Magnets are used to keep drawers and doors shut while the van is moving. A small slat of wood is on the front interior of the shelves inside of the cabinets to prevent items from moving during driving and/or falling out when opened. Larger stronger hinges are used on the upper cabinets to remain up when opened. Laminate floors (that I LOVE and were cheap) were cut to fit our floor shape.

the day we put the laminate floors in!
PAINTING the carpentry: Notice that all that wood in photos above were painted white… I wanted everything white to make it brighter and happier so I didn’t feel like I was in a small space… and boy did I have to work for that. Spent hours and hours and days painting everything (including my hair and myself) all white. I used a bright white matte paint meant for kitchens, because the dirt is easily wiped off of it.

im not the cleanliest painter that existed

the cabinet doors and walls before painted
Power Options: There are multiple ways to get power into the rear of your van WITHOUT having to hook it up to an outside electrical source and without running your vans engine. Leisure batteries, gas, and solar panels are all common ways to power your van.
We have one 12volt leisure battery in the rear of ours (which is the bare minimum of power supply, we know). To explain it in layman terms: Anytime the van’s engine is turned on, or while we are driving, it charges this leisure battery. When the van is turned off, the leisure battery can then power anything we have hooked up to it without using gas or the engines battery. We personally don’t have TOO many things to power, so one battery is enough for us for now. It allows our water pump (running water in sink), the ceiling lights and light switches, electrical outlets and USB charging ports to all function while the van is turned off. A 2000 watt inverter is connected to that battery in order to plug in objects that require an AC output (example: laptops, hairdryers, etc). — damn this van taught me all kinds of new things.. I really didn’t understand electrical terms at ALL before this. (Edit 2019: Our second van build has solar panels and 2 deep cycle batteries. View setup in full detail by clicking here).*
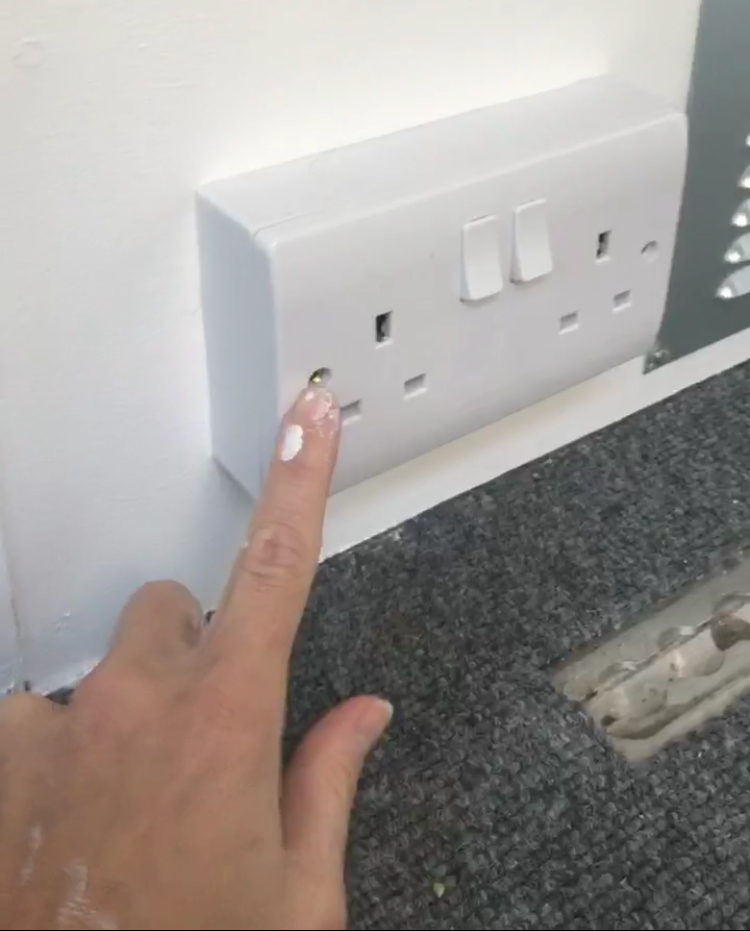
one of our electrical outlets (yes they’re European.. as we are doing van life in Europe first)
We have a large power charging station with USB ports and power switches that is run off the leisure battery. This is where we charge our phones and cameras each night.
Our stove is run off of a little 10kilo propane gas tank stored underneath of it. We’ve used it nearly everyday living in the van and it’s been amazing.
Solar panels are the most ideal way of getting power to your van, no matter how off grid you go. They last much longer than batteries once powered and are obviously also the most eco friendly way of powering your van as well. Powering all of the mentioned above by nature itself. We do not yet have them on our van, but we hope to put them on our roof of our next one (yes, we’re already planning the next van).
Lastly, although we rarely ever stay in a campground with electrical hookup (I prefer to stay in wild spots off the grid), we also DO have the option to plug into an outside source using our 240 volt electrical hookup if needed.
**I have to add photos of our battery/water pump/electrical stuff at another time**
Water supply: As mentioned above, we have running water in the sink. We have a 20L (5.2 gallon) water tank underneath the sink, which is connected to a water pump, which is powered by the leisure battery in the back of the van for anytime use. I’ve gotten a few questions about this.. so to answer it: yes, when the 20 liters is used, it would be empty and need refilled. But the tank is easily removed to be refilled anywhere, anytime, that we wish. We haven’t had an issue refilling anywhere. We’ve refilled in springs, spickets, sinks, and natural water sources.. never once paid to refill our water tank. We mainly use it for cooking, cleaning up, brushing teeth, etc. And no, we do not have a water heater. To view an in depth tutorial of how to set up water click here.*
Our “Bathroom”: One of my favorite features in our van is our tiny little portable toilet (@Coldwell porta potty), because you’d never know it’s in our van unless I showed you it was. It’s hidden under our bench seat and you can just lift up the bench seat lid and sit down on the pot right there. It’s not connected to any water tanks or plumbing (so yes we have to empty it every once in awhile after use). But the bottom section has cleaning fluid mixed with water, which is where the bodily fluids safely remain enclosed until emptied… Otherwise, we use the great outdoors as our bathroom majority of the time. But it’s definitely convenient to have the toilet option there for emergencies when there are people around, on a highway, or in bad weather, etc.
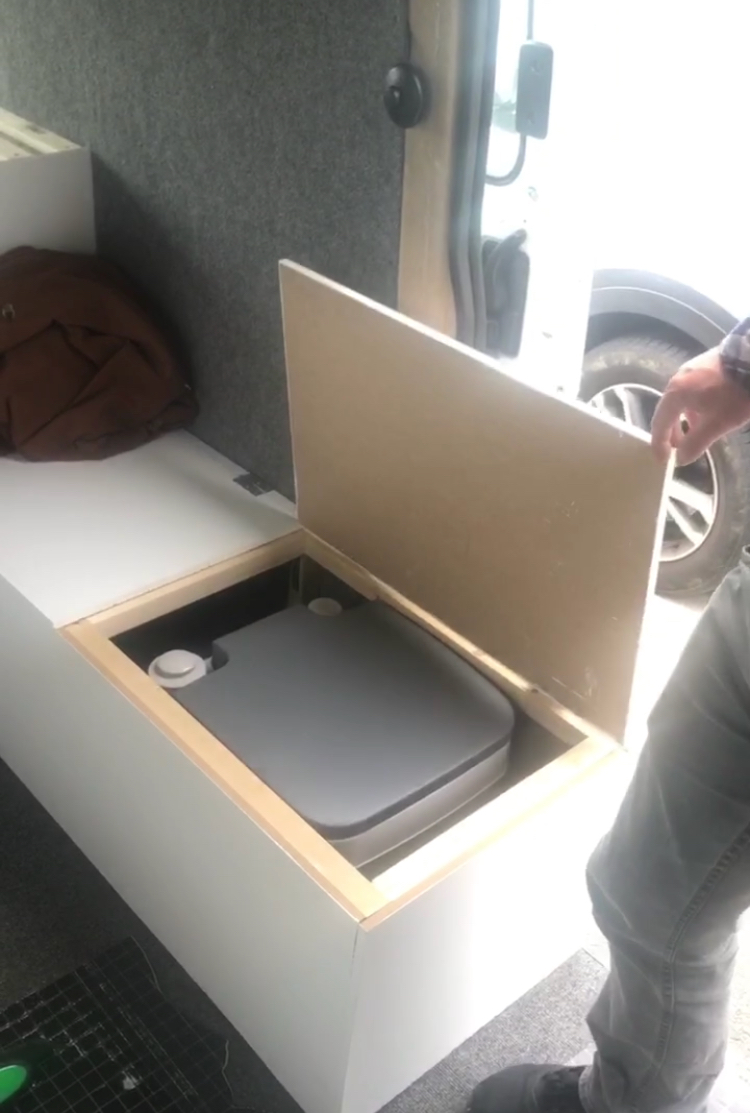
hidden toilet under our bench seat

first time I used the hidden toilet
We don’t have a shower built in. I was fine with skipping it, but Dave is adamant on having one in our next van. We randomly purchased a cheap solar shower for like 8 bucks in a camping store and I’m sooo glad we did because we’ve used it a LOT. It’s a solar bag with 20L capacity, that heats up in the sun when left outside for a few hours (of course it has to be warm out though). You can hang it up on anything (usually on the van door) and it has a small hose and shower head attached to the bottom of it that can be turned on or off as needed. I’ve used this in the woods, on beaches, in parking lots, etc. And often I just use it to quickly rinse off my feet or hands. (Side note: Of course be aware of what soap you use and where it goes when showering outdoors.. never put animals/environment in harms way).

using the solar shower bag
Our Kitchen: Our kitchen contains a sink, a small 2 burner propane stove, and a bit of counter space. It is right in front of the window for bright and easy lighting and ventilation. Underneath the sink and stove is where the water tank and propane tanks are stored. (See water supply section above). In the other cabinet there is a mini fridge cooler to store perishable goods (although we never really have this turned on because it uses too much of our battery power). The rest of the kitchen utensils and supplies are kept in the storage cabinets next to the kitchen counter (silverware, plates, bowls, cups, pots, pans, food, spices, etc).
We have a foldable table and chairs that we can eat on outdoors OR we can eat on the bench seat indoors.
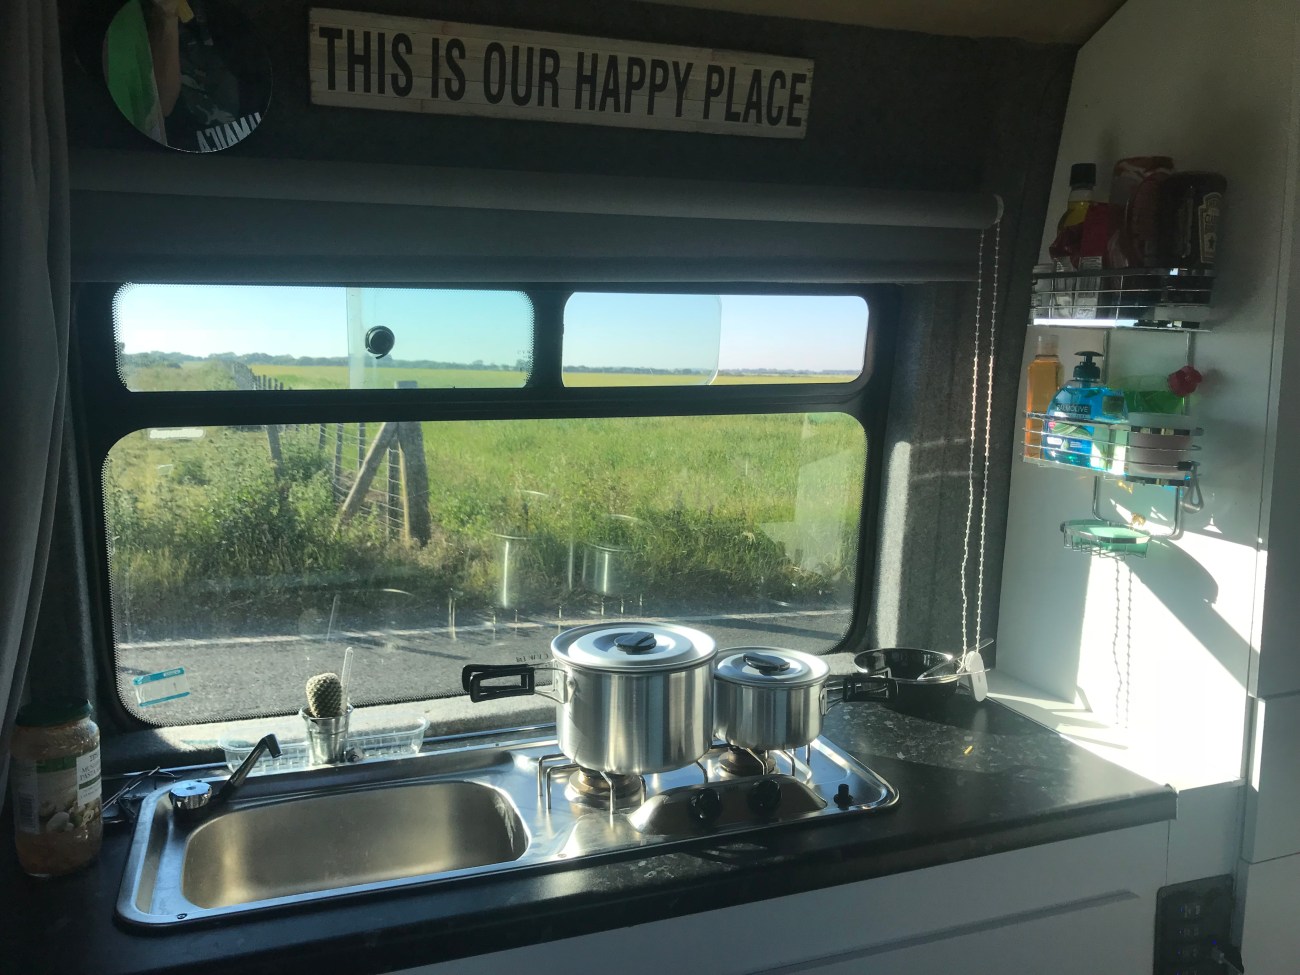
the kitchen.. with 2 burner propane stove and a 20L water tank under the sink
Our Bedroom: As mentioned above, we chose to turn our bed sideways instead of longways. Luckily our van is wide enough for it to still be comfortable. This allowed us to have so much more space in front of it. We also raised the bed up relatively high in order to have a lot of hidden storage room UNDER the bed. We got a custom made mattress fit to our beds dimensions (it’s not a standard size) from CustomSizeBeds. I highly recommend the company… they can make a mattress (or bench cushion, seat cushion, etc) in any shape or size. They custom made and delivered our mattress within 48 hours of ordering it! Ours is 20cm high (about 8 inches) and was nervous it wouldn’t be comfortable but it is topped with 10cm (4 inches) of memory foam and soo super comfy. So check out their site (not an ad, just had genuine good service).

our bedroom
Organization/Storage: IT’S EVERYWHERE in ours. And so important to me. It allows the van to be filled with everything you need to live, while being easily accessed, not falling everywhere when you drive, and clutter free. We have storage under the bed, above the bed, in a floor to ceiling cabinet, under the sink, and inside of the bench.

all the work cutting and painting wood for storage was SOO worth it
Raising the bed up allows for either one large “garage” underneath it, or a few sectioned off storage areas. We didn’t need a garage so opted for a few sectioned off areas. The back side of ours is for tools and all outdoor items. The inner side of ours is used for clothing and bigger indoor items, easily accessible with a large hinged door.
Benches are great for dual purposes. Obviously acting as a seat for lounging, eating, or working.. but also hiding/storing things underneath it. As mentioned above, we have a toilet under ours, as well as storage for all of our shoes. Have to use your space wisely!
The cabinets above the bed and next to the bed provide plenty of space for clothing, toiletries, medicines, kitchen utensils, cooking tools, food, towels, blankets, cosmetics, etc.. and when the cabinets are shut, there’s no clutter seen anywhere from all that stuff!
Ahhhh organization is so so important when living small. Have I said that enough yet? Nobody wants to have to dig for what they need. Build the cabinets. And buy storage bins to go in them. 🙂

floor to ceiling storage cabinet, storage under the bed, storage under the sink, storage inside the bench, etc.
Window coverings: You can of course put up any typical household blinds or curtains that you desire over your windows. We have a long gray curtain that goes across the front of our van from floor to ceiling. But be sure to secure them to your van in a way that they will not bang around the van while you are moving. We decided to cover all our other windows with a removable thin layer of foil insulation that reflects the sun (if theres a slight air gap). We honestly just bought 2 big windshield covers from an autoparts store and cut it with scissors to the shape of our windows. You can also order long rolls of Reflectix from Amazon or certain hardware stores in person. (Example: Reflectix). You can then cut this roll to the shape of any window in your van. Then finally you can cover the interior side of it with any color fabric you wish so you are not blinded by that tacky silver color on the inside of your home. (Keeping the exterior of it the same is important if you want it to act as an insulator as well as a blind).

window covering BEFORE we sewed on a neutral color fabric for the interior sides.. held on with magnets to easily be put up and taken down
We then attached a couple super magnets to the outside of them so that they do not fall down while up.. but the whole thing can easily and quickly be removed and stored each morning for the daytime.
I preferred this as opposed to blinds for a few reasons: They serve a dual purpose as both a privacy blind (nobody can see in at all) as well as additional insulation to keep the heat out (if there is the air gap to reflect the heat), they look cleaner visually, they lie flat and flush against the window without curtains and blinds taking up limited space in the vehicle, and they make sure nobody can see in or out through the sides, cracks, or slight transparency that a curtain may have.
Cushions: As stated above, our bed is from CustomSizeBeds made out of firm foam on the bottom and memory foam on the top. We had some foam from an old couch that we cut and used for our bench seat and then sewed new durable fabric around it.

the day we put the mattress in the van

Dave’s mom Maxine helping cut & sew a fabric cover onto our bench seat cushion
SWIVEL SEATS!: A bonus in our van that I LOVE are swivel seats. They can turn around and lock into place to either face forward for driving or backwards for hanging out.

our front seats turn around backwards to hang out while not moving.. LOVE that feature

left side: after we gutted interior before we built right side: after our build, with just finishing touches left to go
the day we finished the build and started living on the road #vanlifecouple

and now we sleep all over the world
I think that about covers everything in the van. If you have any specific questions please don’t hesitate to message me on Instagram @KellyNicoleTravel or shoot me an email at KellyNicoleTravel@gmail.com
-Kelly god
Categories: Van Life

1 reply »