Having functioning power in the living space of your van is perhaps one of the most important components of converting a van into a home. This allows you to power things like a water pump for running water, a fan for ventilation, lights when needed, outlets to charge electronics, the ability to cool a refrigerator, etc…. all while the vehicle is off and not plugged into an outside source of power. Essentially, it is what allows you to live in a vehicle practically and functionally. In this blog, I will explain what we chose to power the living space in our van, as well as how we set it up.
If you want to scroll to a particular topic it will go in this order:
- Intro Basics
- Choosing a Leisure Battery
- Options to Charge Leisure Battery/Costs
- Setting up/Connecting Battery Isolator
- Setting up/Connecting Solar Panels
- Connecting Fuse Box to Battery
- Connecting Appliances/Electrics to Fuse Box
- Summary
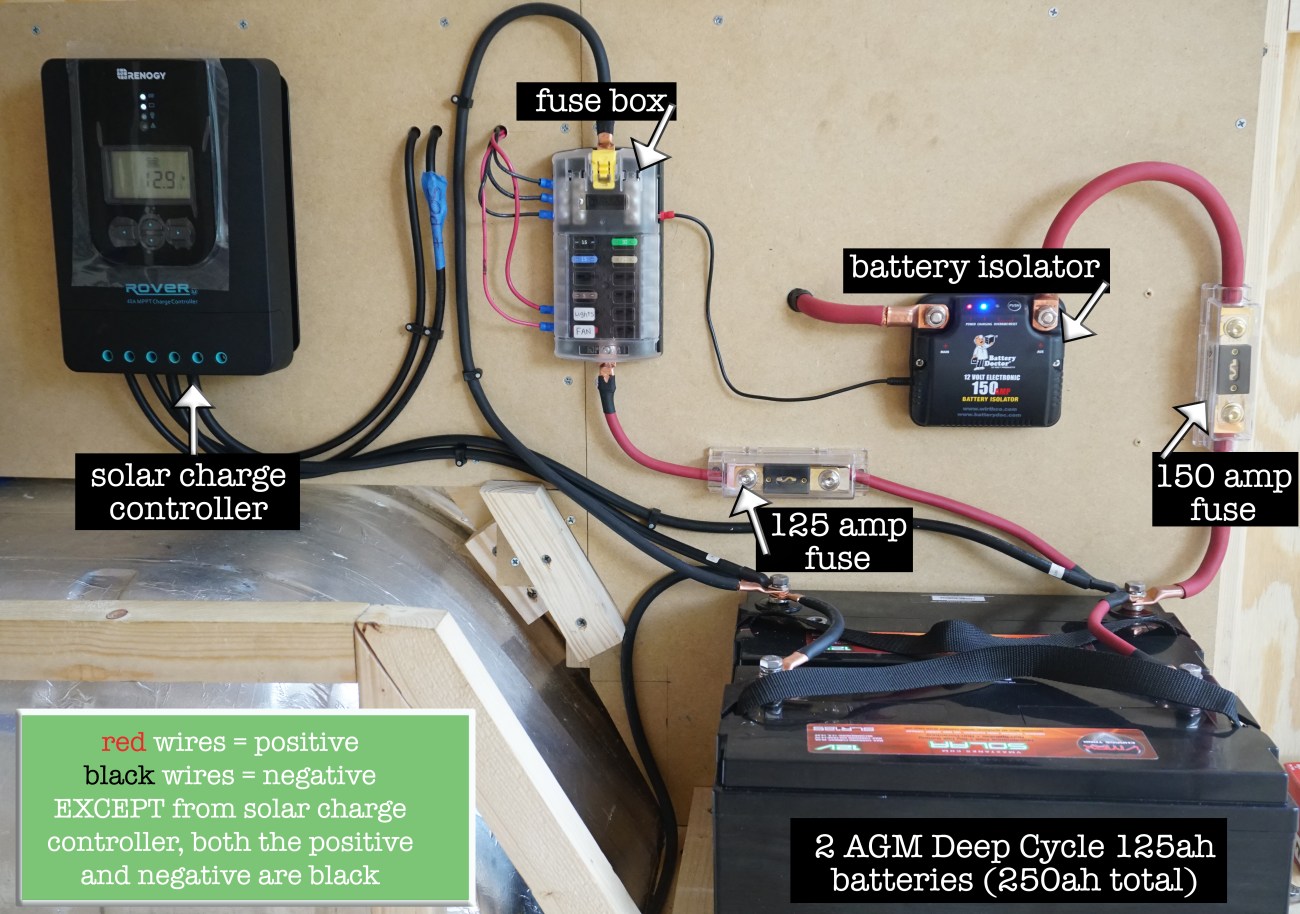
1.Basics to begin: At least one leisure battery is needed in the living area. It is what will power the living space in your van. It will run on a 12volt DC power system. This leisure battery then needs to be kept charged at all times, without using the starter battery’s charge. You can do this through a couple of ways. We chose to power our leisure batteries by 2 different sources: 1) solar panels and 2) a 12volt battery isolator connected to the starter battery. Both will be explained in depth below. Once the battery has power, you can connect a fuse box to the battery, and finally all of your appliances/outlets/lights will be connected to the fuse box.
2.Choosing a Leisure Battery: You will want to get deep cycle AGM batteries OR lithium batteries. There are so many different battery brands/companies/sources and you will want to research what works best for you. However, I can tell you we bought 2 VMax AGM DeepCycle Batteries and highly recommend them. (Click for more info). We honestly bought them through Amazon and can say they arrived in perfect condition and work really well. Good batteries aren’t cheap, but they are the backbone of your entire power setup so it’s recommended to invest in a good one. The amount of amp hours you will need on your leisure battery depends entirely on how much power you will personally be using in your vehicle. This can be determined by the number of watts and amp hours each appliance or outlet uses and totaling them together. You can then buy 1 battery with the total number of amps you need, or multiple batteries connected in parallel to get the same total number of amps. We bought two 125amp hour batteries for a total of 250amp hours.
PS- “Connecting in parallel” just means connecting the 2 positive terminals of the batteries together with a wire, and connecting the 2 negative terminals of the batteries together with a wire.. so that they run together and act as one more powerful battery together.
3.Charging your Leisure Battery
This can be done multiple ways, and you can decide what you which would work for you. The options are through solar panels, through shore power (plugged into an external source such as a camp ground), or through a battery isolator (connects to starter battery). You can do one, two, or all. Also, a portable external battery charger is a 4th option.. but it requires AC power, and I only recommend that option for occasional charge of a dead starter battery or something.
We personally have chosen to charge our batteries through both solar panels and a battery isolator. We chose these because they are the 2 options that allow you to live offgrid. In our first van, we did not have solar panels and our battery never stay charged long enough to power a fridge, so we couldn’t have a fridge. We knew on our second van build that a fridge was a must, so solar panels were going to be a must for us too.
Solar Panels vs. Battery Isolator:
Solar panels rely on the sun for energy. During the night or on super rainy/snowy days, there may be little to no power being received by the solar panels. However, they have sufficient amperage when they are receiving solar power to keep the batteries charged for quite some time, even when the sun has gone. A battery isolator allows you to charge your leisure battery through the van’s starter battery, regardless of time or weather, but only while the van’s engine is on and running. It runs on a way one current (meaning the alternator battery can charge the leisure, but the leisure won’t ever affect your alternator battery’s charge.. so it can’t drain your starter battery.) A battery isolator is wonderful for times of long haul drives when the batteries will be charged during your drive. If you will not be doing many long haul drives or will be staying offgrid for awhile, I highly recommend investing in solar panels!
Costs: A good solar panel setup can be quite expensive, but depends on the number of panels you need/buy and what type of controller you get with them. A battery isolator is relatively cheap. We bought both our battery isolator and solar panels off of Amazon (because they had cheaper prices than any local shop or direct retailer), and arrived in perfect condition. When we bought them, the 12volt 150amp isolator was about $50, and it had closer to $100 in the local auto shop. The Renogy Solar Panels we purchased came as a complete kit (a digital charge controller, mounting brackets, cables, and adapter kit) for around $700 for a 300watt kit (3 panels). You can change the amount of panels/watts to however many you want.

*Setting up the 12 volt DC Power supply* – This part is perhaps why you are reading this. It may seem overwhelming to set up wires, cables, fuses, etc. by yourself… but at the end of the day, it is relatively simple. I will do a step by step guide of what you will need, how to set it up, and connect both the isolator and solar panels below. ↓
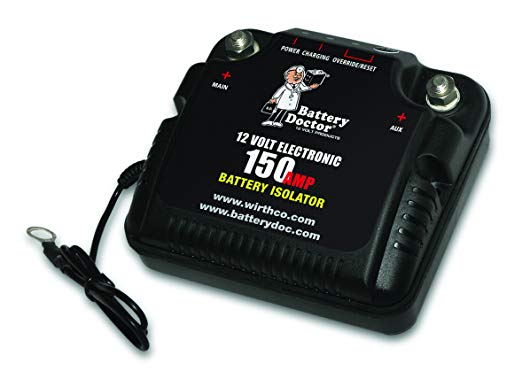
4. Setting up Battery Isolator
*You will need: A 12volt 150 amp battery isolator, two 150 amp fuses/fuse holders, 1 gauge copper cable wire, and multiple battery ring terminals (And optional but recommended: conduit protective housing to put wire inside of)
- You first need to decide where/how you would like to run your 1 gauge copper wire through your van from under the hood (starter battery) to the rear interior of your vehicle (leisure battery). Most vans come with a pre-cut hole under the hood that goes into the dash for this reason (see photo below). Once it is through that hole into the dash you need to determine the best wire route in YOUR van to get it to the rear of the van, based upon the location of your leisure battery. Ours was perhaps the most difficult way because our starter battery is located in the front left, and our leisure batteries are located in the rear right. We had to take apart the dashboard and put the wire under there in a safe spot where it would not touch anything else to get it to the right side of the van. From there we could just run it along the upper side rib of the van to the battery in the back. (making video soon here of how we ran the wire from front to back).
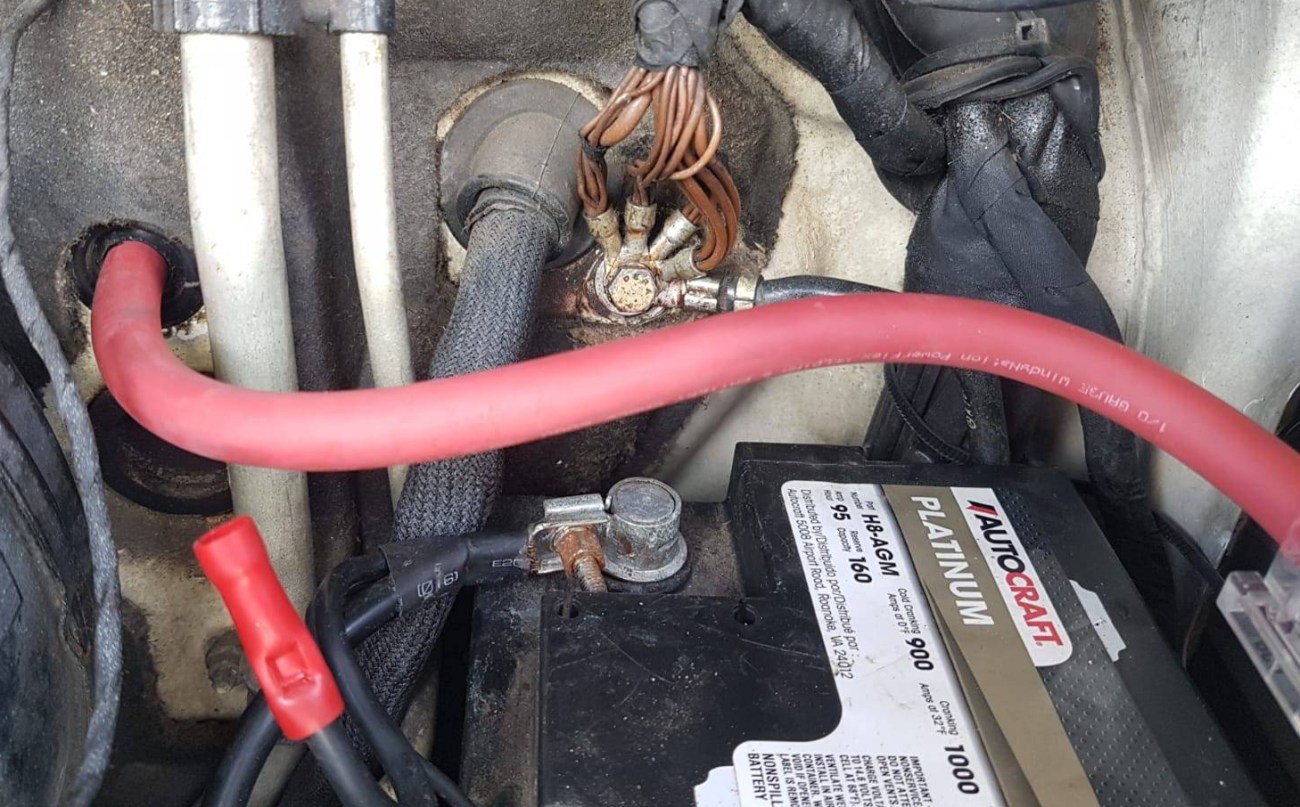
The hole on the left of this photo is the hole that was pre-made with the van. It is located under the steering wheel on the inside of it.
- Once you have determined the route of the wire, I highly recommend placing the wire in some sort of protective housing (we used 3/4” plastic conduit). This will ensure the wire is safe from anything hitting/breaking/moving it. Measure the length of wire you will need, cut it, and then secure the conduit with wire inside in its place.
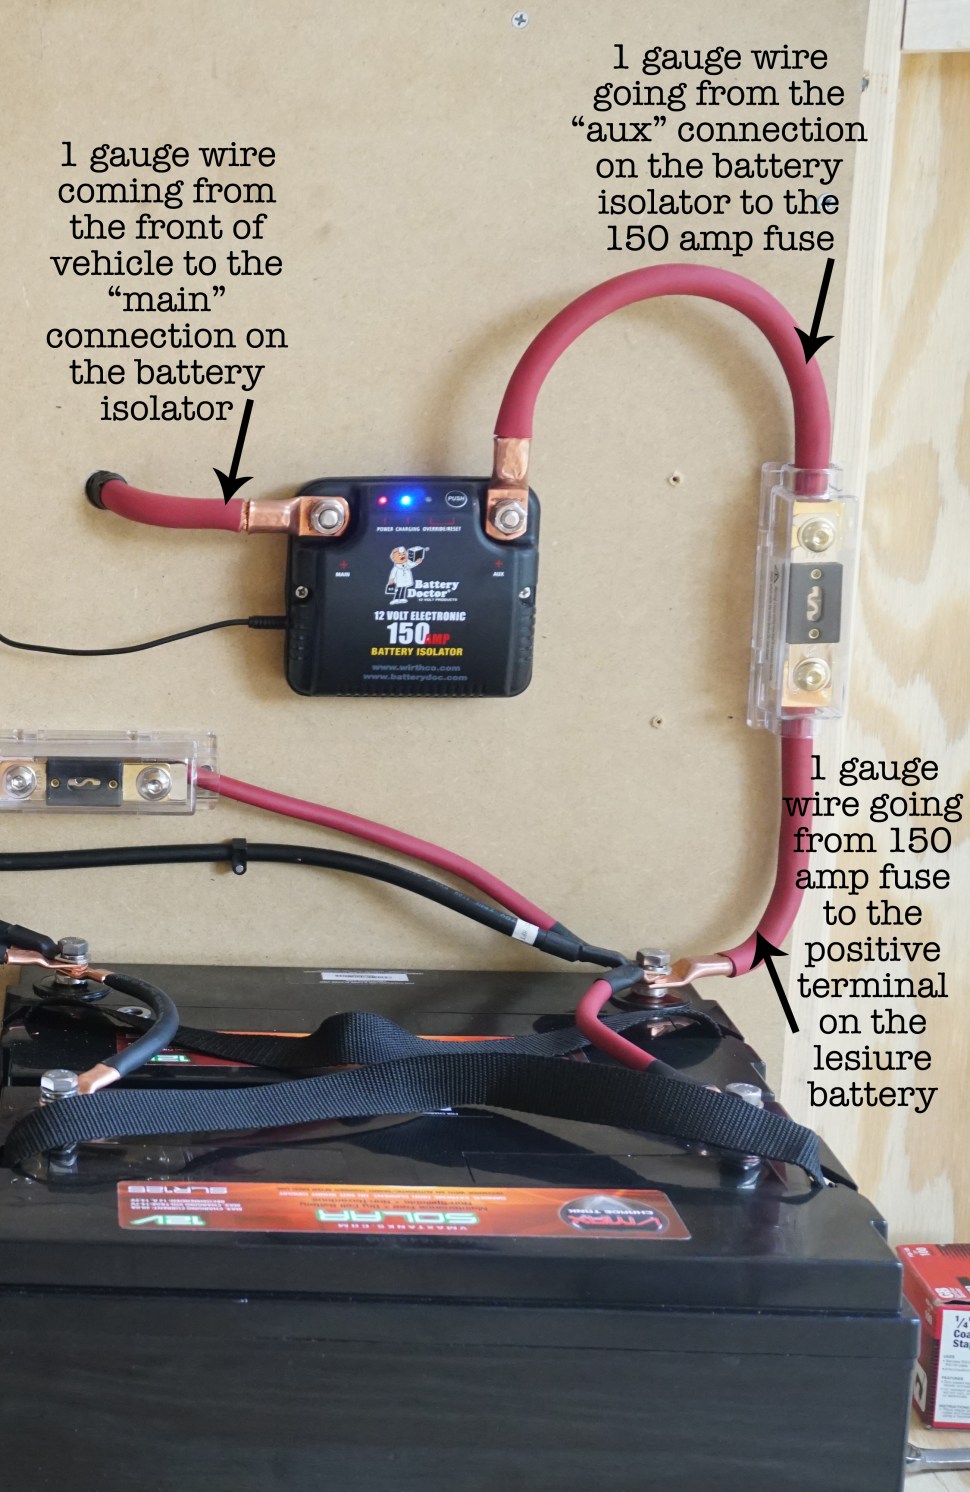
- Connect the rear end (leisure battery end) of the 1 gauge wire to the battery isolator itself on the terminal labeled “main”. Do this by cutting the wire to exact length, removing a small portion of the rubber coating on end of that length to expose about an inch of the copper wire itself, and finally placing a copper ring terminal over the exposed wire end of it. You will want squeeze/pound the terminal until a snug fit on the wire so it does not fall off/become loose. Then simply place the terminal on the bolt of the isolator labeled “main” (for main battery) and secure with a provided nut.
- Measure, cut, and connect another piece of 1 gauge wire from the other side of the battery isolator to a 150 amp fuse. This piece should be attached to the battery isolator on the side that says “Aux” for auxiliary (or leisure) battery on one end, and the 150 amp fuse on the other end. Be sure to follow the same steps mentioned above of adding a copper battery terminal on the isolator end of the wire. The fuse I recommend comes with a fuse box and the wire can go directly into the box without a terminal. This fuse is so important to protect your battery from an accidental surge of power.
- Connect the 1 gauge wire from the other side of the 150 amp fuse to the positive terminal on your leisure/auxillary battery. (Battery terminal needed on the battery end of the wire).
should look something like this based upon the location of your stuff
- Connect the negative cable from your battery isolator to a negative spot on your fuse box
- Go back to the front end of your 1 gauge wire underneath the hood and attach it to another 150 amp fuse BEFORE the main starter battery. Meaning secure the 150amp fuse somewhere safe near your starter battery (see photo of ours below). Then cut and connect the wire to that fuse. This fuse is important to protect your starter battery from a surge of power.
- Connect the 1 gauge wire from the 150 amp fuse to the positive terminal on your starter battery, using another copper battery terminal.

1 gauge wire coming through dash, connecting to a 150amp fuse, and then connecting to positive terminal of starter battery
- Make sure the negative terminal of your leisure battery is grounded (connect a wire from the negative terminal to metal, easiest to attach it to the floor or wall of your van).
- Start your engine, and the isolator should light up that its charging! 🙂
Summary: At one end you should have a 1 gauge copper battery wire connected to your starter battery, then have that wire going through a 150 amp fuse near the starter battery, from there the wire should run to the living space of your van and go through the battery isolator, from the isolator it should then go to another 150 amp fuse, before the wire finally connects to the leisure battery at the other end.
5. Setting up Solar Panels (in parallel)
*You will need: However many solar panels you choose, , branch connectors (to connect panels together in parallel if you have more than 1 panel), positive and negative cables, mounting brackets, charge control box (allows you to digitally see how much charge your battery has as well as how much power your solar panels are bringing in), cable housing (to cover the cable hole in roof), battery ring terminals.
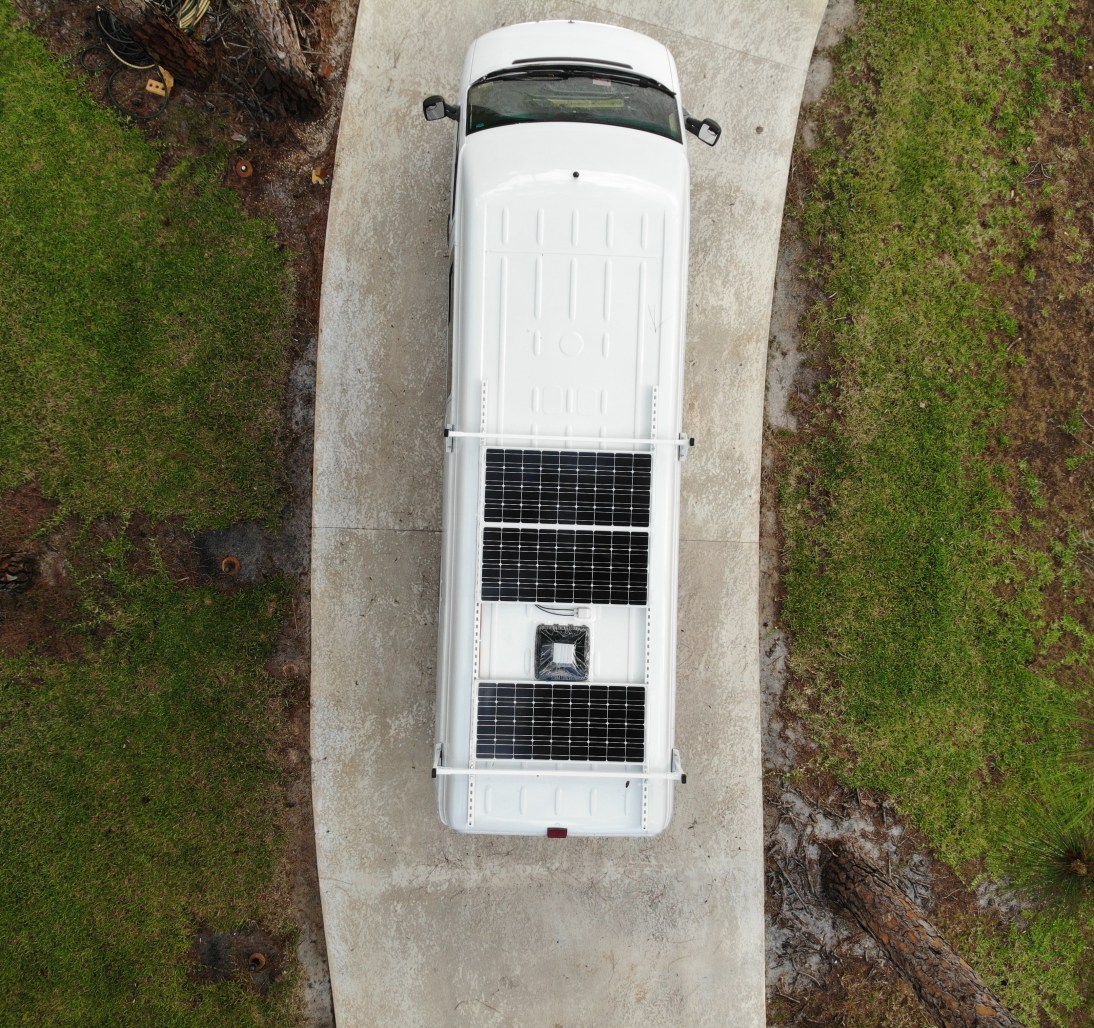
aerial view of our 3 solar panels on a roof rack
Without Renogy’s Kit I think this would have been confusing. But it was sooooo simple because of their kit and connectors. I highly recommend them. My guide to setting up solar panels will be based upon Renogy’s kit.
- First, secure the charge controller somewhere nearby your leisure battery. Connect it to your battery using stranded copper wire (the Renogy kit came with this wire). Put the wires into the battery terminal of the charge controller and match the positive and negative to the battery’s positive and negative terminals. Screw in the wires tightly inside the controller on the charge controller end, and use copper battery terminals on the battery end of the wires (these battery terminals also came with the Renogy Kit). There is a picture of this controller if you scroll down to #6.
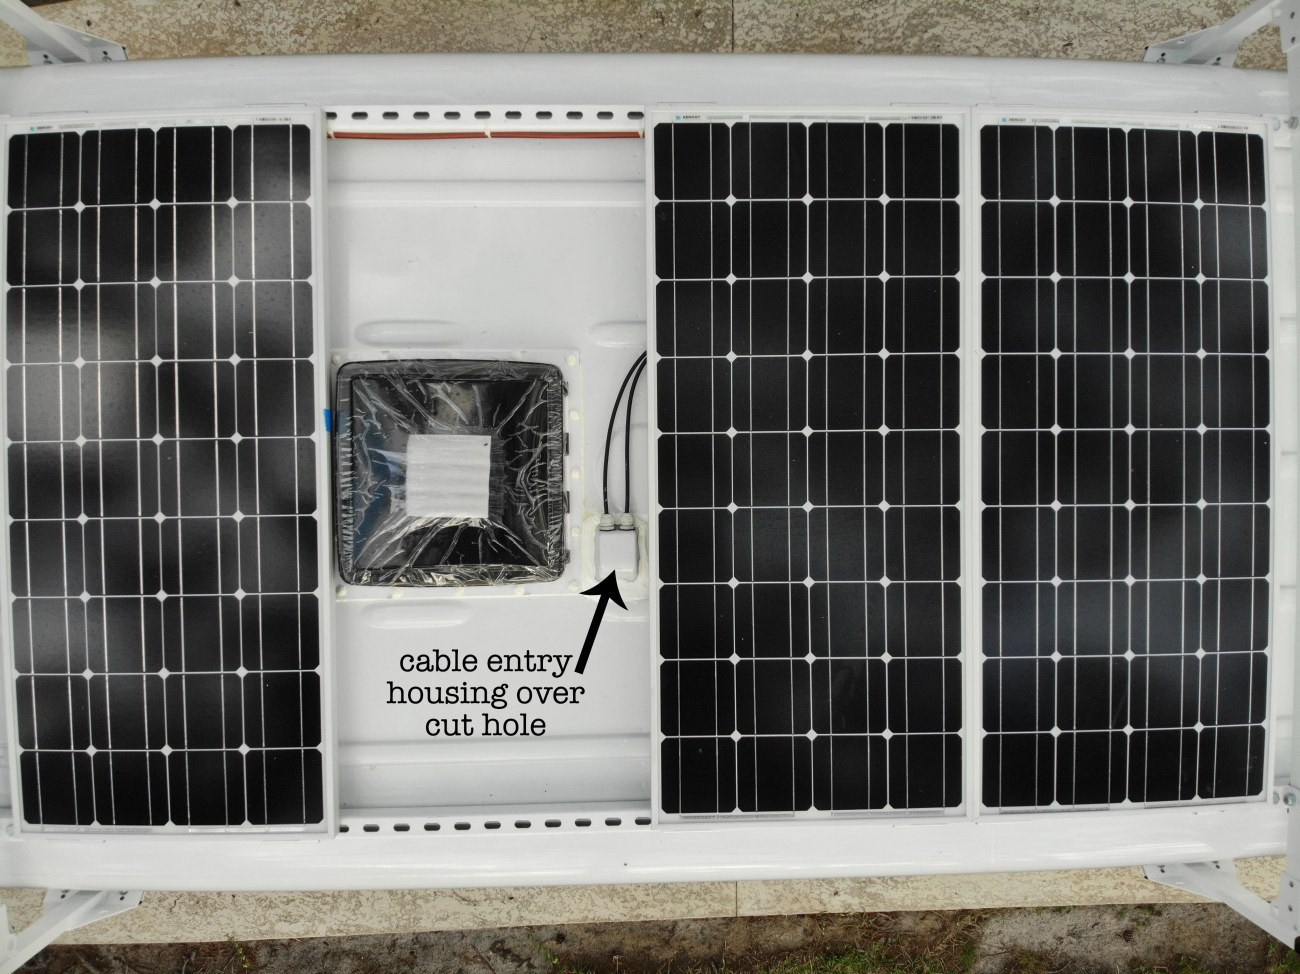
- Place (but don’t screw in yet) the solar panels where you want them to be on your roof. We made a roof rack on our van so we did not have to put any holes in our roof. If you put your solar panels directly on the roof, you will have 8 screws (so 8 holes) per panel in your roof. Anyway, line them up where you want them to sit, keeping in mind where you will cut the 1 necessary hole for the wires to enter the van.
- Connect the solar panels together in parallel by connecting their positive wires to each other, and connecting their negative wires to each other. (These wires come attached to the panels themselves, so its as simple as plugging them into one another). This can be done easily with Renogy’s branch connectors. The branch connectors come in different sizes based upon how many panels you have. We have 3 panels, so we ordered branch connectors with 3 branches on each one (see photo below). If you had 2 panels, you would only need connectors with 2 branches on each one. Essentially, it takes the wires from all your panels and connects them so you only have 1 positive wire and 1 negative wire going inside your van.

photo of connectors with 2 branches from Renogy.com’s website (you’d use these if you had 2 solar panels)
If the wires cannot reach each other because of how the solar panels are set up on your roof (this happened to us), you may need to get extender connection cables so that they can all reach each other.
4. Secure all the wires on the roof in a way that they will not move when the van does. We opted to use plastic wire ties to hold them tightly against our roof rack, and they are only exposed in a small area. Most are secured on the underside of the panels themselves.

you can see the orange wire is our “extender cable” to connect panels to each other on either side of the fan. But it is tied securely to the roof rack.
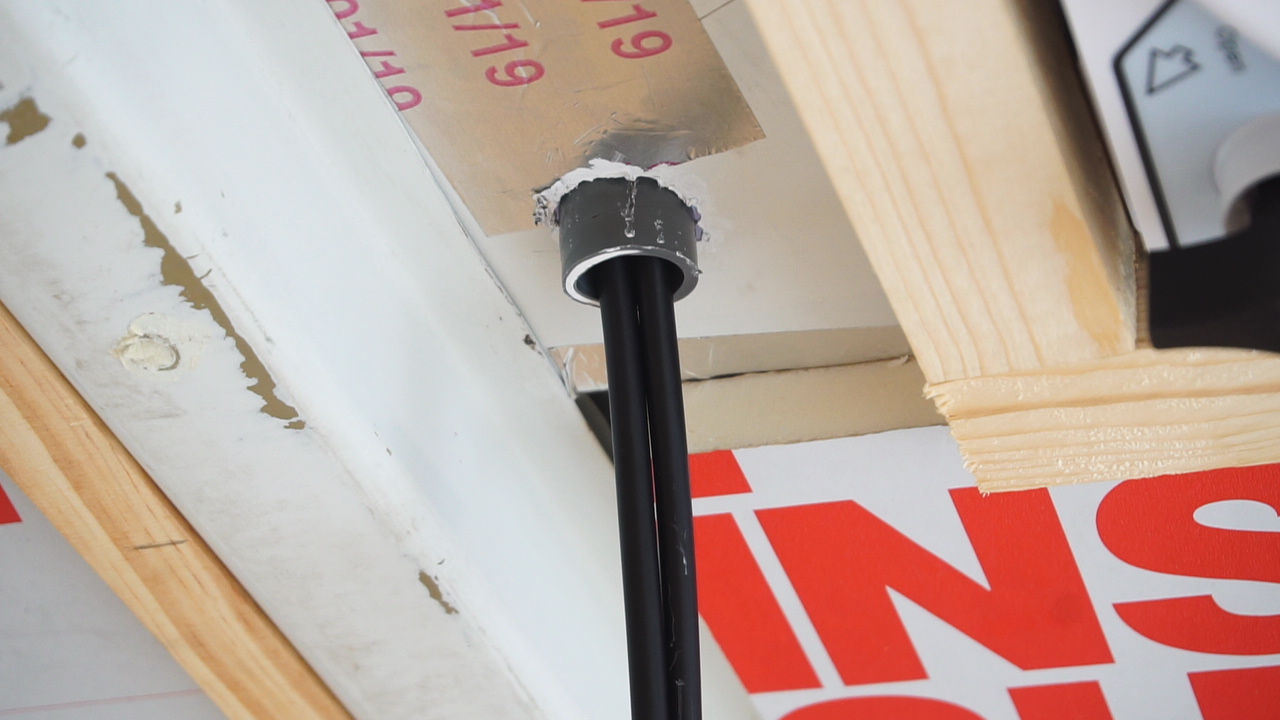
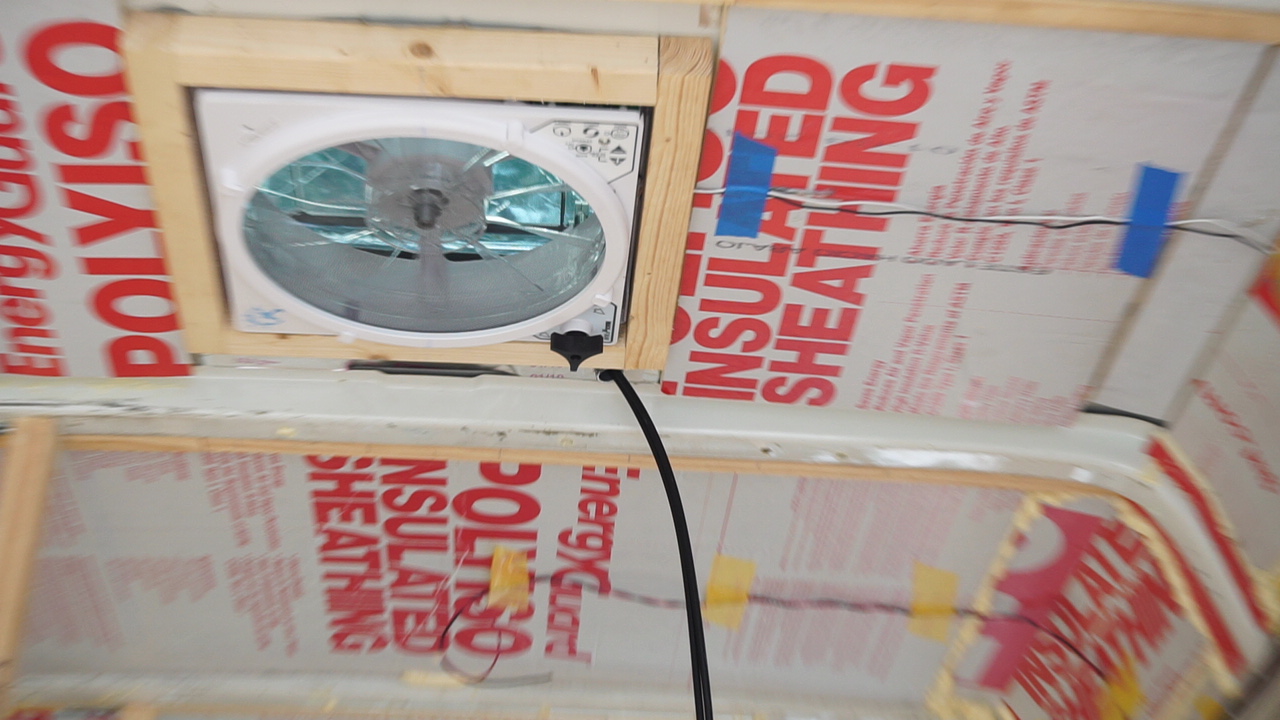
5. Run the one positive wire and one negative wire labeled “out”, into the inside of the van. Do so by cutting a small hole in the roof of your van near where your leisure battery is located. The shorter the distance, the better. Before you put the wires through that hole, make sure you set (and seal after everything is set up) some sort of cable entry housing (click to see example) over the hole, and have the wires run through it. In the pictures below, it shows what the hole looks like from the interior, and points to the hole with housing on the exterior. This housing will prevent any rain/water/weather from getting into that hole.
view of cables coming through roof inside
view of cable entry housing from roof
6. Run the positive/negative wires securely along the interior ceiling and down the wall, down to the charge controller. Secure them so they do not move. We even put ours in protective conduit for added protection. (it sits behind the walls and ceiling panels so you can’t see it in the end). Attach the ends of the wires in tightly to the panel terminals of the controller. At this point, if there is ample sun/energy outside, your solar panels should be working!!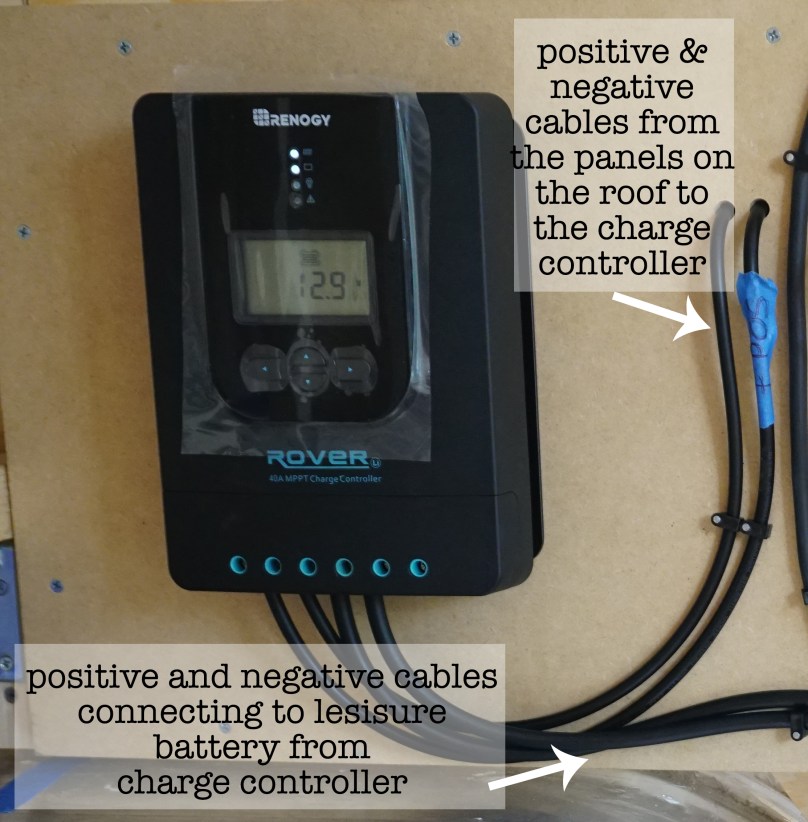
7. Once everything is in place and working properly, go back and screw in your solar panels with the mounting brackets that came with them, and seal the edges of the cable entry housing unit with a sealant. I recommend doing both of these things at the very end in case you need to move or change something during your setup process. We sealed our cable entry housing with marine adhesive sealant and it works great.

cable entry housing

sealant for housing
6. Connecting Fuse Box to Battery
This step is rather simple. We chose a 12 circuit fuse box. Secure the fuse box somewhere close to your leisure battery. Then connect it to your leisure battery using 4 gauge black/red copper wire. The negative terminal of the leisure battery can be connected directly to the negative on your fuse box (is located on the top of ours). A copper battery terminal will be needed on each end of this negative wire for a secure snug fit. The positive end of the fuse box should first run through a 125amp fuse before connecting it to the positive terminal of the leisure battery. Battery terminals are needed on the fuse box itself and on the battery itself, but not on either side of the 125 amp fuse. The 125 amp fuse we got came with a protective housing that allowed the wire itself to sit securely in the 125amp box. This fuse will protect the fuse box. And that’s it!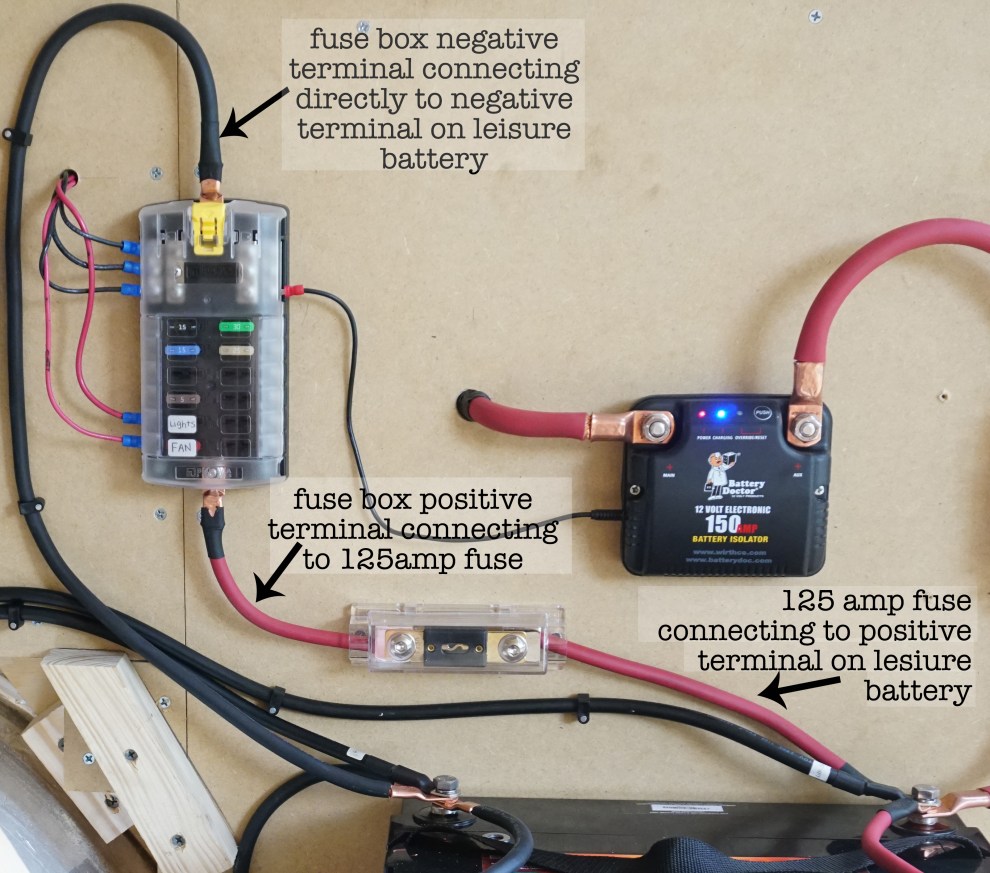
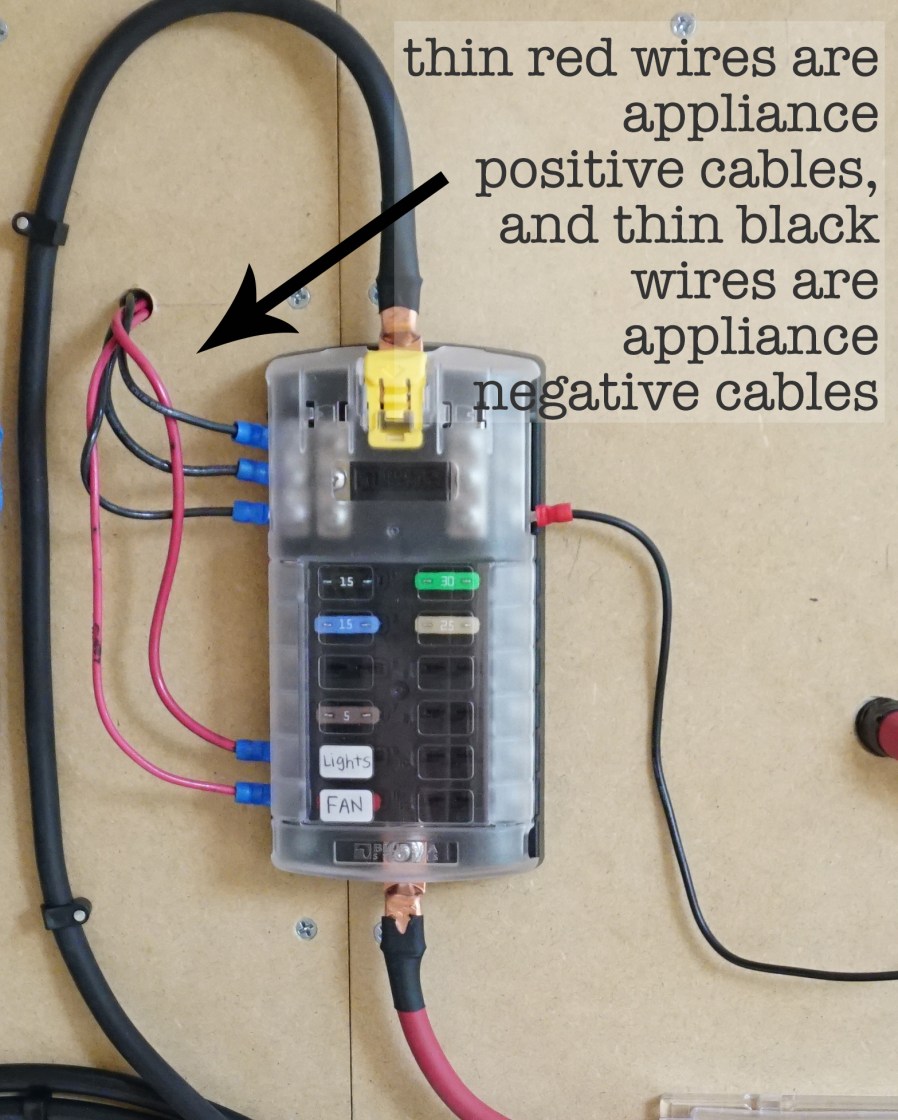
7. Connecting Appliances/Outlets/Lights to Fuse Box
Using much thinner wires than anything above, typically between 12awg and 16awg, you can easily connect anything that uses 12 volt power supply to your fuse box! Simply connect the positive wire from your appliance/outlet to a positive terminal on your fuse box, and connect the negative wire to a negative terminal on your fuse box. Our fridge, ceiling fan, water pump, USB outlet, etc. were really that simple.
 When the wire that comes with the appliance or outlet is real short, you just need to connect the copper of the long wire you’re using (the one thats between 12-16awg) to the copper of the short piece it came with. Permanently connect them together with connectors (click for example). Do this by placing the end of the short wire it came with into one side of the connector, and the longer wire you’re using to connect to the fuse box into the other side of the connector, making sure the 2 wires are fully touching or intertwined, and then squeeze the connector with pliers or similar tool until super tight so that it cannot move.


The only thing a bit more complicated is a light switch. A light switch basically cuts the circuit short each time you turn the light off. To connect a light to both a light switch and the fuse box, there will be 4 wires coming from the light switch. 2 positives and 2 negatives. Connect one of the positives to the positive wire of the light, and one of the negatives to the negative wire of the light. Then connect the light switches other remaining positive and negative wires to the fuse box accordingly. Basically, the lights themselves will not be connected to the fuse box directly, but the light switch wires will be. This allows the light switch to do its job and break and restart the circuit between the lights and the fuse when you turn them off and on.
When you want more than 1 light to be connected to the same light switch (for instance, ceiling lights, we have 5 ceiling lights all on the same switch) you can use quick splice connector terminals (click for example) to connect all the light wires together so they all connect into the same 1 positive and 1 negative wire coming from the switch (instead of having 5 positives and 5 negatives individually going to 5 different switches). When using these splice connectors, simply put over the wires you wish to connect and push the piece of metal through the wire until it touches the copper inside. Do not be afraid to push rather hard. We didn’t want to break our wires at first so we did it lightly only to find the lights wouldn’t turn on. When we pushed the piece of metal on the splice connector into the copper wire really hard, the lights then turned on.
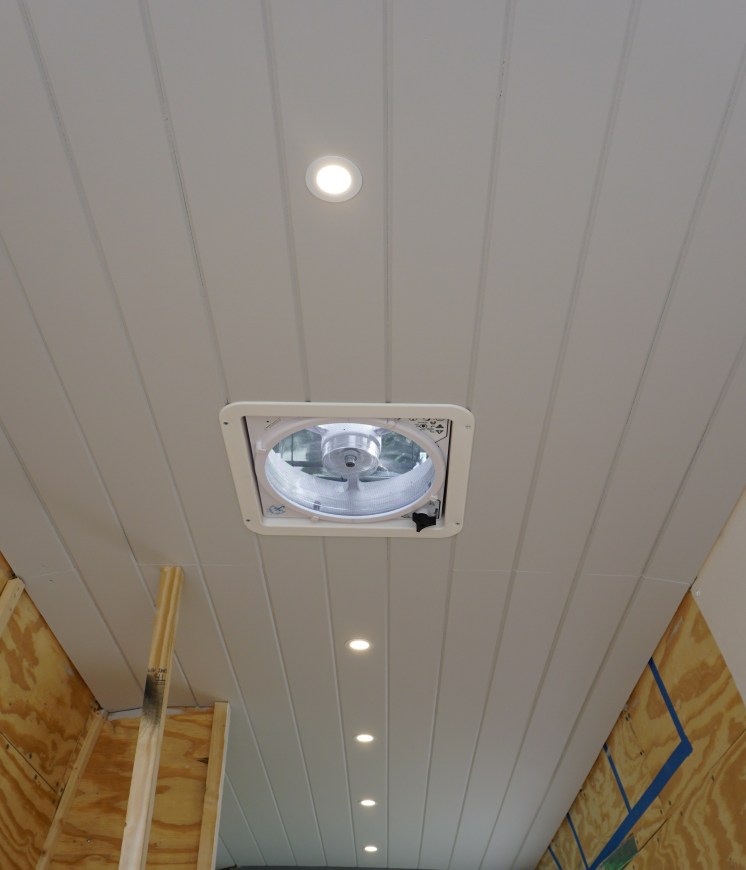
let there be light and a working fan!!!! 🙂
8. Summary of it all:
That is ALOT of information in one blog. But I hope you found it informative. To do a very quick recap of power: To set up a 12 volt DC power supply in your vehicle, first get a deep cycle leisure battery in the rear of your vehicle, then power it either through solar panels or a battery isolator with your starter battery’s alternator. Once the battery is powered successfully through those then add a fuse box near the battery, and finally connect your electronics/appliances/outlets to the fuse box.
If you have ANY questions whatsoever or want more in depth details of a specific step, item, or general inquiry, please feel free to email me at KellyNicoleTravel@gmail.com or send me a message on Instagram @KellyNicoleTravel

Back to: Complete Guide to Self-Convert a Van into A Home
Related Pages: Treating Rust, Installing Windows in Van, Insulating a Van, Setting up Van Water Supply, Building Van Layout, Choosing Appliances for Van, Flooring/Cieling/Walls
