If you are going to live in your van, whether full-time or just for periods at a time, insulating your van is perhaps the most important step for you to live comfortably. Just like you insulate a stationary home to help prevent heat/cold/moisture getting into your home, you will want to insulate your home on wheels. There are a myriad of products people use to insulate their vans including polyiso, XPS, EPS, fiberglass, wool, reflectix, and foam.
This blog shows you how to install polyiso boards specifically, as well as all the materials you’ll need.

>To see a VIDEO of how we insulated our van, click here to watch insulation video<<
Materials used: Polyiso Insulation Boards, 3M 90 Spray Adhesive, Premium Foil Tape, Gaps and Cracks Spray Foam, Reflectix for windows, and a MaxxAir Roof Fan to help with air flow. Photos below.


STEP 1: MEASURE AND CUT POLYISO BOARD
*Polyiso board comes in varying thicknesses ranging from 1/2” to 2”. The thicker the layer, the higher the R value, which means the stronger the insulator. You can layer the boards to your desired thickness. If you will be in extremely cold temperatures in the winter, I recommend insulating as thick as possible. We opted for 3/4” boards. We ended up layering it twice around the back half of our van for a total of 1.5”.
- Every area of the van that has metal exposed to the exterior should be covered up to the best of your ability. Every. single. area. This means you must measure and cut the Polyiso board to fit snugly against the metal for each square, rectangle, and odd shape along the walls and ceiling. You want the board to sit right up against the metal with no gaps for the best thermal barrier and to prevent moisture buildup. That is why you shouldn’t just place a whole board against the wall. Cutting individual pieces is necessary so the metal ribs do not prevent it from sitting directly on the metal wall.
- Polyiso is a very rigid board, but cuts very easily. We found that a stanley blade made the smoothest cleanest cuts on it. In places that the walls have a slight curve (most vans do), we cut a small line about 1/4 way deep through the board to allow the board to bend slightly with the wall in those areas (which in turn, allowed it to stick without air gaps).
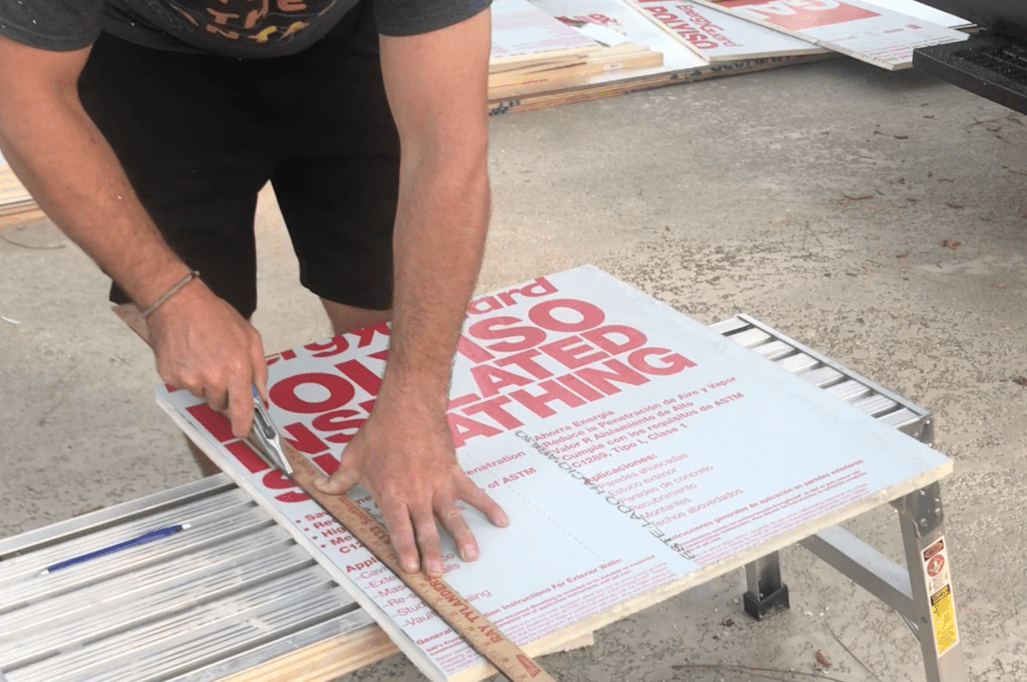
measuring and cutting Polyiso board pieces
STEP 2: COVER ANY RIDGES WITH FOIL TAPE (OR PLACES THAT ARE DIFFICULT TO COVER WITH POLYISO BOARD)
- BEFORE gluing on the Polyiso boards, use the premium foil tape to cover any ridges or areas that can’t be touched directly by the board. For example, we have many ridges that stick up on our ceiling. Even though we covered our ceiling entirely in polyiso board, the boards do not touch the metal directly in those ridges. Because of that, placing foil in those ridges will help serve as an extra thermal/moisture barrier where the boards cannot touch directly.
 ridges before tape on top, with tape on bottom
 close up of taped ceiling ridges
 - The wheel wells also need to be covered in this tape in entirety. Because they are so curved, is the best material to ensure that it is touched directly on all sides, in all places, leaving no gaps. If you’d like to place reflectix or another insulating material on top of the wheel wells, do so after taping them.
STEP 3: GLUE CUT POLYISO BOARDS DIRECTLY ONTO METAL
- Before spraying glue, be sure to clean the metal real well with alcohol. Once clean, spray the 3M Spray Adhesive Glue generously on BOTH surfaces. Meaning spray it on both the foil side of the Polyiso board AND on the metal of the van. Then wait anywhere between 20 seconds and 2 minutes for the glue to become tacky. If you stick them together when the glue is still liquidy, it might not stick properly. Once the glue is tacky, press the board firmly into the metal. Smaller pieces should stick just fine after a few seconds. Some of the larger pieces (like the ones on the ceiling) may need extra support to ensure the best seal between the board and metal. Remember, you don’t want to have any air gaps between the 2. We used wood supports for our ceiling overnight and it worked well.

spraying 3M adhesive glue onto Polyiso

wooden supports for larger glued pieces
STEP 4: SPRAY FOAM ALL GAPS, CRACKS, AND RIBS
- Once you have cut and glued the Polyiso in all possible areas, use Gaps and Cracks Spray foam to fill in all the gaps, cracks, and ribs. Fill in all the gaps and cracks between each piece of Polyiso board. All. of. them. Only a small amount is necessary because it expands quite a bit.
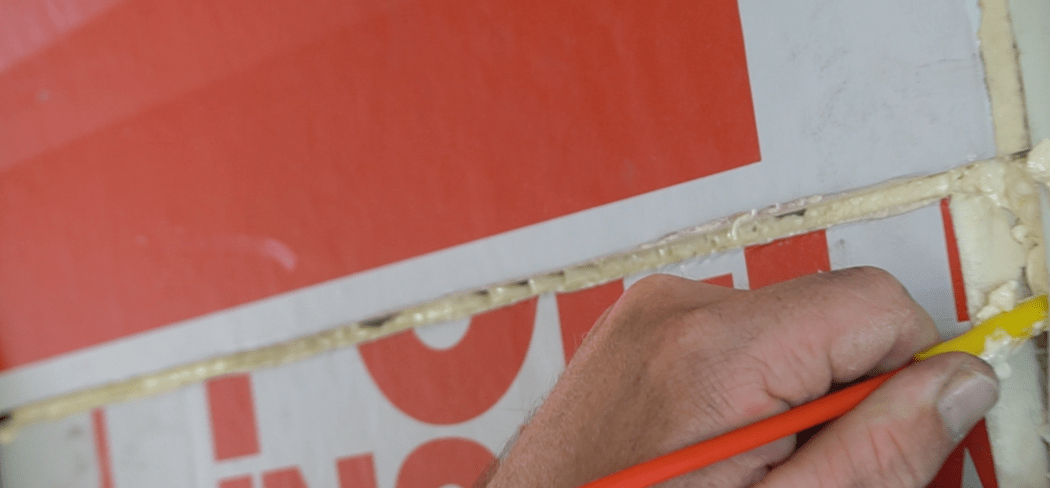
- The long metal ribs along the walls need filled too. Because it is impossible to get inside of them with board or tape, you have 2 options. Some fill it with wool (more expensive) and other use spray foam. Fiberglass is not the best option so I never recommend that. We opted for the spray foam to fill the ribs. ADVICE if filling ribs with foam: DON’T fill them more than 50%. It dries slower in the ribs and will continually expand over time.. so if you fill them too much it will continually ooze out of the ribs all over the place (learned this the hard way, ha).
- Spray Foam cures (dries) relatively quickly in open air spaces (like the cracks between the boards) and is easy to use. However, It is not meant to be used in closed areas that aren’t exposed to much air. Just be careful to not overdo it in the ribs. Good news is, those hard-to-reach inside of the ribs will be filled entirely and insulated well.

filing in ribs with spray foam. Do NOT overfill
STEP 5: FOIL TAPE ANY REMAINING EXPOSED METAL
- Last but not least, cover any remaining interior metal with foil tape. (The metal that isn’t directly exposed to the exterior as seen in the photo above). Meaning the top of the ribs and channels. Some people will put foil tape over all of the spray foam on the gaps and cracks as well, and even tape over their boards for an extra barrier. It is ultimately up to you how much or how little you decide to insulate. But DEFINITELY insulate to some extent.
STEP 6: REFLECTIX OVER WINDOWS/GLASS
- Once all metal is insulated in your vehicle, you are going to want to cover the windows when you are not using them. If you just use regular curtains without any form of insulation, heat/cold will easily enter your van through the glass. An easy and effective way to minimize this is to cut a roll of Reflectix to the exact shape of each window. Once cut, you can sew super magnets onto the exterior side of them to hold the Reflectix in place while up. This not only serves as a thermal barrier in your glass windows, but also as your privacy shades when you want privacy (ex: when sleeping). If you do not want to look at the silver color on the interior side, you can sew on any color fabric you desire on the interior side of the reflectix. But make sure you keep the exterior side of the Reflectix as it comes in order for it to reflect light/temperature most effectively.

Roof Van: Insulation is only capable of doing so much for temperature control. In my opinion, a cieling/roof fan is a must while living in a vehicle to suck air in/out of your van. Our fan has multiple settings, including both intake & exhaust (blowing air either out or into vehicle as needed) as well as a rain sensor that automatically closes when it senses rain. 10 fan speed settings and remote control. Most importantly, it is 12volt.

If you have any questions, feel free to contact me at KellyNicoleTravel@gmail.com or send me a DM on Instagram @KellyNicoleTravel

Back to: Complete Guide to Self-Convert a Van into A Home
Related Pages: Treating Rust, Installing Windows in Van, Setting up Van Power Supply, Setting up Van Water Supply, Building Van Layout, Choosing Appliances for Van, Flooring/Cieling/Walls
