This is perhaps the most diverse component of converting a van into a home. There are obviously a myriad of options for van layouts, completely based upon personal preference and needs. This part of the van build guide will serve solely as that, a guide. It is not meant to tell you exactly how to build your van, but rather give you ideas for different options. It will go in depth for how we personally chose to build our framework and structure.. but does not mean you have to do it like we did.
>> To see a video of us building the structure of our van, click here <<

With that being said, here is what this part of the guide will cover in order if you want to scroll.. sort of like a table of contents:
- In-depth details of how we built our personal layout
- Our ceiling, floors, and walls
- Overhead cabinets
- Kitchen/Storage Cabinets and Drawers
- Bench Seat
- Bed Frame
- Choosing a layout that works for you
- Bed Options
- Bathroom Options
- Kitchen Options
1. How We Personally Built the Structure of our Van
Our ceiling is made out of tongue and groove wooden planks from Home Depot. They came in either 8′ or 12′ length. Our van is 14′ long, so none were long enough to go all the way straight from front to rear.. so we opted for the 8′ planks. Ours sit parallel to one another (as opposed to scattered every other row). Knowing we had to have a crack somewhere lengthwise between 2 planks, we opted to make it right where the edge of the bed and the rest of the living space meet. That way, if any crack between boards happened to be noticeable, it separated our “bedroom” from our “kitchen and living space”.

Planks we used on ceiling

Before putting the boards up, we filled all knots with filler and then sanded until smooth. We then carefully measured the center line of the roof from front to back and put the middle plank up first. The rest of the ceiling would be centered around this middle plank. From there we worked from the middle outward. It was relatively simple to connect the planks together, requiring nothing but a hammer in some places to close any small gaps. The 2 outermost ceiling planks required cutting the width of the plank in order to sit against our wall panels properly where we wanted them to.

when it was only halfway done and lights weren’t secured in place yet
After all the planks were in place, we used 1.25” screws to secure the planks into our wooden supports. We did not screw any of the ceiling planks into metal, at all. (We had previously put up 1×1 wood supports into the sides of our ceiling ribs. NOT underneath the ribs. And NOT into the metal ceiling itself. This allowed us to not lose any head room height. We then screwed the ceiling planks into that 1×1 wood) After all planks were screwed in, we filled the screws with filler, sanded them down, and painted the planks light gray. Because we filled and sanded the screws, not a single screw is visible in our ceiling in the end and it looks beautiful.

pointing to the 1×1 pieces of wood we attached into the side of the metal ribs, which is what we screwed all our ceiling panels into! without losing headroom
Our floors are also tongue and groove and easy to install. We also got them from Home Depot. You can buy them in either vinyl or laminate and they are available in so many various colors and styles.

the floors we used
To install you simply lock each floor panel into one another using the tongue and groove. No screws or nails are necessary as they should fit snugly from wall to wall. To make them fit snugly, you may have to cut some of the outermost panels to shape or size depending on the width of your van. We cut straight lines with a skilsaw and curved lines with a jigsaw. They cut easily, but make a bit of a mess while doing so. We finished the edge of our floor by our sliding door with a metal threshold. This looks clean as well as protects the edge from wear & tear as it is stepped on to get in and out of the vehicle.
showing the metal threshold on the edge of the flooring
Underneath the vinyl flooring, we have a subfloor layer made of plywood, and a layer of insulated boards under that. We bought 4’x8′ size boards of each of those and cut them to shape and size using a jigsaw and circular saw.
Our walls are 4’x’8′ white bead board with paneling. Every decision we made was to keep the most space in our van as possible. Bead board is thin and easy to shape to the curve in the walls without losing space, yet looks clean and professional when finished. I also like the look of shiplap panels on the wall, but they are a bit more expensive and a bit thicker, so we did not use them. We cut our bead board to size and shape using a jigsaw and circular saw. We then used a nail gun with 3/4” brad finishing nails to secure it to the wall. We filled a few of the nail holes with filler as necessary and sanded where necessary for a smooth finish. Finally, we painted the walls with a fresh coat of white paint so that you cannot see any nails at all on the finished wall. We put a piece of white trim over the crack where 2 wall panels met. For cohesiveness, that crack between panels is in the same place as the one on the ceiling (where the edge of the bed meets the rest of the living space). In the end, there are no cracks or nails showing.

the wall boards we used
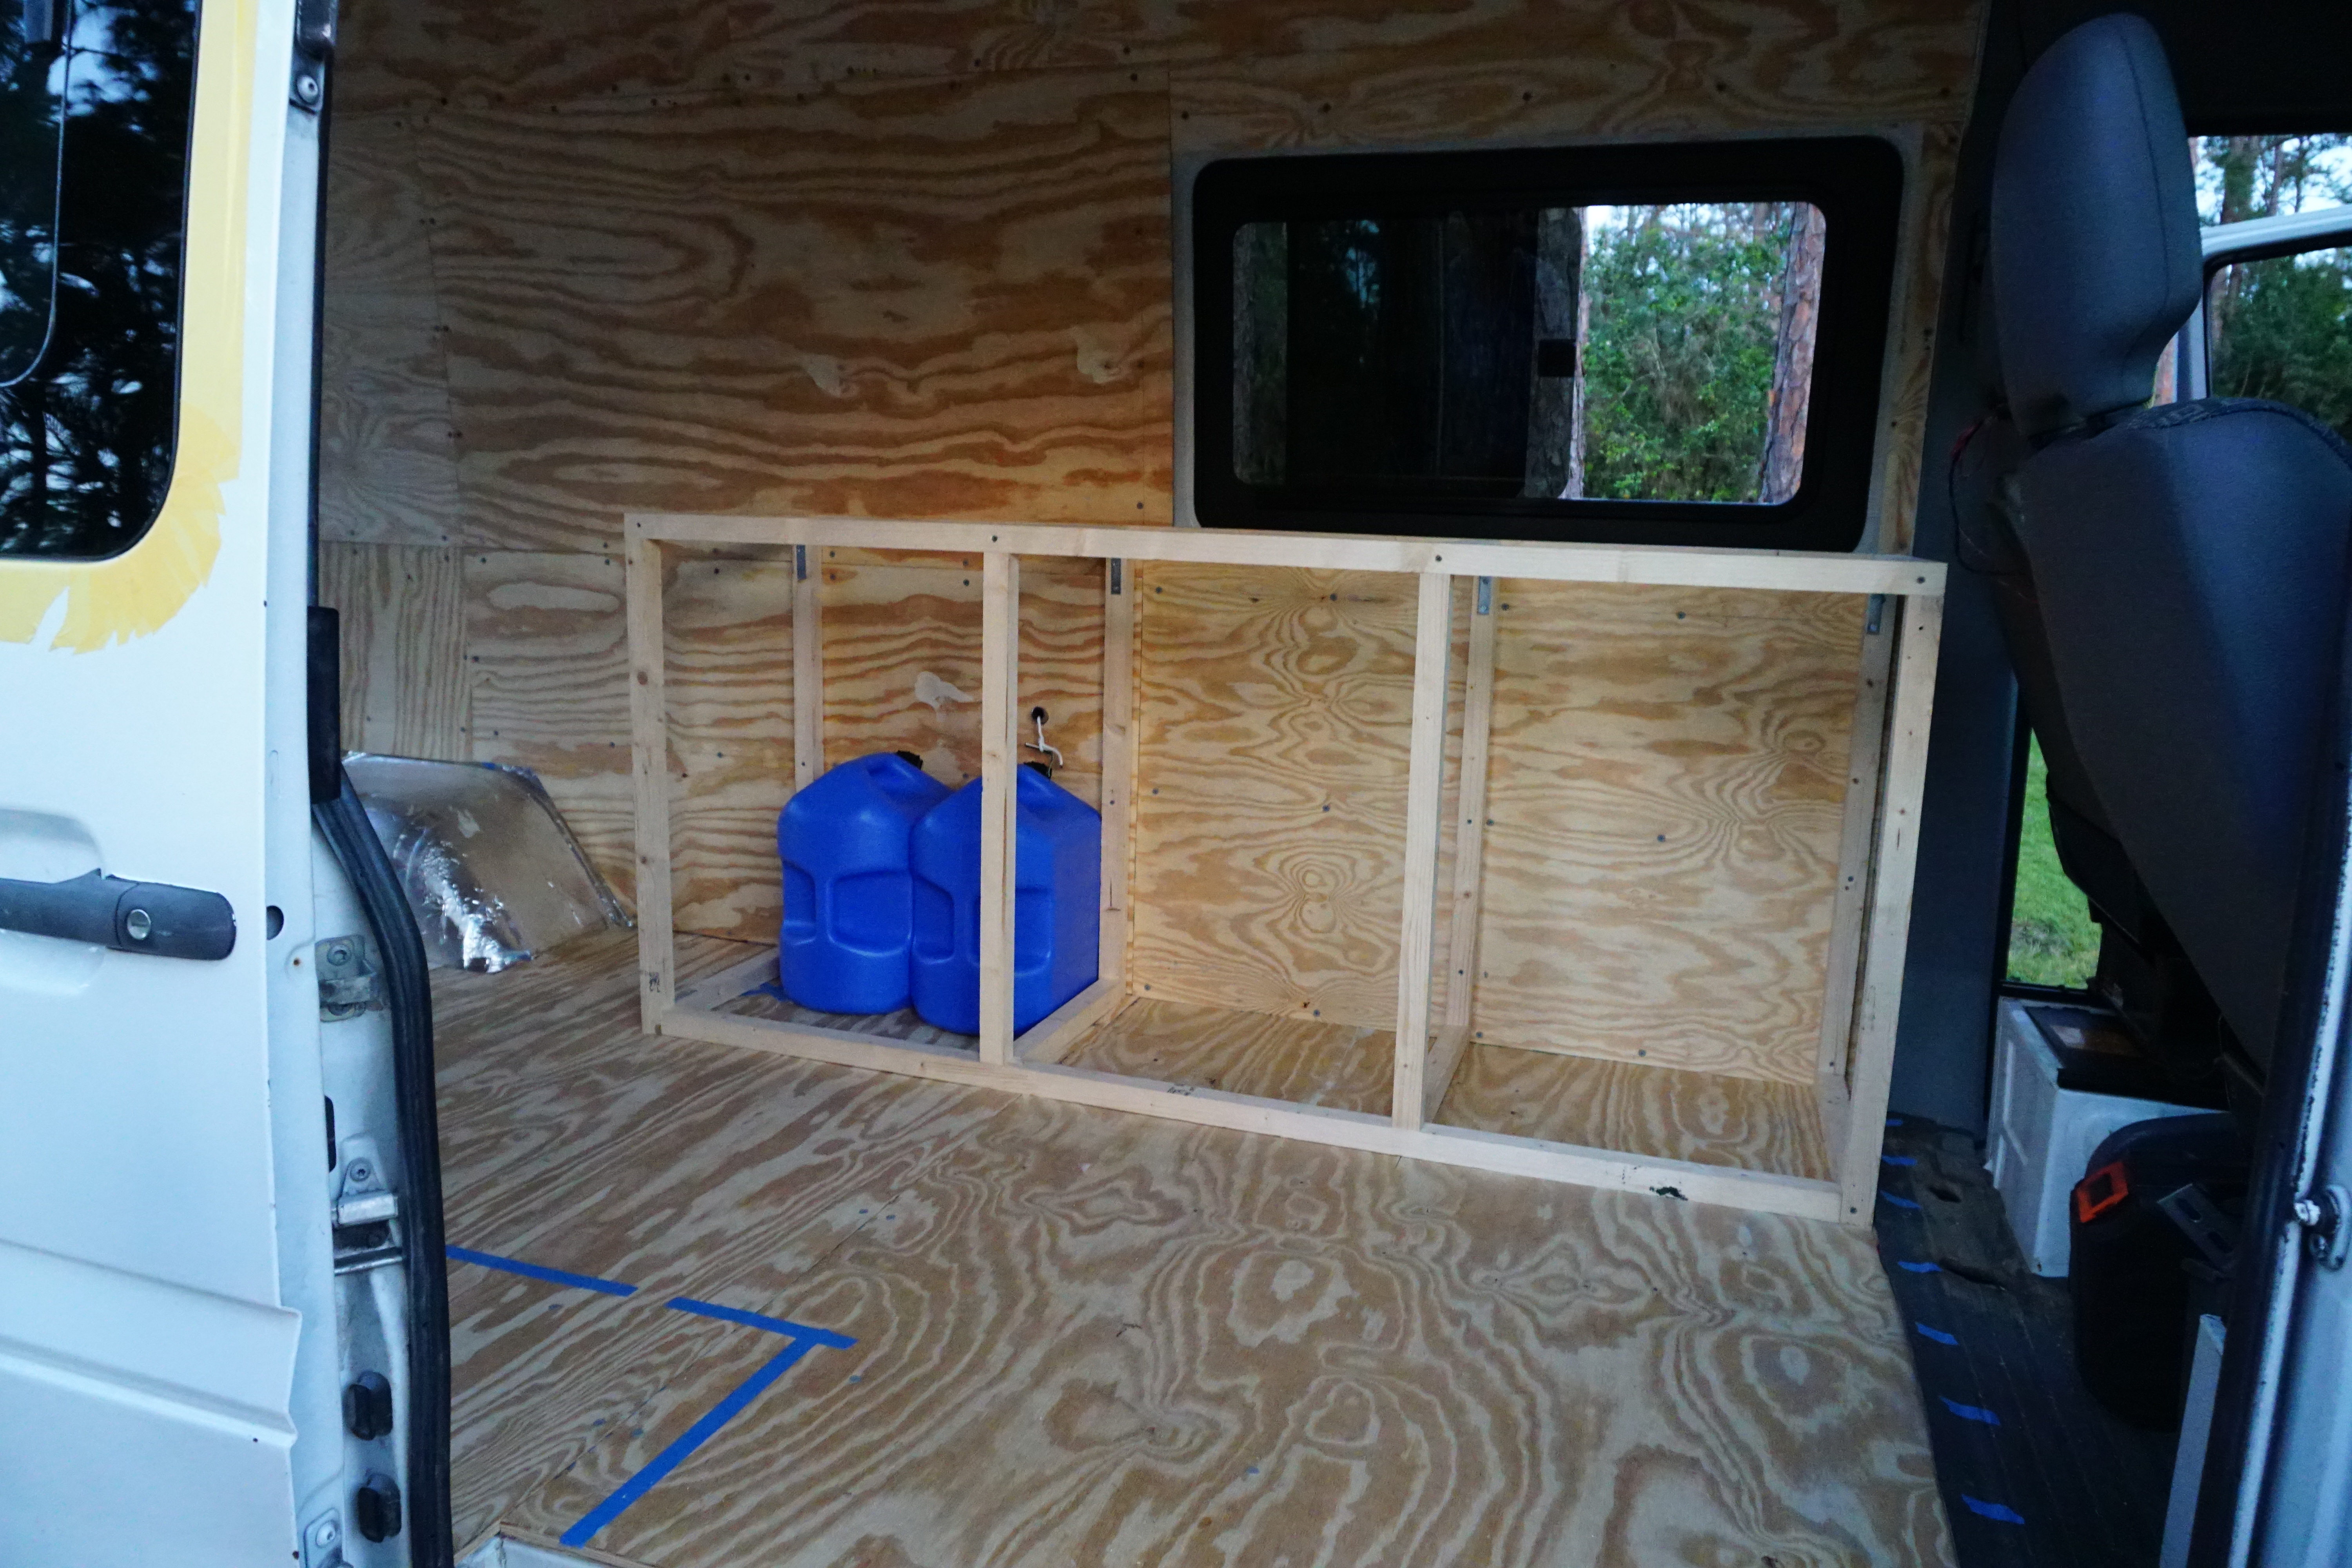
No matter what you put on your wall, you are going to need some sort of support behind it to screw or nail into. With shiplap, most people screw wooden furring strips into the ribs on the walls of their van and use these strips as support to screw/nail their shiplap panels into. Because our white beadboard sheets are relatively thin, we opted to put up a sheet of plywood underneath all our walls. This allowed the walls to be strong as well as have plenty of places to use as support to screw/nail into.
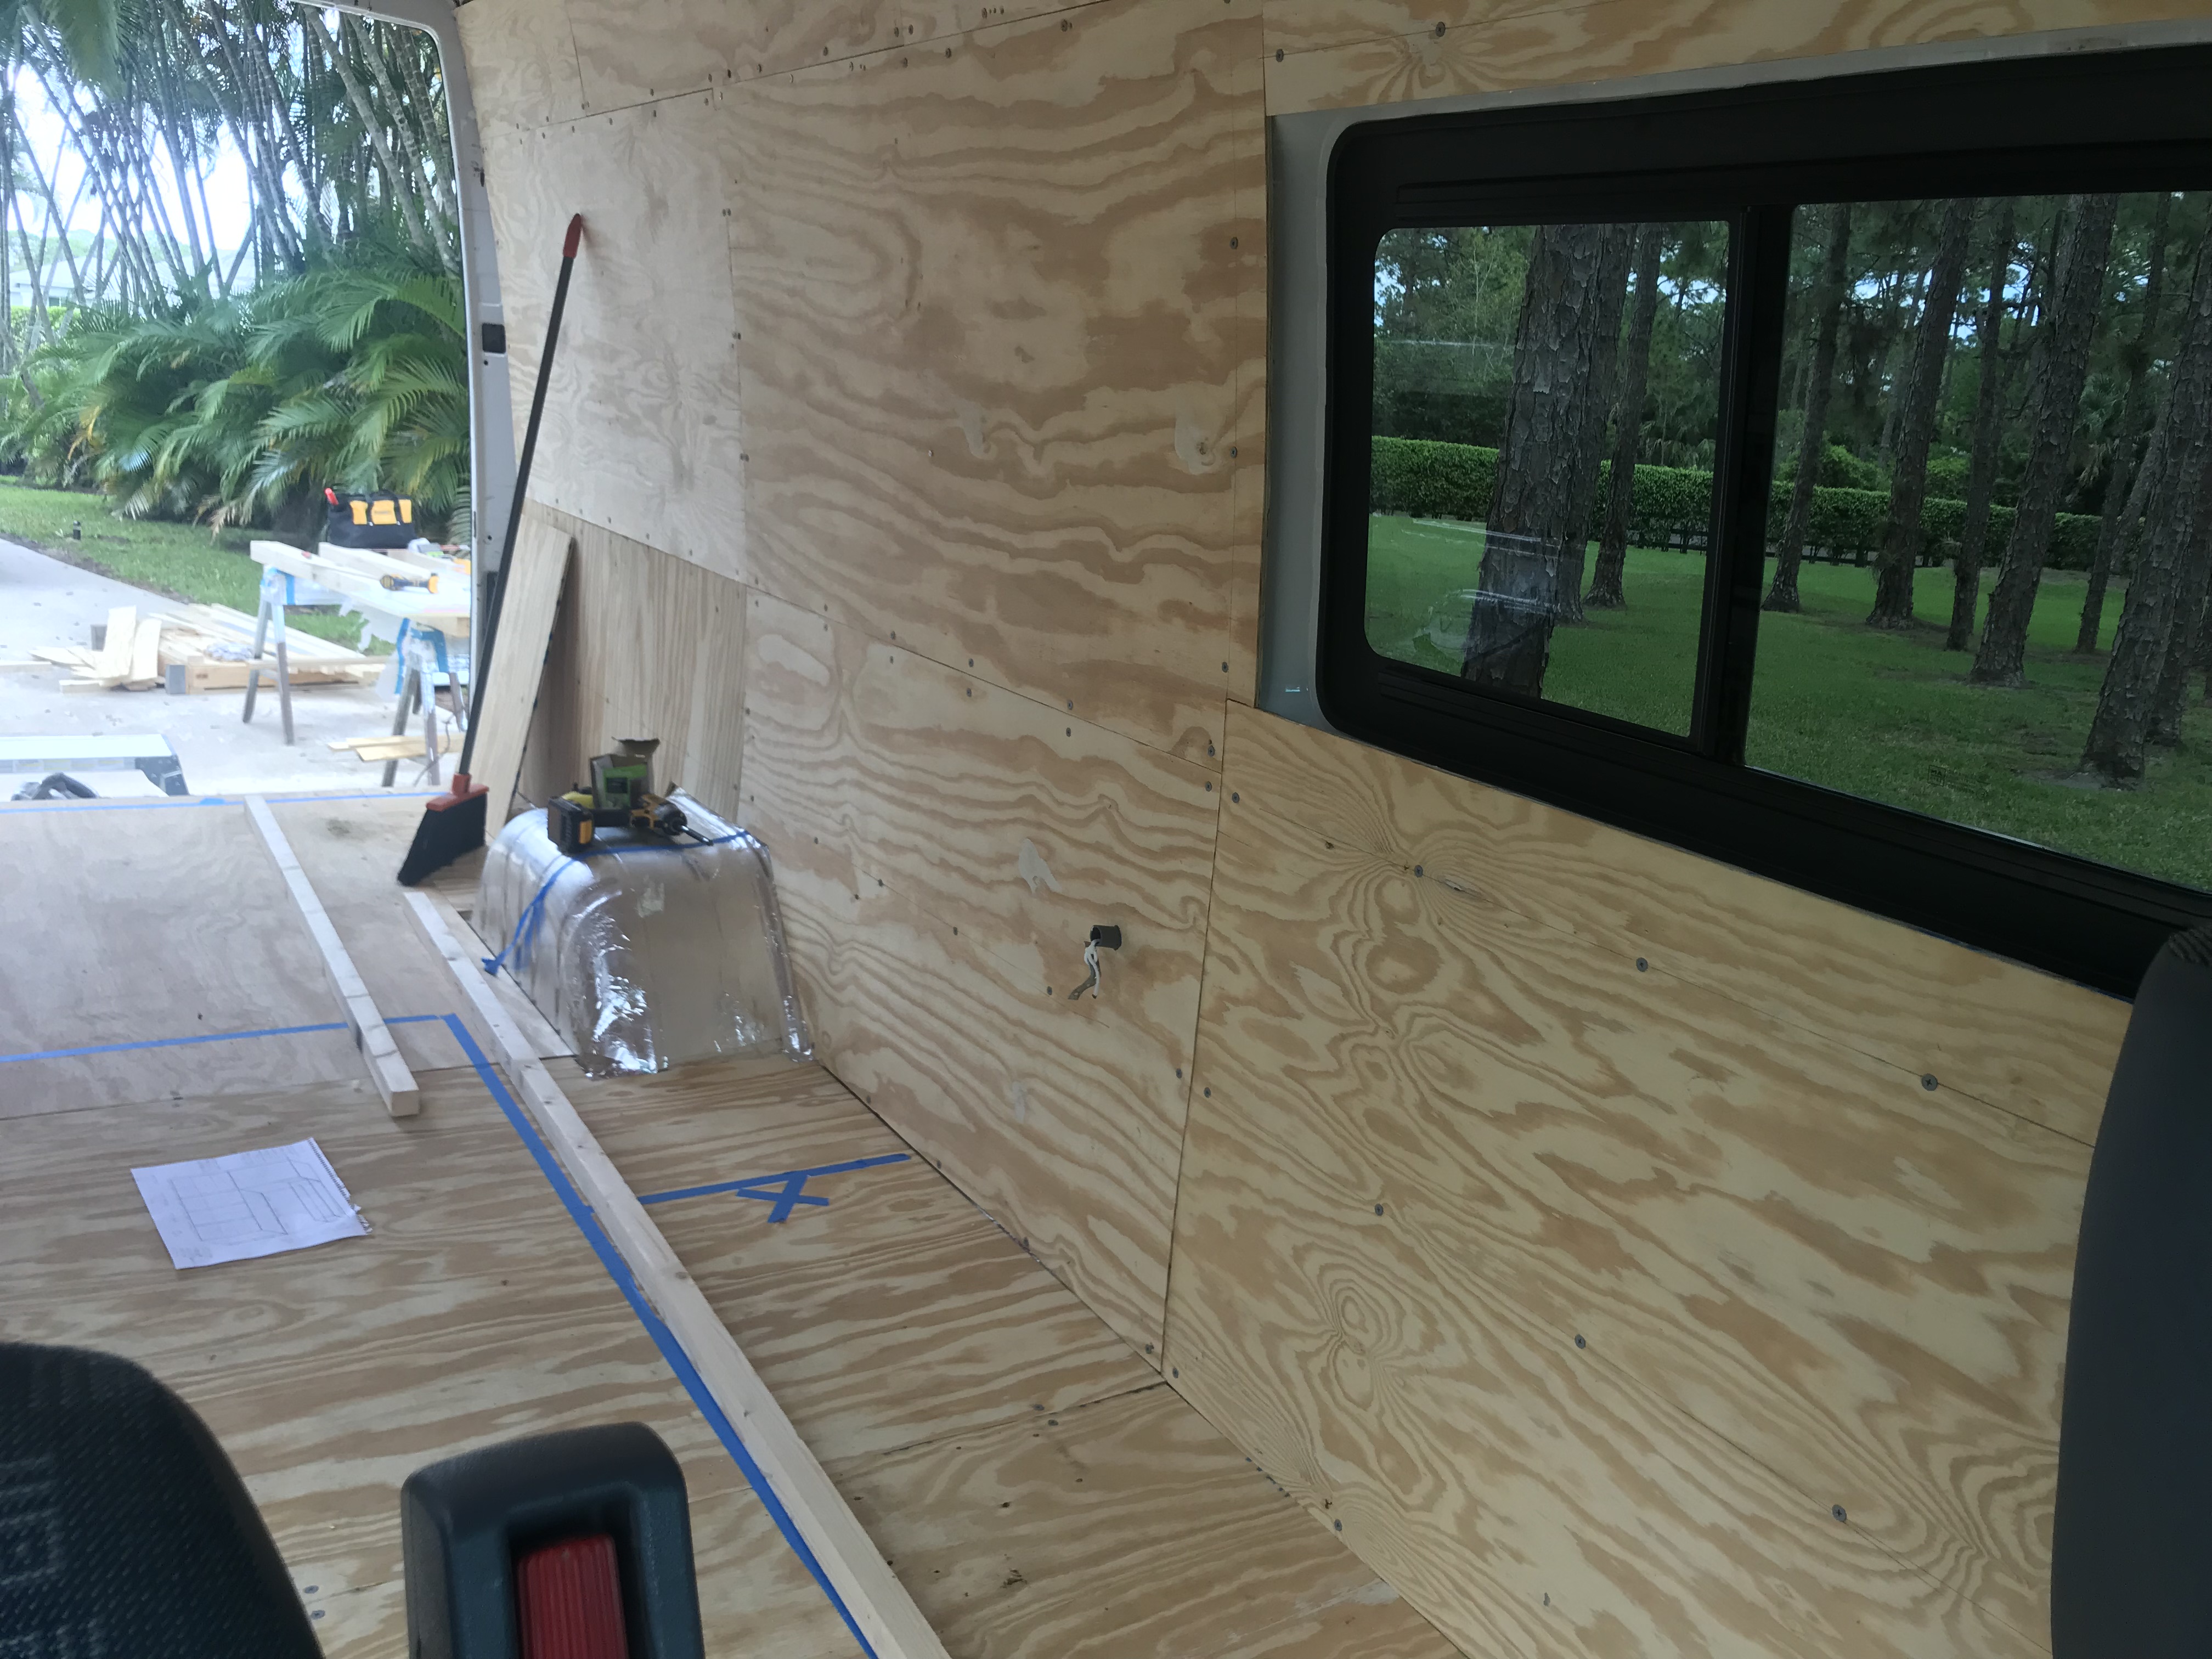
plywood layer

after walls up, before tile backsplash & before painting/finishing edges of walls

Overhead Cabinets:
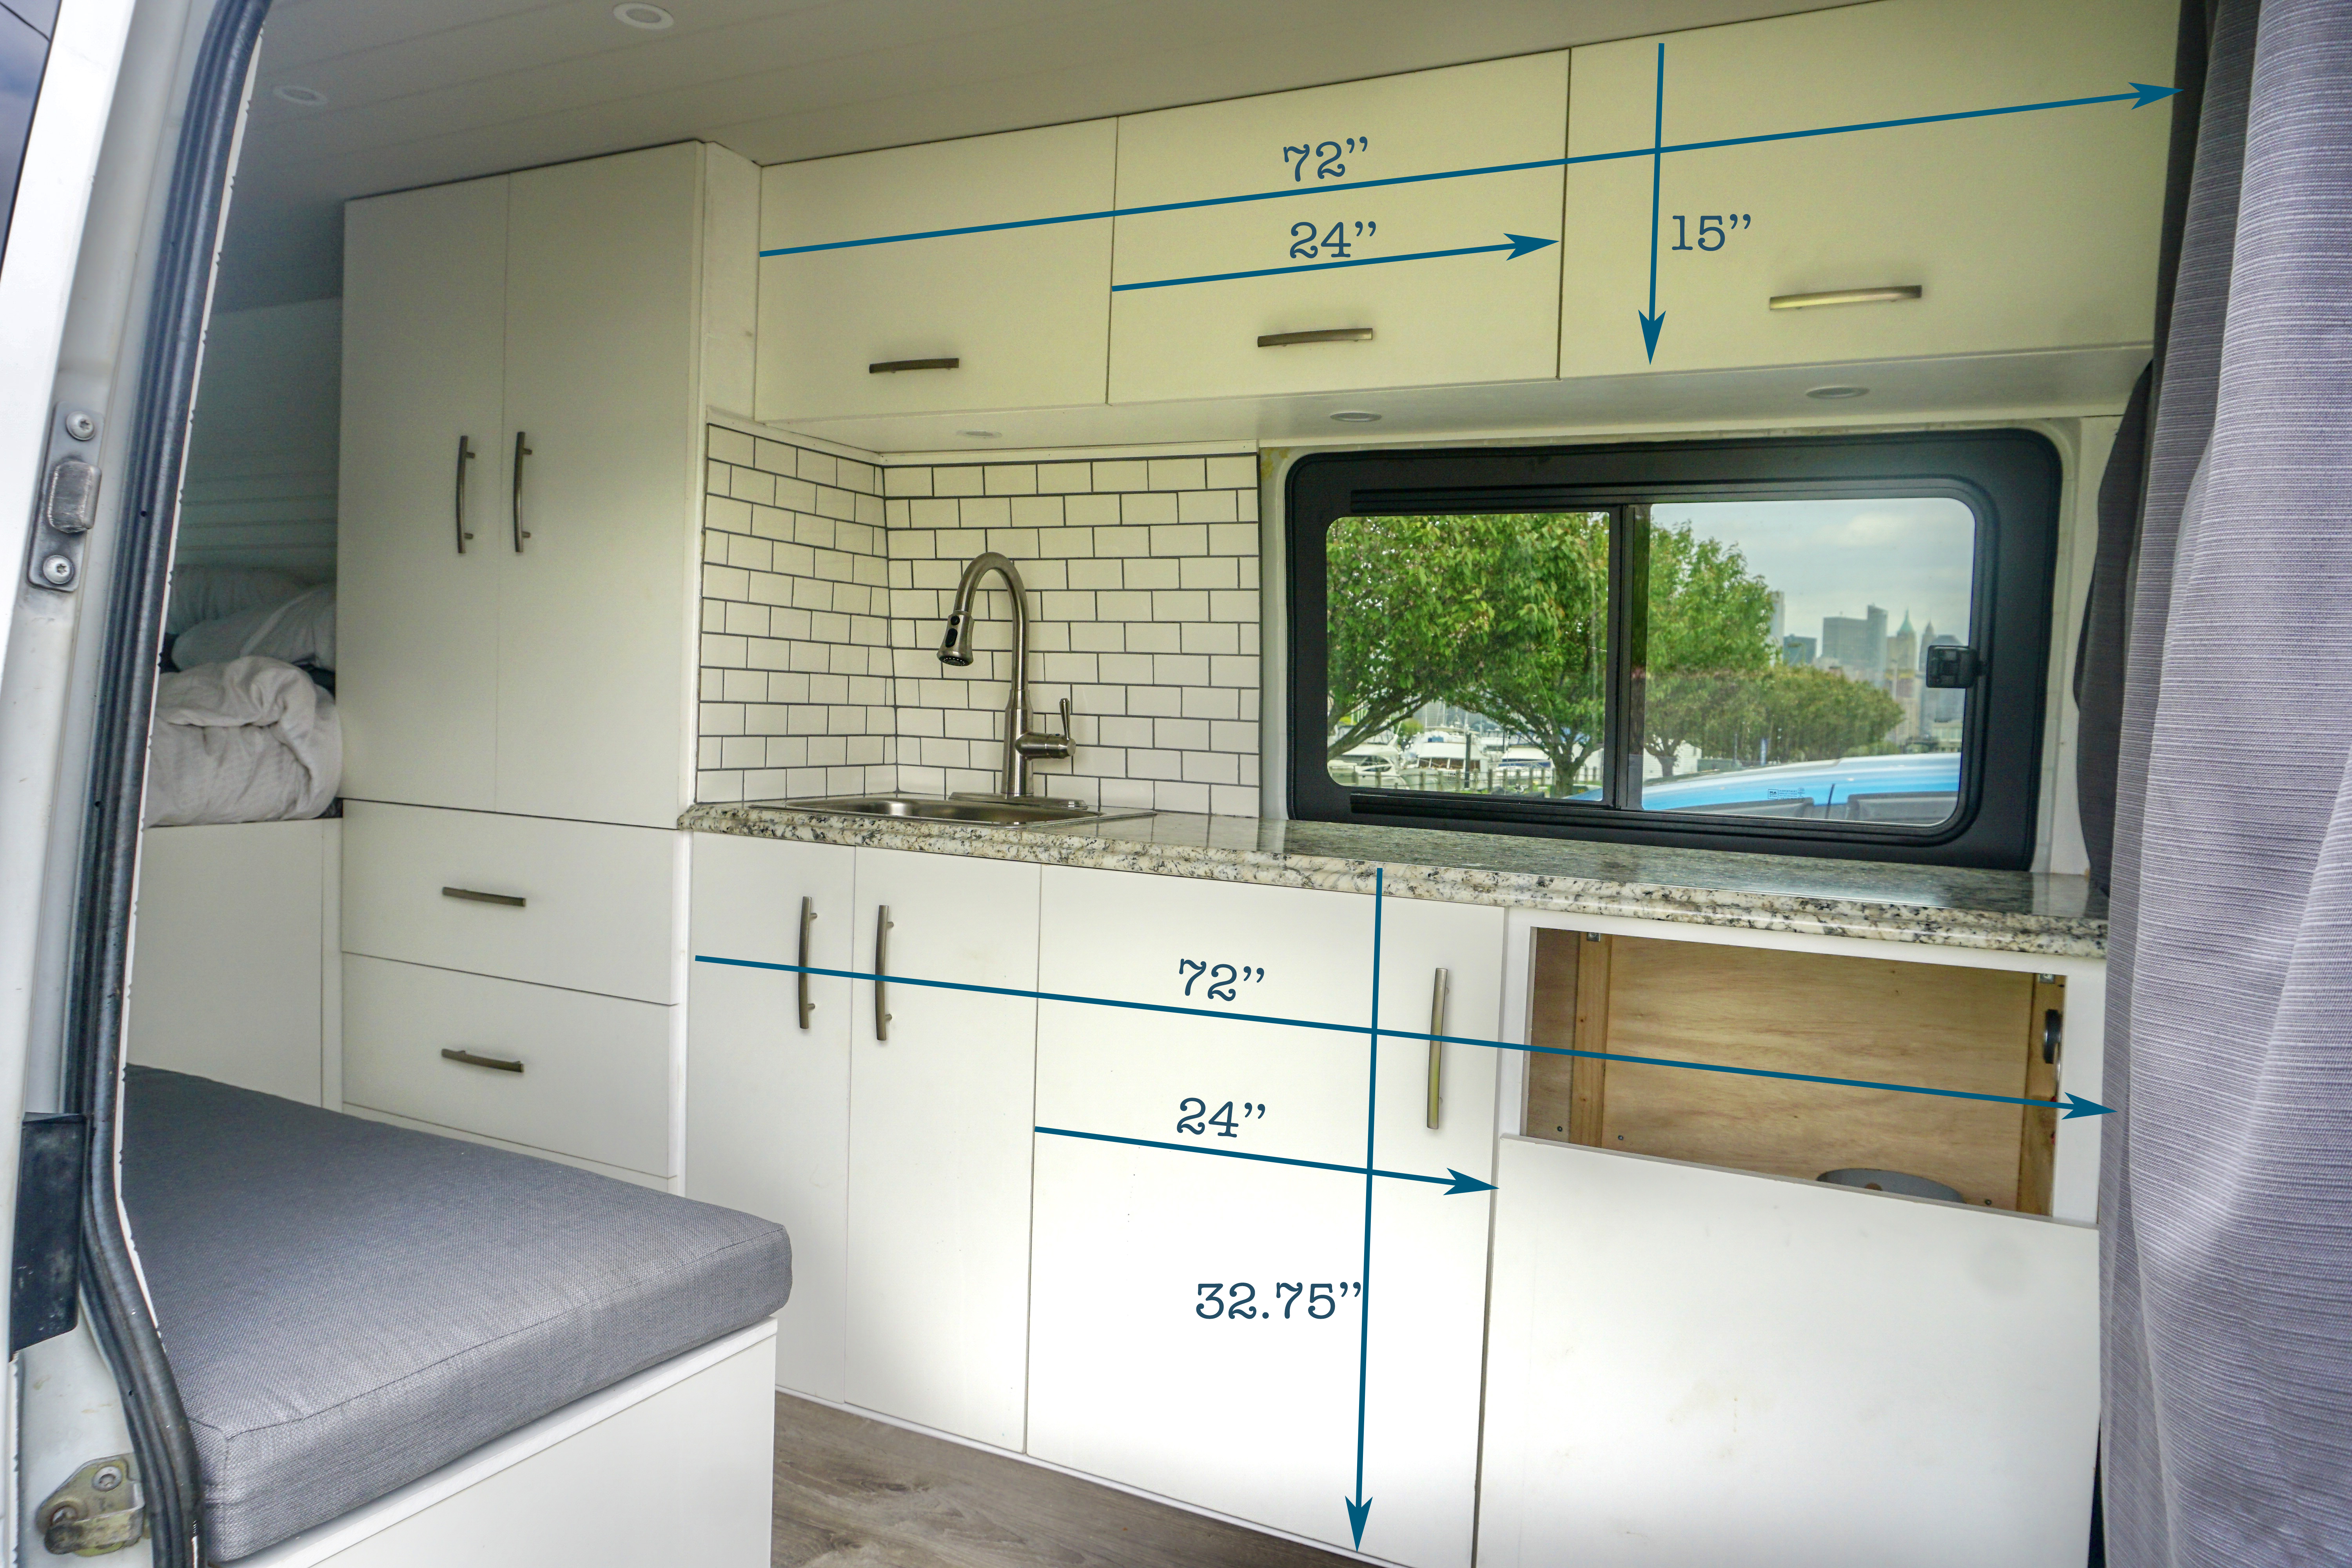
Size: Kitchen overheads: 72” long x 15” tall in front, x 12.25” deep at bottom of cabinet (depth is different on the bottom of the overheads versus the top of the overheads because the van walls curve inward so the depth gets shorter as the wall goes up). The depth also includes the cabinet doors, so it’s 11.5” deep framework with 3/4” of cabinet door in front of it for the 12.25” total. Each of our 3 cabinet doors are then divided evenly lengthwise into the 72” length, so each cabinet door is 24” long x 15” tall.
Overheads above the bed: Slightly smaller than kitchen overheads. 60” long x 12” tall x 12” deep at bottom of cabinet. Same rules apply to depth as in kitchen, with 3/4” cabinet doors included in depth number. 3 cabinet doors divided evenly into 60” length so each door is 20” wide x 12” tall.
Used 2×2 treated wood for the framework and 3/4” white melamine for the cabinet doors and sides. Built the framework as a modular piece outside of the van and then installed the melamine doors once the framework was placed inside the van. Our video of this will show what that looked like. — Before installing the framework into the van, we filled the screws on it with filler and sanded it down. We then painted the framework white and you could no longer see any screws anywhere. Our overhead cabinets in the kitchen are the same length as our countertop (72”) and the length of our overhead cabinets by the foot of our bed are the same width as our bed (60”). Most counters are not as long as ours, and overheads can be built to whatever length you choose.
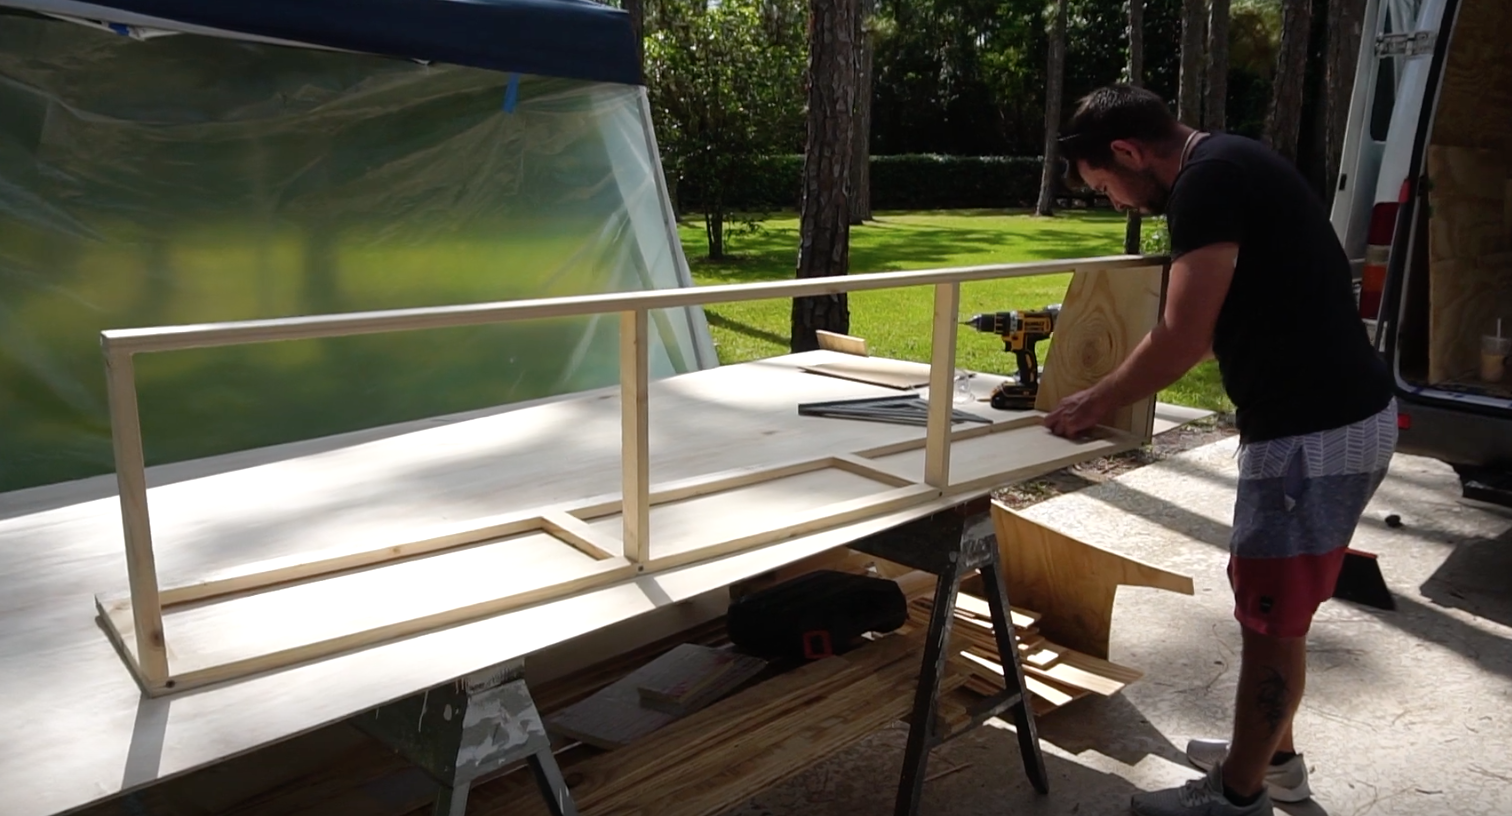
made the overhead structure as modular piece outside the van first
We attached the 3/4” white melamine cabinet doors using surface mount hinges. We further supported the overhead cabinet doors with gas struts. These gas struts allow the cabinet doors to remain open without having to hold them open yourself. They also allow you to set the doors to stop opening at a certain place so they do not hit your ceiling when open. They also seem to hold the doors closed firmly when shut because our overhead doors don’t rattle when moving the vehicle, even without magnets or locks. Highly recommend gas struts. We opted to have brushed metal arched cabinet handles on all of our cabinets.

showing the gas struts holding open the overhead cabinets!!
Other things to note about the overhead cabinets: We cut to shape and placed a layer of unpainted beech wood on the bottom of the interior side of our overheads. This is what our storage bins/food/etc directly sit on top of. In the kitchen overheads, we have 3 down lights sitting between this piece of beech wood and the bottom of the cabinet itself. We cut these 3 holes for the lights using a hole saw drill bit.
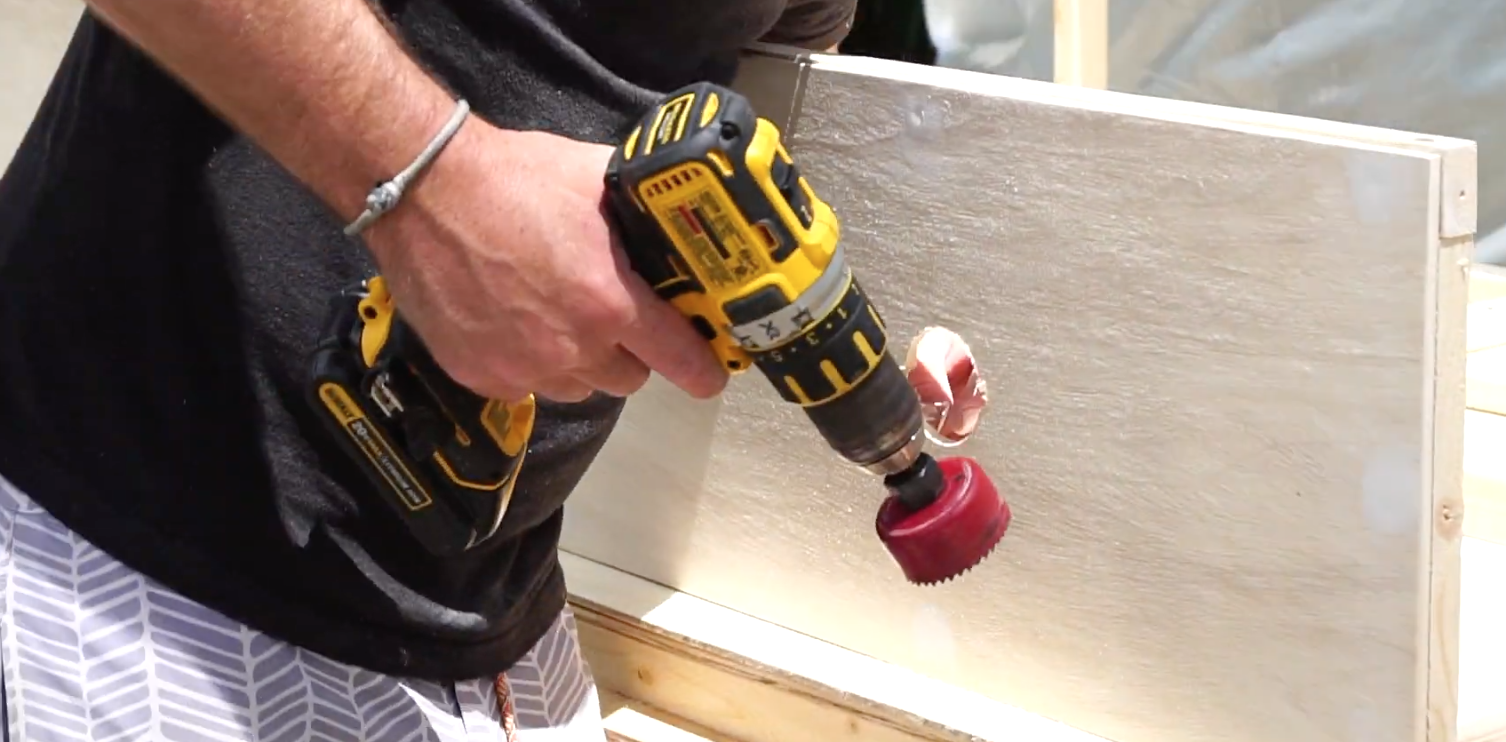
cutting holes in the bottom of the kitchen overheads for downlights to sit in
Kitchen Cabinets/Tall Storage shelves and Drawers
We have a lot of storage in our van. Of all different sizes. 
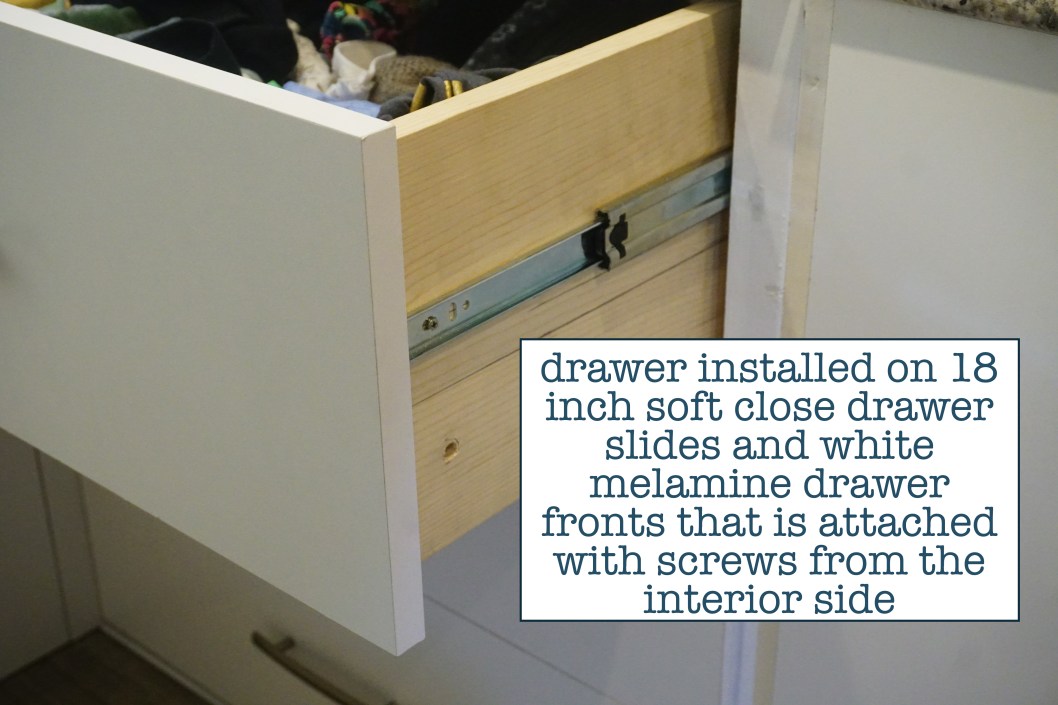
Our floor to ceiling storage area 71” tall and 30” wide total. It has 3 drawers on the bottom, and 2 large cabinet doors with multiple shelves inside of it on top. The drawer area is 20” deep before drawer installation. The drawer slides we used are 18” deep soft close drawer slides. 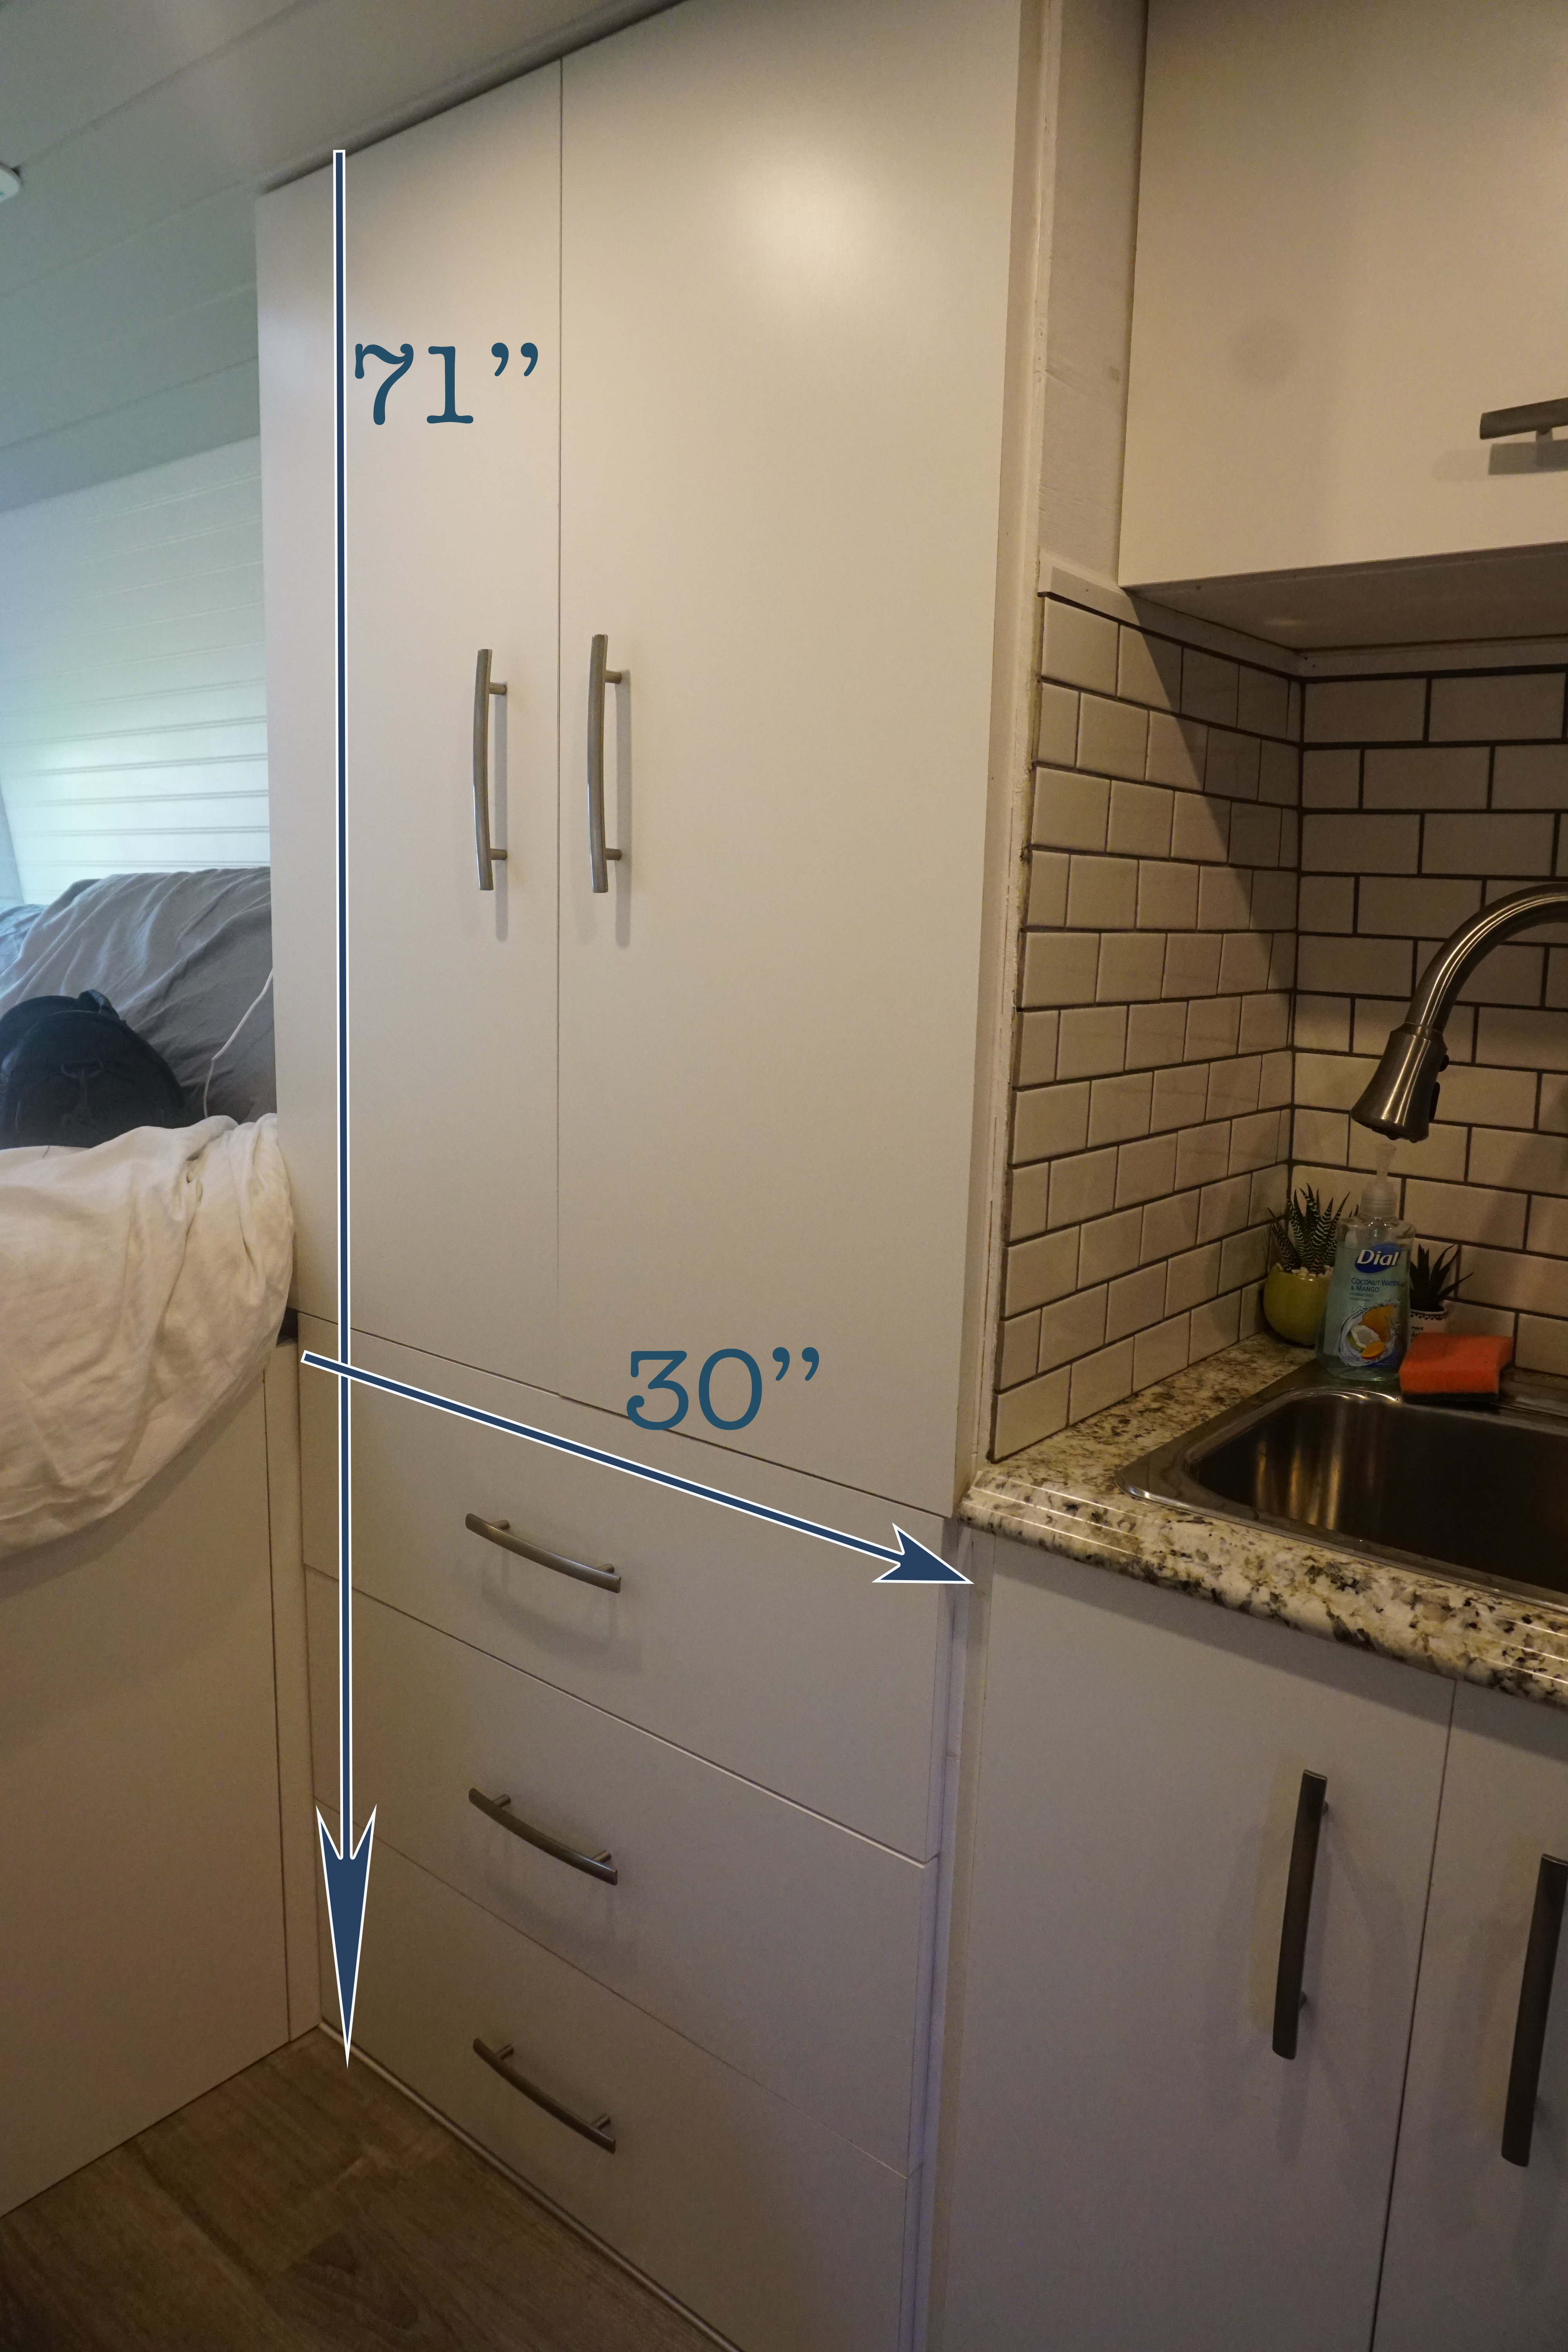
The interior walls of the shelving area was finished with beech wood for a clean finish. We then put a strong magnet underneath the middle shelf to hold the 2 cabinet doors closed when the van is moving. We put these magnets on all of the cabinets below the countertop as well as the access door to get under the bed. We got them from Home Depot and they work really well!

shelves inside the floor to ceiling with magnets to keep them shut
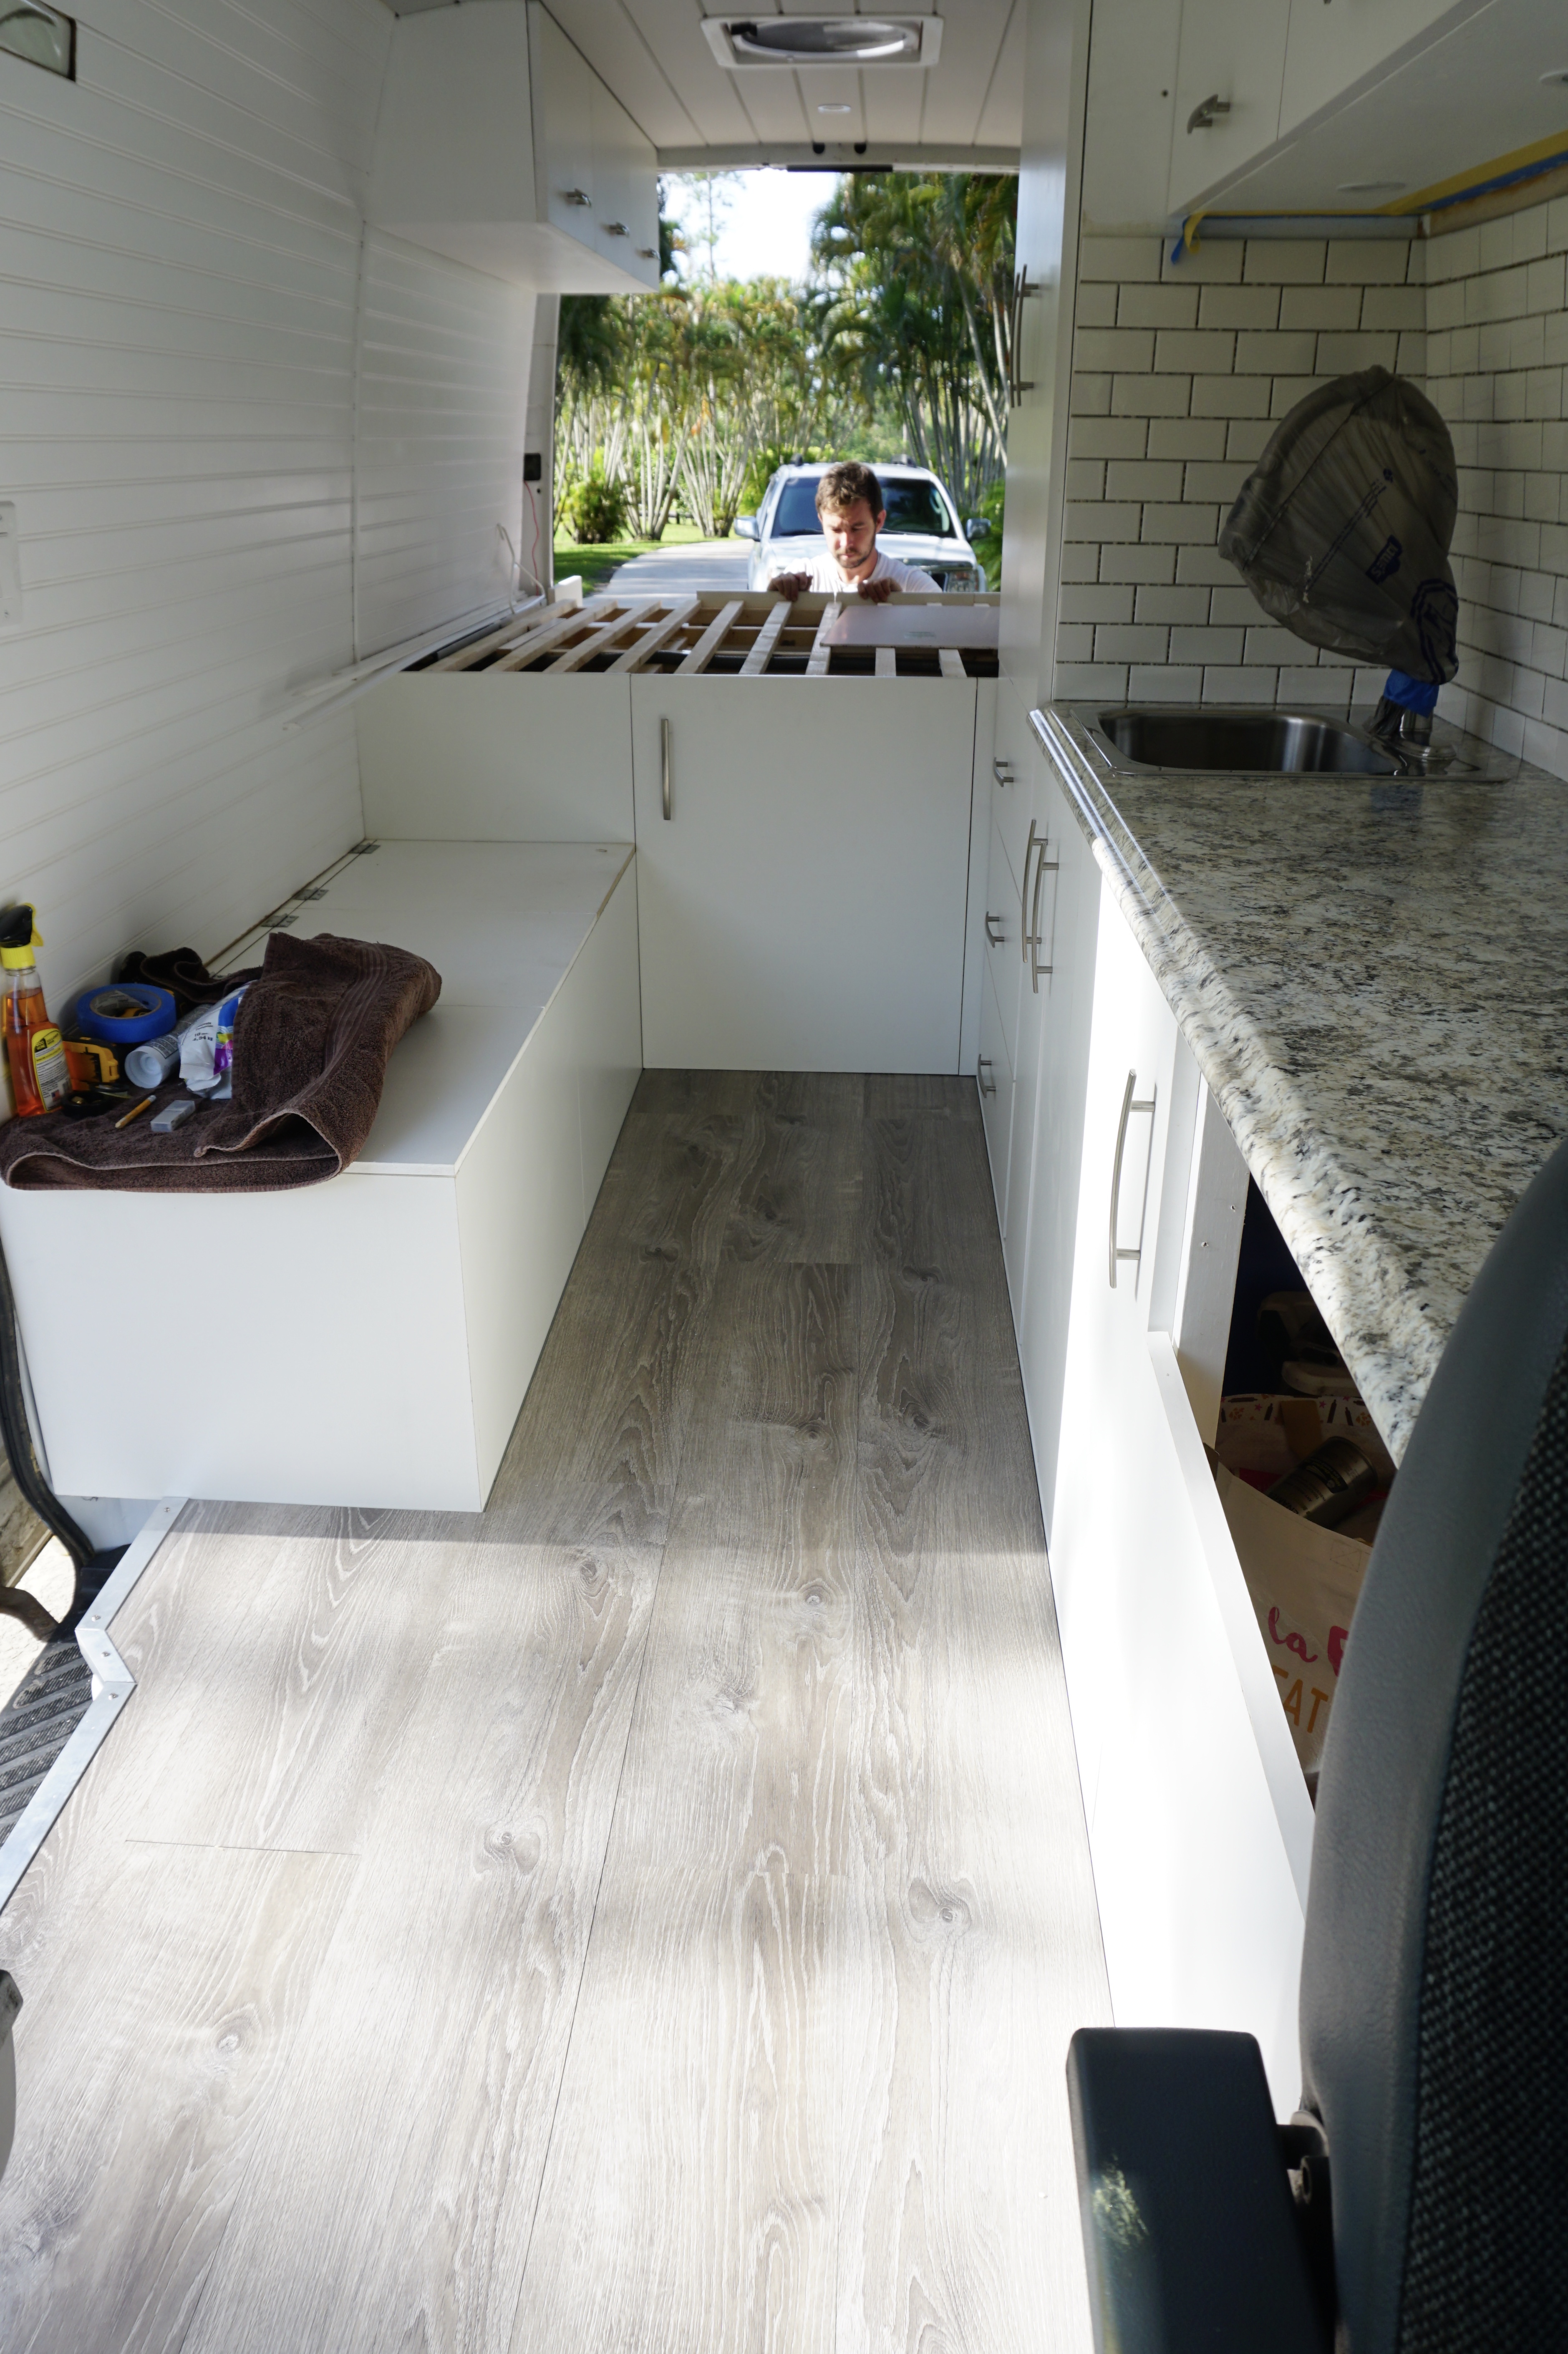
The kitchen counter framework is 32” tall with a 3/4” thick countertop on top of it making it 32.75” tall in the end. The countertop is 20” deep and 72” long (most van builds opt for a shorter length countertop fyi, we wanted a large one).
some of the kitchen counter framework, notice metal brackets in corners for extra support
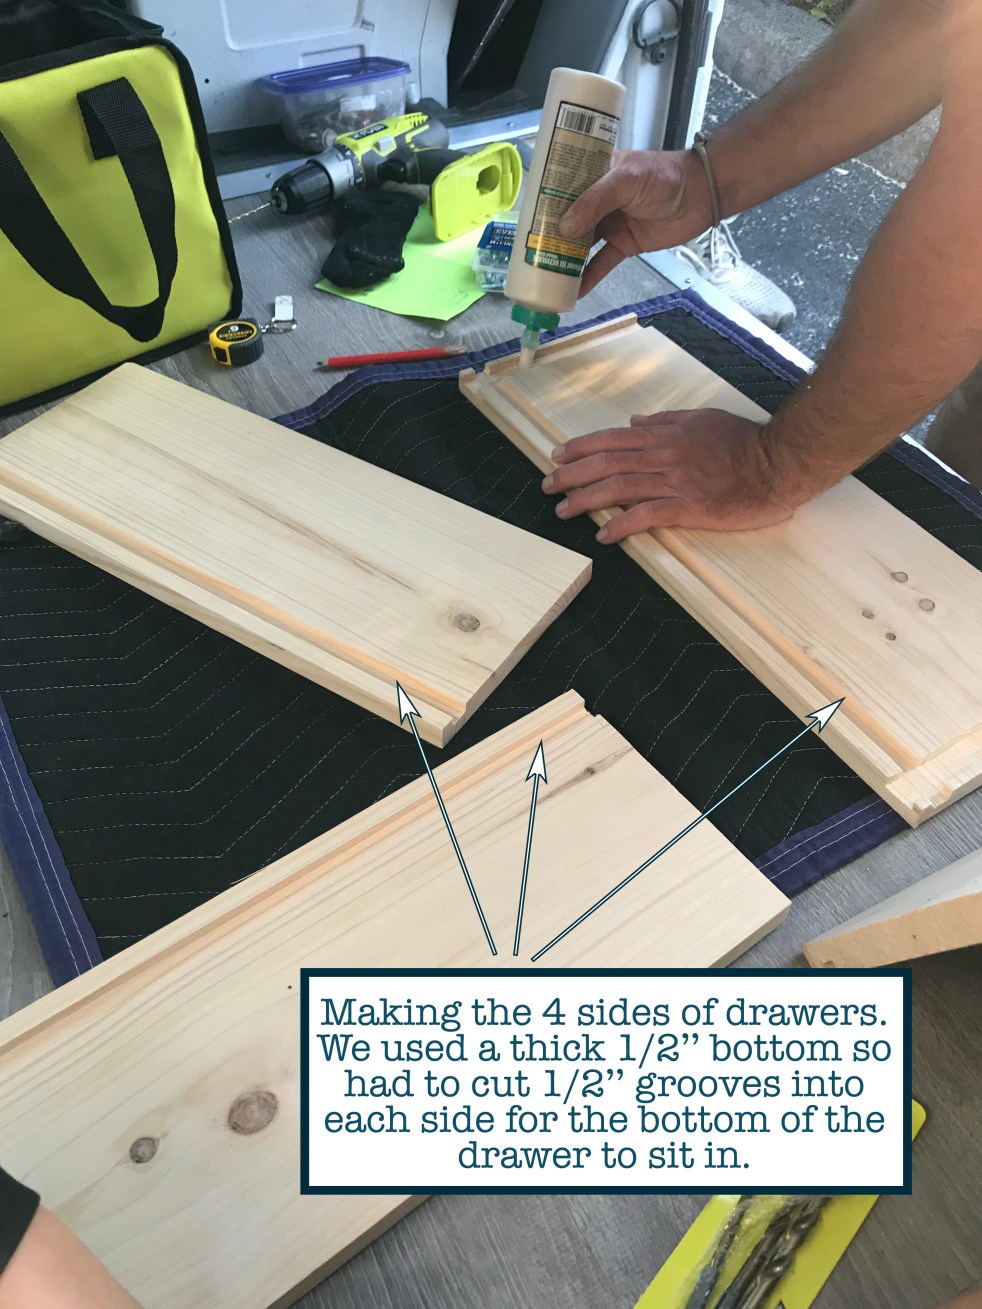
Used 2×2 treated wood for the framework for all the cabinetry underneath our countertop and in the floor to ceiling. We used 3/4” white melamine for all cabinet doors and drawer fronts. We used 1/2” MDF for the shelves inside the top of the floor to ceiling cabinet as well as for the bottoms of the drawers. (Our first van build we used thinner material for our drawers bottom and it ended up bending and breaking once weight was put in the drawer.. this 1/2” MDF is very strong.. make your drawers durable!) The 4 sides of our drawers were made with 9” wide x 1/2” thick pine wood. I am able to put a lot of weight in my drawers and they’re perfect. We used metal brackets throughout the framework for extra support. We used surface mount hinges on all the cabinet doors and brushed metal arched handles on all the cabinets. (Picture of making drawers below)


drawers installed before melamine drawer fronts attached
Bench Seat
Size: 60” long x 17.25” tall x 20.5” deep (height is combined 17 inches of framework & 1/4” MDF for top lids, depth is combined 19.75” framework + 3/4” melamine siding). We then have a 3” firm cushion on top of this.
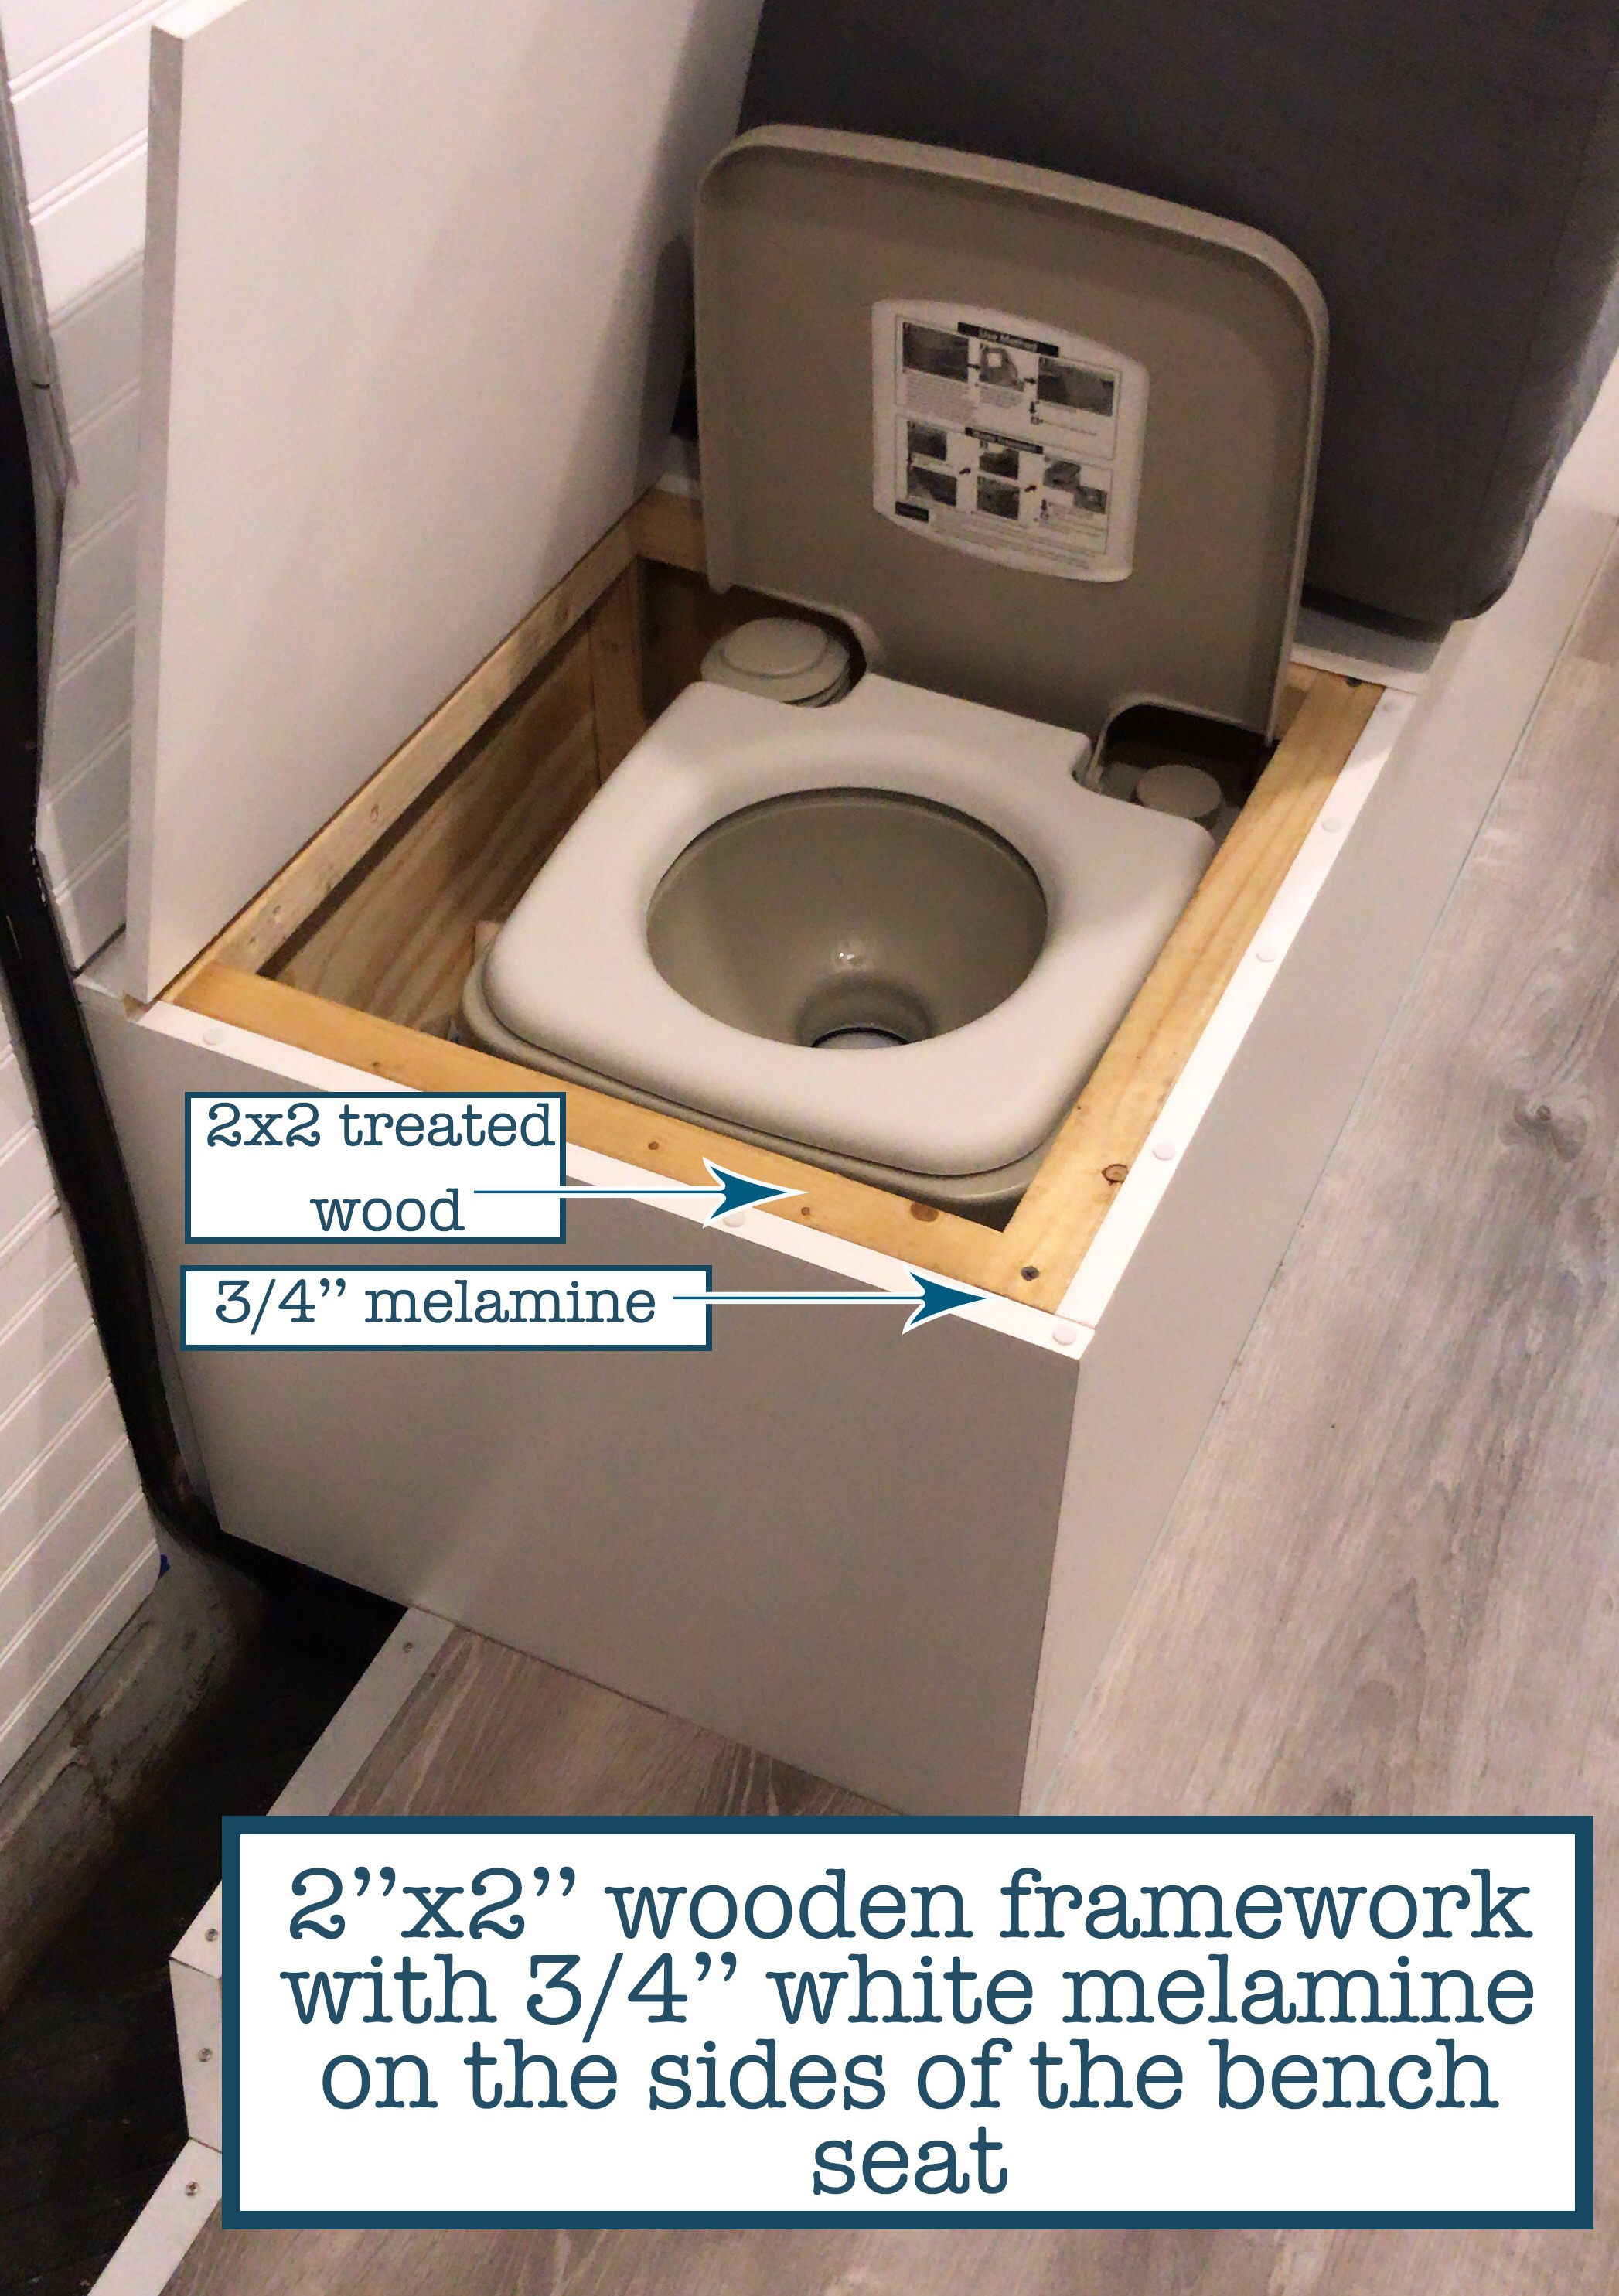
Used 2×2 treated wood for the framework, 1/4” MDF for the top “lids” that open and to separate the 3 storage areas in the interior of bench, and 3/4” white melamine for the finished sides of the bench. We used 3” metal brackets for extra support inside the corners of the 2×2. This is longer than most bench seats, but fits us both comfortably and I can even lay down on it. A typical chair/toilet is around 16-17” high so it’s a typical height to sit on. Our cushion is firm and you cannot feel any wood when sitting on it. The 3 lids on top of our bench seat open separately for 3 separate storage areas (separated with MDF in the storage area itself). We used simple hinges for these lids. Our portable toilet sits in one of these storage areas. It is a perfect place for it as the toilet is 16.5” high.
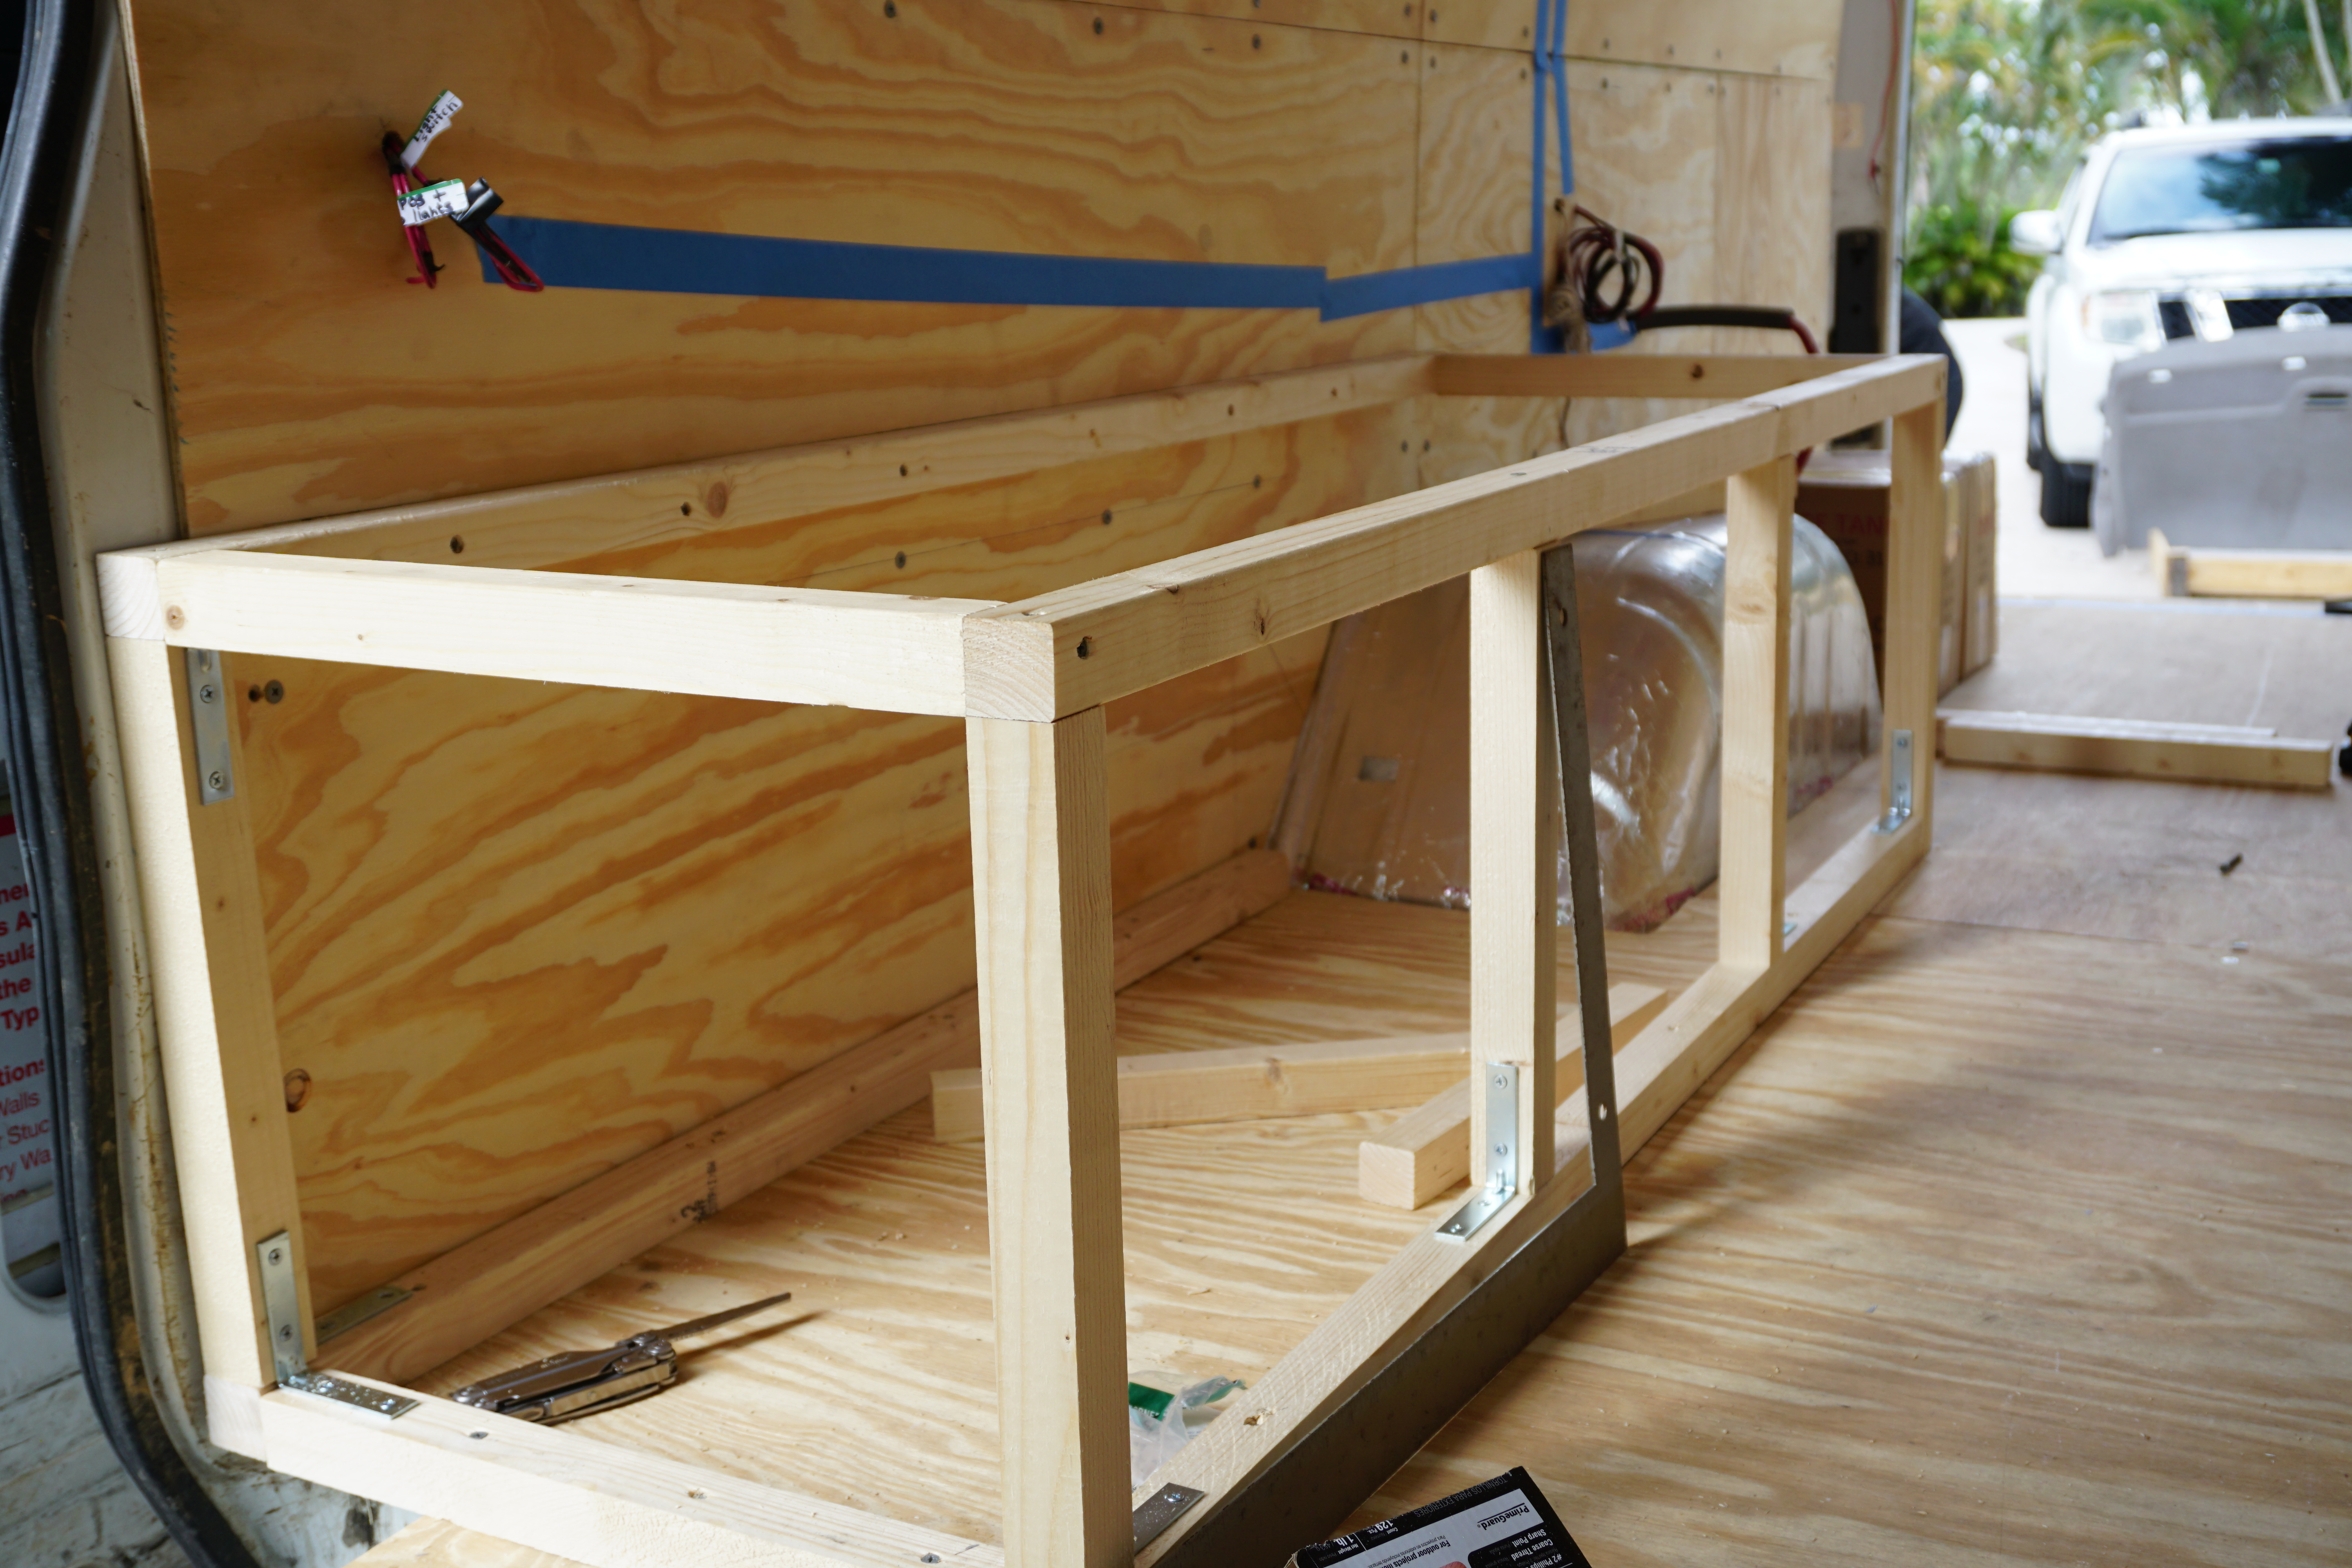
Bench seat framework with 2×2 wood and metal brackets


finished bench seat!
Bed Frame
Size: 60” wide x 68” long x 30” high
Used 2×2 wood for the framework and 2×1 wood for the bed slats on top. We like to have bed slats as opposed to a piece of plywood/full sheet under our mattress for appropriate airflow under the mattress (if you put your mattress on top of a piece of plywood or solid wood without slats, you will be prone to mold! Make sure you have air flow under it). 3” metal brackets were placed throughout the 2×2 framework corners for extra support.

We have 3 different storage areas underneath our bed, separated with large pieces of MDF “walls”. We definitely wanted our electrical section (fuse box, batteries, solar control box, etc) to be protected and have their own space where nothing else could get into. So we used one of these 3 areas for our electrical area. See how we set up our electrical power here.
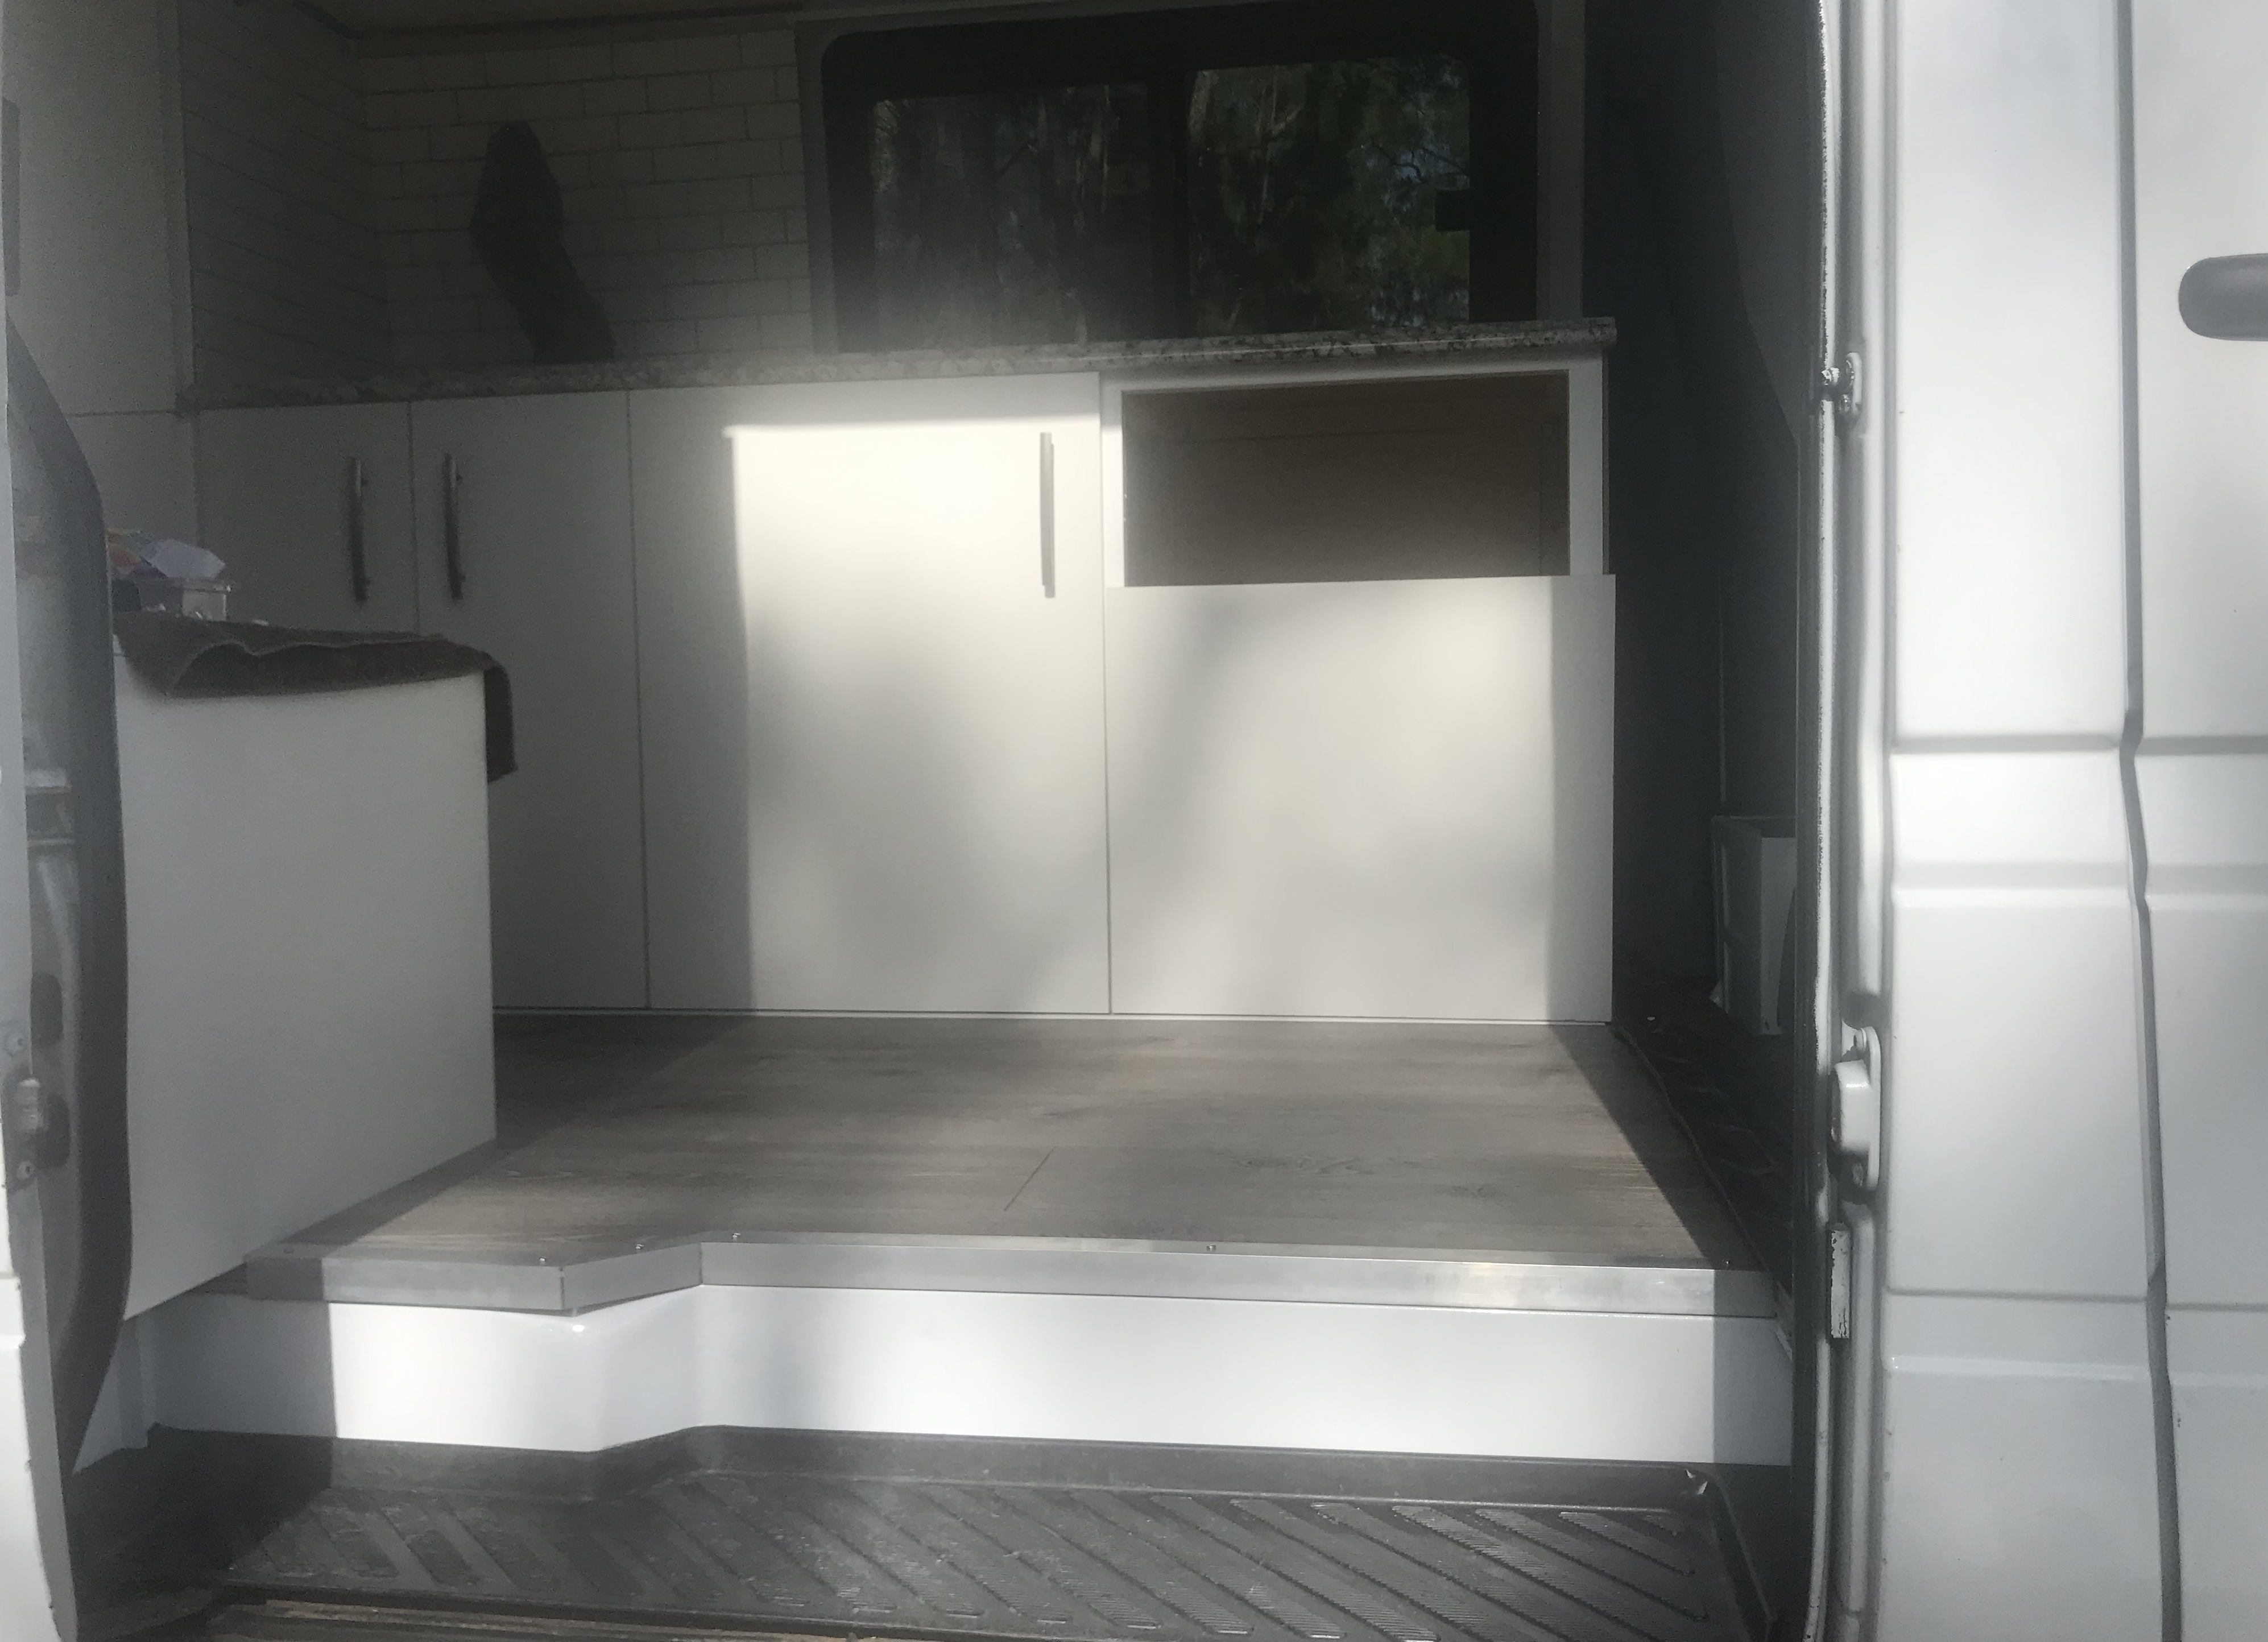
Access doors to get to these storage areas were made with 3/4” white melamine cut to size. We have 1 large access door on the front/interior side of bed and 4 access doors on the rear/exterior access side of bed. (see below.. first photo of them closed, second photo of them open). We used surface-mount hinges for all of these doors and opted for brushed metal handles on these doors.

Tile Backsplash

ceramic tile that came in sheets that are 12” x 12”
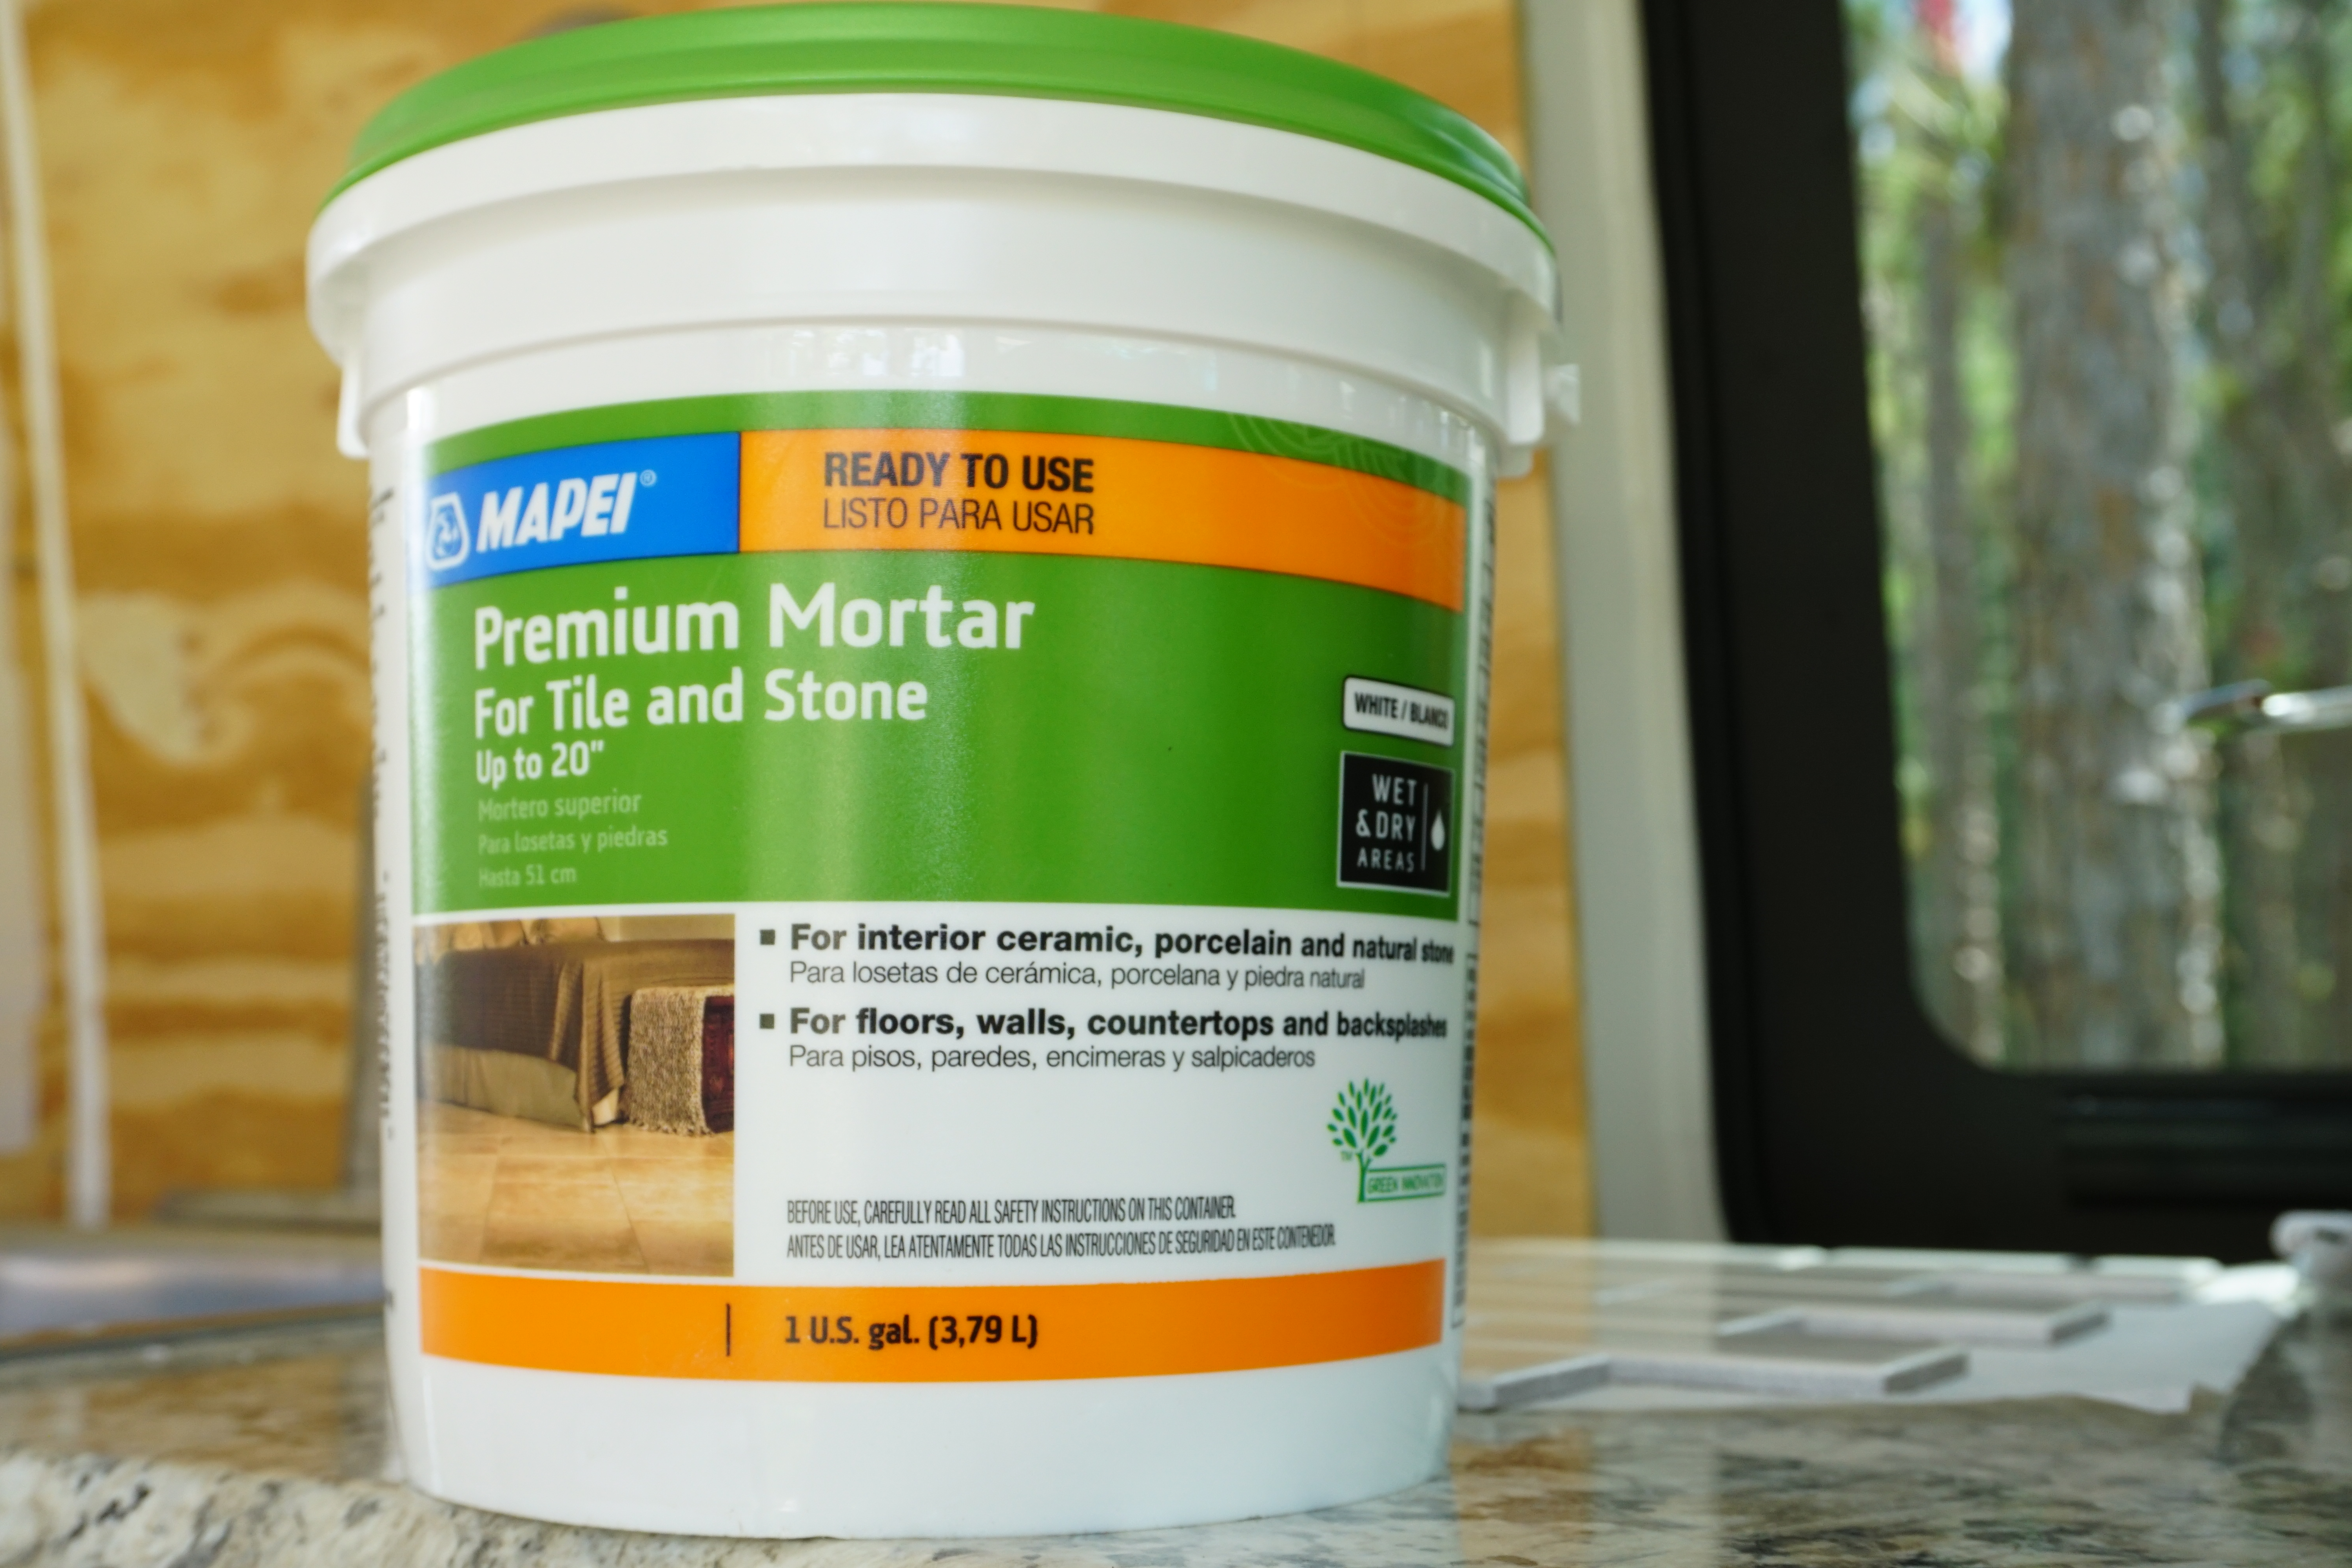
adhesive for tile to the wall
These look amazing but are super affordable. The installation can be messy, so be sure to put old towels/rags on the counterspace under the wall you’re installing tiles on. Theres basically just 3 steps. Spread the premium mortar adhesive evenly with a scraper. Be sure the scraper has gaps in it or “teeth” so that there are lines in the adhesive on your wall. This will allow the mortar to spread into those gaps when you press the tile onto it, rather than the mortar spreading out all over the sides of your tile when you press the tile onto it. After the mortar is spread evenly, place your tile sheet where you want it and push firmly into the adhesive. You will be able to move it around for awhile so don’t worry if it’s not perfect right away. Repeat this process until all your sheets are in place. You will most likely have to cut some tiles on the sides to fit your wall perfectly. Do this with a tile cutting saw. A tile cutting saw has water inside of it. You will want to scrape off any excess mortar/adhesive that got onto the front sides of your tiles before it dries. If it does dry, you can use a razor blade and press lightly to remove dried mortar. We waited 24-48 hours before applying the grout. This allowed the mortar adhesive to full dry until cement-like.

gray grout
We chose to grout our tile in “pearl gray”, but you can choose whatever color grout you wish. Follow instructions on the bag to mix the grout with water based on how much you need. Use a scraper to evenly spread the grout over top all of the tiles. Once it is spread evenly into all of the cracks, it will look messy on top of the tiles, but simply take a clean sponge and wipe off all the excess grout from the top of your tiles.


2. Choosing a Layout that Works for You
When deciding how you should lay out your van, you should ask yourself a few things. The first being obvious but how many people will be living in the van? (more people=more bodies and more ‘stuff’=more storage or more rear seats needed) Then ask yourself: Do I have any large items (bicycle, surfboard, chairs, etc) that will require me to need a “garage”? Is a bathroom necessary for me? Do I want a kitchen inside the van or just portable items that can be used outside the van? How tall am I? (to help determine the direction the bed should face and ceiling options) What is my budget? What can I absolutely not live without? What can I live without? What amenities/extras would I like to have, if any? (hot water, large water supply, oven, shower, fridge, etc.)
Once you have answered those questions you should have an idea what you want in the van and can think about your layout.
Bed Options – The 2 most functional and popular options include either a fixed raised bed with storage underneath or a lower bed that transforms into a bench/table during day. There are of course other options such as a single size bed if that’s all you desire. For us, a lot of storage space was a necessity. So this meant choosing a permanent bed, raised up, with large storage area underneath. This also appealed to me because having to physically change my bed into a table/bench every morning and vice versa each evening didn’t appeal to me.. when I’m tired I just want to crawl into bed. However, if you don’t need that tall storage space and/or don’t have space for a table elsewhere and want a table, you may want the daybed set up instead. You can still use the area under the daybed bench seats for storage, they just won’t be as tall as the raised bed. Either one is a good set up to store either your water supply or your electrical setup under. We opted to have a safe closed off area for our electrical setup underneath our bed (batteries, solar control, fuse box, etc).
If you have more than 2 people, you are obviously going to need more than 1 bed. Options for this include a bench seat that pulls out/transforms into a bed, a small fixed loft bed built above the main bed (good for small child), or if your budget allows, a second full-size bed on a lift system that raises to the ceiling during the day.
No matter which type of bed you choose, you’ll need to choose the direction of your bed. A sideways facing bed (head/feet on the sides of the van) is shorter in length, but provides a lot more space to build other elements in your van. But if you are tall, you will want a longways facing bed (head/feet on the front/rear of van) to be comfortable when you sleep each night.
*For a specific size reference, our van (a 2005 Dodge Sprinter), is about 6 feet wide sideways. However, because the wall curves inward as it rises up, it is only about 5’8” wide where our mattress sits (including after our insulation, plywood, and wall boards are up). We are both pretty short people so this works for us, even if Dave has to sleep at a slight diagonal. So the length of our bed ended up being 68” long. We made the width of our bed the same as a standard queen size, 60”. Other people would be way too tall for that length and need the long ways facing bed. Just remember when you’re planning your own bed layout, keep in mind the curvature to your walls and thickness of your wall coverings. You will not want to be uncomfortable in your bed each night.
Bathroom Options– Is a full bathroom really necessary? Personal preference, size of van, budget, and where you will be located should be considered. Some vans have a full bathroom built in. Meaning a room with a shower and toilet inside of it. The convenience and comfort of having one puts the mind at ease, especially if you have a family with children in the van. This full bathroom can include a portable toilet, composting toilet, or even toilet set up with piston flush into a gray water tank like an RV. This toilet would typically sit in the same waterproof ‘room’ as the shower. However, full bathrooms can take up a lot of space and be very costly. If your space, budget, or personal preference does not allow for a bathroom, there are plenty of other options!
Toilets: If you’re a single guy in a van, a toilet may not even be a necessity for you. But as a female, I most definitely wanted some sort of potty in our van (full disclosure: I typically use the great outdoors.. but when it’s dark, raining, in a busy area, etc.. it is soo convenient having the toilet).
I recommend getting a portable toilet or a composting toilet because neither one requires plumbing. A portable toilet is affordable, does not require electricity, is easily moved around, can be stored wherever it fits, used where its stored, or taken outside in a tent when camping. A composting toilet is typically kept in the same place once installed and may sometimes require an electrical outlet to run a fan. Composting toilets can be more expensive but are environmentally friendly and do not need to be “dumped” out. They also typically do not require any chemicals that are mixed and dumped with your waste like a portable toilet does. A composting toilet usually evaporates all the liquid and breaks down the waste. It typically has a liner on the bottom that then needs cleaned with remaining waste every so often, into a safe place. A portable toilet needs to be “dumped” in a safe place. Neither toilet smells if set up properly. Toilet paper can be used in both. Both work well for van life if used responsibly.
As far as layout for toilet goes, put it where it fits! We hid our toilet inside of our bench seat, which is a common option. It is fully functional and usable in there just by lifting up the bench seat lid without ever having to move the toilet. You could also build the toilet its own little podium and leave it exposed if you wanted it more accessible (but also more visible). I’ve seen other vans put their toilet inside a cabinet that slides out on drawer slides to use, and then slides back into the cabinet when not in use. I’ve seen people store just store it underneath their bed or in a regular cabinet and then take it out to use when needed (keep in mind it may get heavy depending on the size).
Showers: People get so creative with ways to shower. That’s the thing about tiny living, it makes you so innovative! Of course there is the full bathroom “wet room” option as mentioned above. But when a full shower room is not in your budget or you do not have space, think creatively. A large majority of van lifers use solar shower bags. They are the cheapest option, but not always the most convenient option. Fill up the bag, leave it out in the sun to heat up, and then hang it from anywhere (rear door of van, tree branch, etc.) and shower. You can also connect a hose from your water pump and have the hose run somewhere of your choice (out the rear door, out the slider door, into a bucket, etc.) to use the water from your water storage tanks with a bit of pressure to shower. You can attach a hose head or shower head to the end of this water hose. You can purchase a hot water heater that is heated by propane, with a shower head attached to it and then use this out one of your doors. You can create a “pop-up” shower either in your van or outside of it using a tent outdoors or a shower curtain indoors hung with hooks that can be removed when not in use. Indoors would of course require a waterproof bottom whether a shower floor or bucket. So many options.
Kitchen Options– Sink? Stove? Oven? Fridge? Storage space? Coffee? Living in a tiny home means downsizing. It means you are probably going to have to pick and choose what’s most important to you. Yes you can absolutely have all of the above in your van. A lot of people do. But I’d say the 2 most important things to have kitchen wise are a sink and a stove. If you plan on living in your van for any length of time or going off grid ever, a sink is a must in my opinion. I went into full detail of how to set up water supply in another blog that you can click here to read, but having running water is convenient for washing dishes, washing hands or feet or face, brushing your teeth, etc. It can be a tiny sink that takes up next to no space or a large farmhouse sink if you want. A stove is capable of cooking just about anything (even things that are meant for the microwave, oven, etc).. it just may take longer than you’re used to. A fridge is a necessity for those living full-time in the van, but may not be a necessity to those who are in it for the weekend or part-time. I say this because a good, energy-efficient fridge is super expensive. Dometic fridges or Isotherm fridges are the best options for full-time van life. Top-opening fridges may need a drawer to be stored in and pulled out to use for optimal storage space (often under a bench seat or under the bed). Front-opening fridges can be built right into your cabinetry in a space of your choice. You can always have a small 12volt cooler and/or a cooler that is filled with ice for short term.
Structurally in the Kitchen, you will most likely have a short countertop length-wise. In our first van our entire kitchen was only about 40 inches. We wanted a larger kitchen in our second van so our countertop is actually 72 inches long! Some vans make due with a kitchen only 24-30 inches long depending on the size of your sink/stove. You can add extra counter space into your van by putting a counter into a drawer that pulls out while cooking and is stored when not in use. You can also add extra counter space by folding it down when not in use and folding it up when using it.
The layouts for builds are endless, innovative, and creative. Be sure to search van life and van build hashtags on Instagram for inspiration. Read vanlifers blogs, watch their youtube videos, do research for yourself. There is no right or wrong way to build YOUR van. Do what makes you happy and what works for you.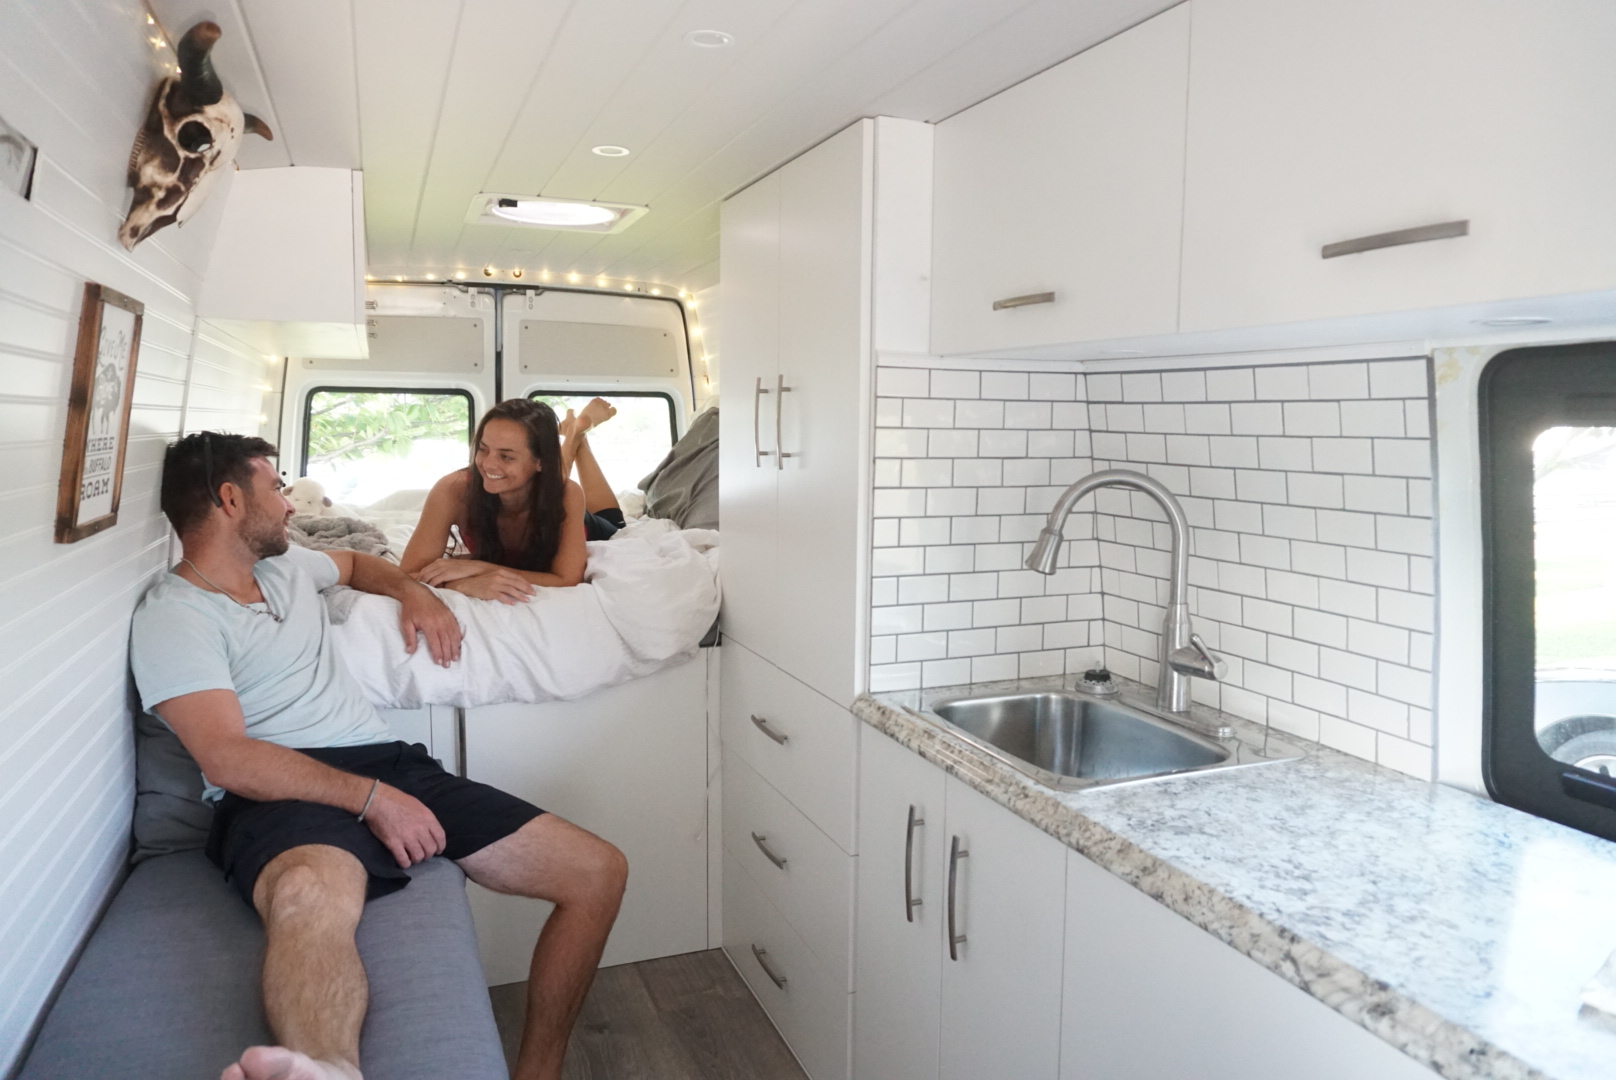
Hope this helped you! If you want more information, have specific questions, please feel free to email me at KellyNicoleTravel@gmail.com or send me a message on Instagram @KellyNicoleTravel.