 Water Supply Options/Basic Intro: Whether you are going on an off-grid road trip for a few days or living in a van full-time, water supply is a necessity that you don’t want to skimp out on. There are many options to have a supply of water in your van. The simplest option being storing water in some sort of storage tanks (whether plastic or steel) with no pump at all. You can manually pour it out to use as needed or place it somewhere high and use a gravity-fed approach for running water. The other non-electric options are using either a manual hand pump or a manual foot pump. Meaning each time you manually hold up/push down a pump with your hand/foot, it creates pressure for water flow and will turn off when you release that hand or foot. These are the most energy-efficient ways to gain water supply in your vehicle. The last option, and the option that this blog is about, is through a 12volt electric water pump. I highly recommend this for full-time and longterm van lifers. Once set up, it is very similar to that in a standard home and will be super convenient for cooking, washing dishes, washing up, etc. while only drawing about 5-7 amps/power when in use.
Things you will need:
- fresh water storage tank
- vinyl hosing to get fresh water from tank to sink OR 1/2” PEX pipes to get fresh water from tank to sink
- 12 volt fresh water pump
- positive/negative electrical wires for the pump
- hose clamps OR PEX clamps depending if you used vinyl hose or PEX pipe
- a sink
- a faucet
- male and female plumbing adapters/elbows (there are various kinds depending on what attachments you need for your specific water tank, specific pump, and specific faucet, etc)
- PTFE tape
- vinyl hosing or pvc piping for your waste water to drain
- a grey water tank if desired
*some optional add-on’s to a plumbing system include: an accumulator (lessens the pressure on and noise of your water pump), a water heater, and a pipe strainer (to keep pump clean etc).
The items we used personally can be found by clicking here.
*Please note: Size of water tanks vary greatly and depend on personal preference, as does the type and power of the water pump. This blog is based upon the materials we chose for our first van and is meant to serve solely as a guide to help you set up the materials you choose. This blog not describe setting up a shower, just a sink.
Setting it Up in 10 steps:
- Securely run your positive/negative electrical wires from your fuse box to the location where your water pump will be located. Make sure they are secured along their route using cable clips or wire staples so they don’t move around while the vehicle moves. Also suggest putting them in protective conduit housing where it is possible for added protection. (Electrical sidenote: The gauge of this wire depends on the amperage of your exact water pump as well as how far your wire will be running. Should be around 12-14awg though).
- Hang/Secure your 12 volt water pump on the wall or horizontally somewhere. Self explanatory, but it should have screw holes built in, so simply screw in until tight against wall or surface.
- Connect the wires. The water pump typically comes with a short positive and negative wire attached to it. Connect the ends of those positive and negative wires to the end of your wires you set up in step 1, using cable connectors. Do so by placing the positive end of your longer wire into one side of the connector and the positive end of the pumps shorter wire into the other side of the connector. Making sure the 2 wires are touching or intertwined, squeeze the connector until very snug so the wires cannot fall out. Then repeat this with the negative wire. If your pump comes with 2 negative wires, you can place them both in the same connector. Then connect the other end of the long wires to a positive and negative terminal on your fuse box respectively. (Side note: if your water pump happens to be located near your fuse box for some reason, the short wires on pump may reach the fuse box and you can skip the connectors part in this step).
- If you haven’t already done so, place your water storage tank wherever you have decided to keep it/them. Some choose to have 1 large tank (for more water supply) that is typically stored further away from the sink (under the bed for instance) and have the tubing or piping run further from tank to sink. Others choose to have smaller size storage tanks and keep them directly under the sink with a short tube run.
- Size of tank is personal preference based upon the amount of water you will use daily, ability to lift the weight if refilling outside van, how long you will be away from somewhere to refill, and where you want to refill it.
- The material of your tank is also personal preference. Plastic is most common and most affordable and comes in various sizes. Steel is more environmentally friendly and possibly healthier to store water in, but is more expensive and harder to find.
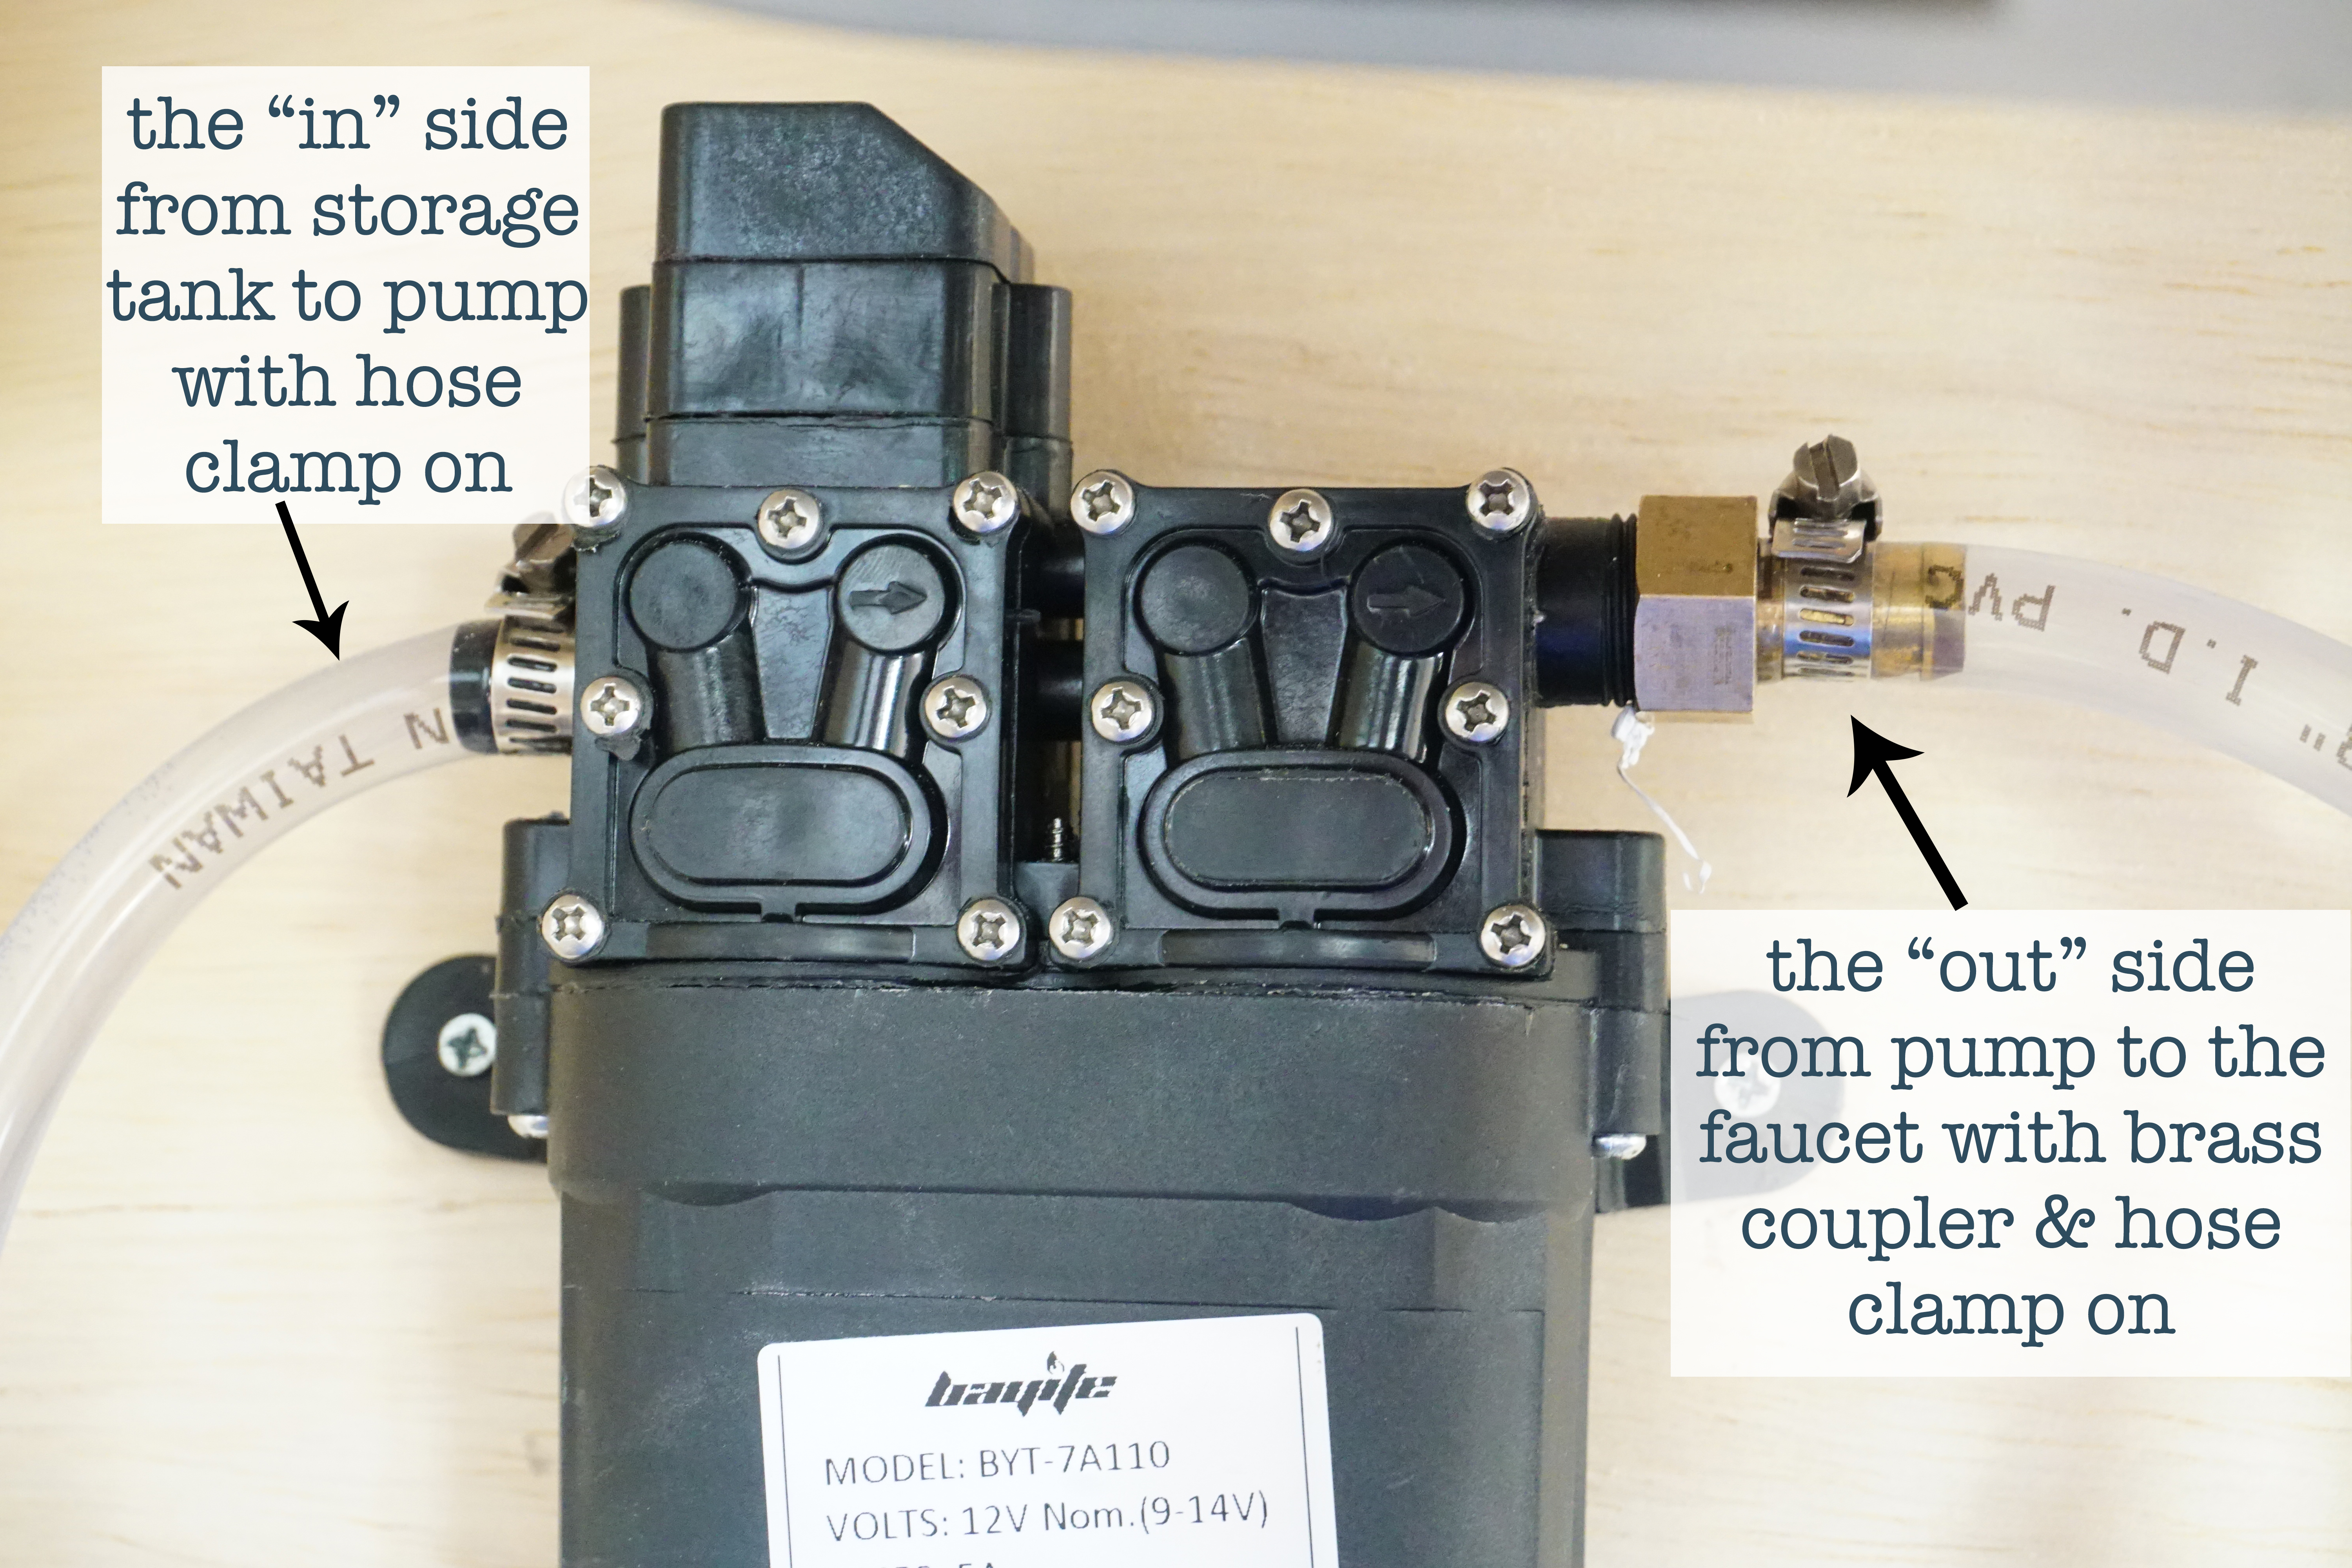
- Measure and cut the length of hosing or PEX you will need from the bottom of your water tank to the “in” side of your water pump, as well as the hosing from the “out” side of your water pump to the underside of your faucet. (Note: if you are adding the optional accumulator or water heater, they will both be connected in between the water pump and the sink). There should be 2 separate pieces of hosing or piping without the optional extras.
- Connect the pieces of hosing OR piping you just cut to your water pump. Do this by placing the hosing/piping around the inlet and outlet of the pump, and then tightening with an appropriate size clamp. The water pump should have come with 2 clamps that fit perfectly on your pump’s inlet/outlet. If not, an average size would be between 3/8” & 1/2” for hosing and clamps. On the “out” side of our pump, it was required to place a brass coupler before we attached the hose. This is not always the case, but the pump should come with it if it is required. See photo below.
- Note: Even though it is not connected to the faucet yet, if you have a fuse in your box and water in your storage tank, you should have running water at this point. We opted to test our hoses out before connecting the faucet by running the end of the hose out of the window as a test. It did not leak and we had running water. Also note that it may take a few seconds for a new pump to turn on and get the water flowing.
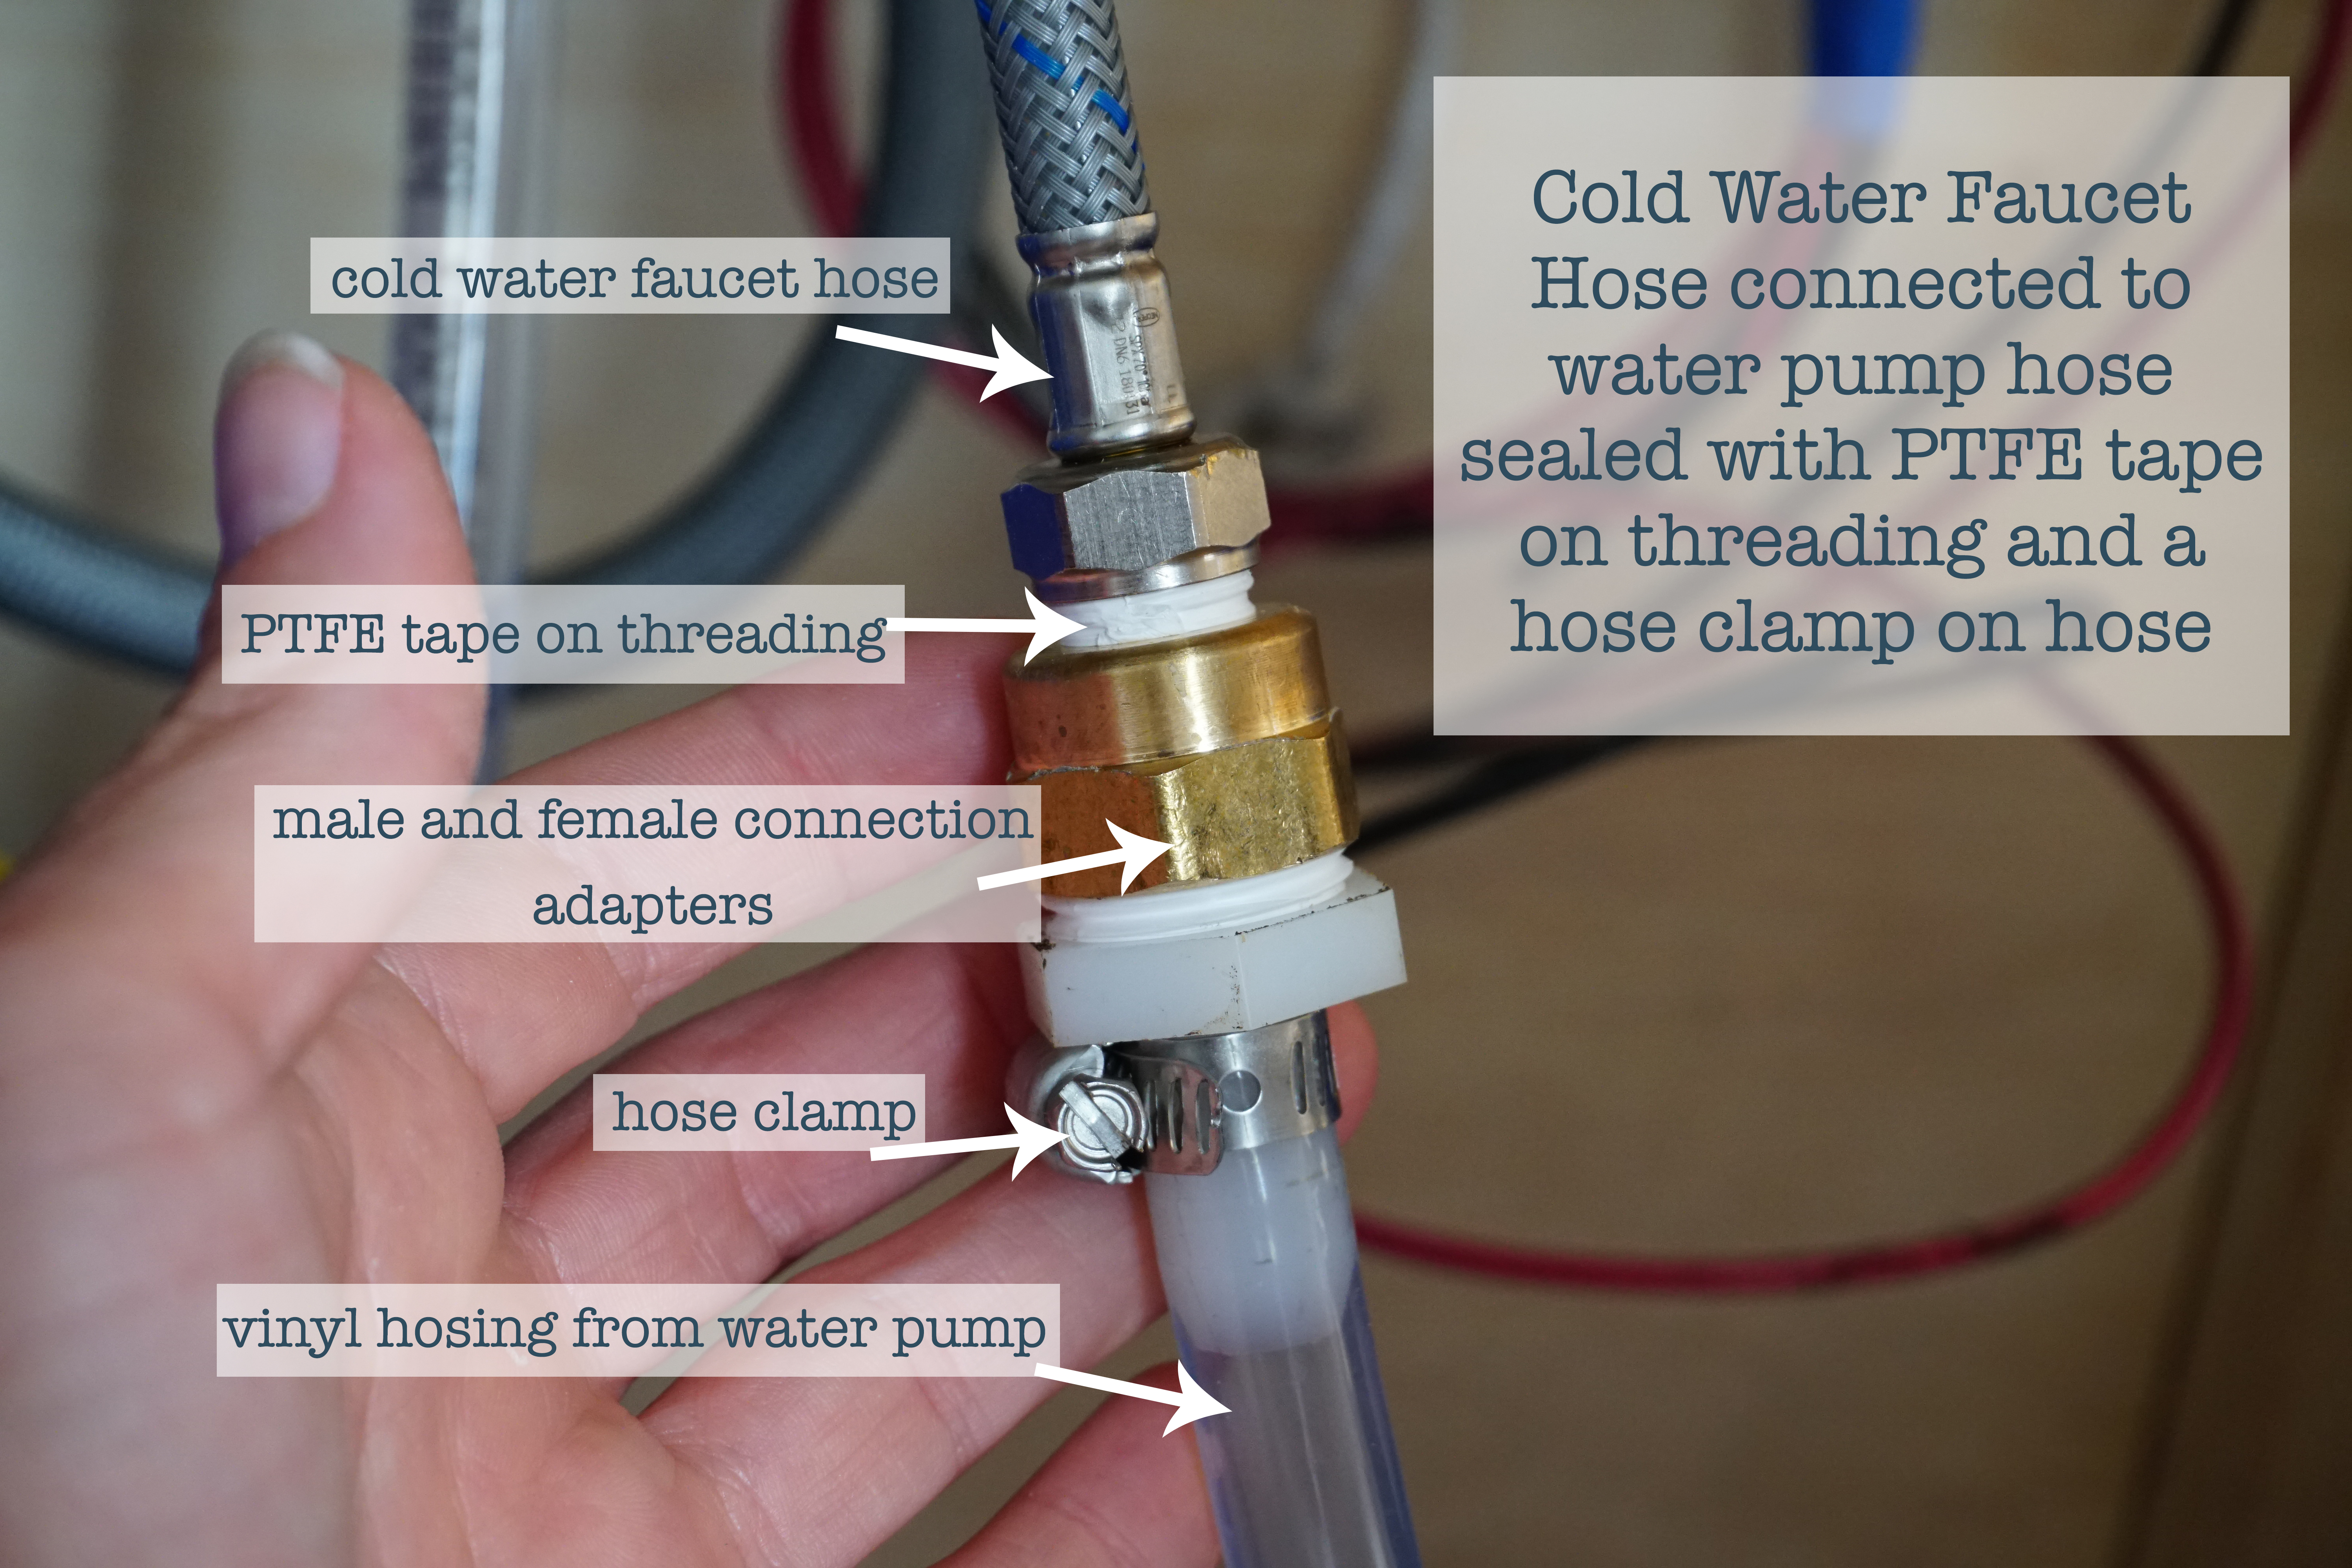
- Connect your “out” hosing/piping to the faucet. Your faucet will most likely come with both a cold water and hot water hose hanging underneath it.
- First, attach the hosing to the cold water hose on the faucet. (Each faucet is slightly different and may vary based upon the size of the hose. All of ours had a 3/8” inner diameter, and most should be similar to that). The faucet should have a threaded female on the end of it’s cold water hose. Attach a threaded male to the faucet’s female. The other side of threaded male should have a ribbed end to fit inside your water pump hose. Then secure/tighten the ribbed end inside of the hose by placing a hose clamp around the exterior of the hose. I also highly recommend I recommend placing some PTFE tape on the male threading before attaching it to the female end, as it will add an extra seal to ensure no leakage in the connection.
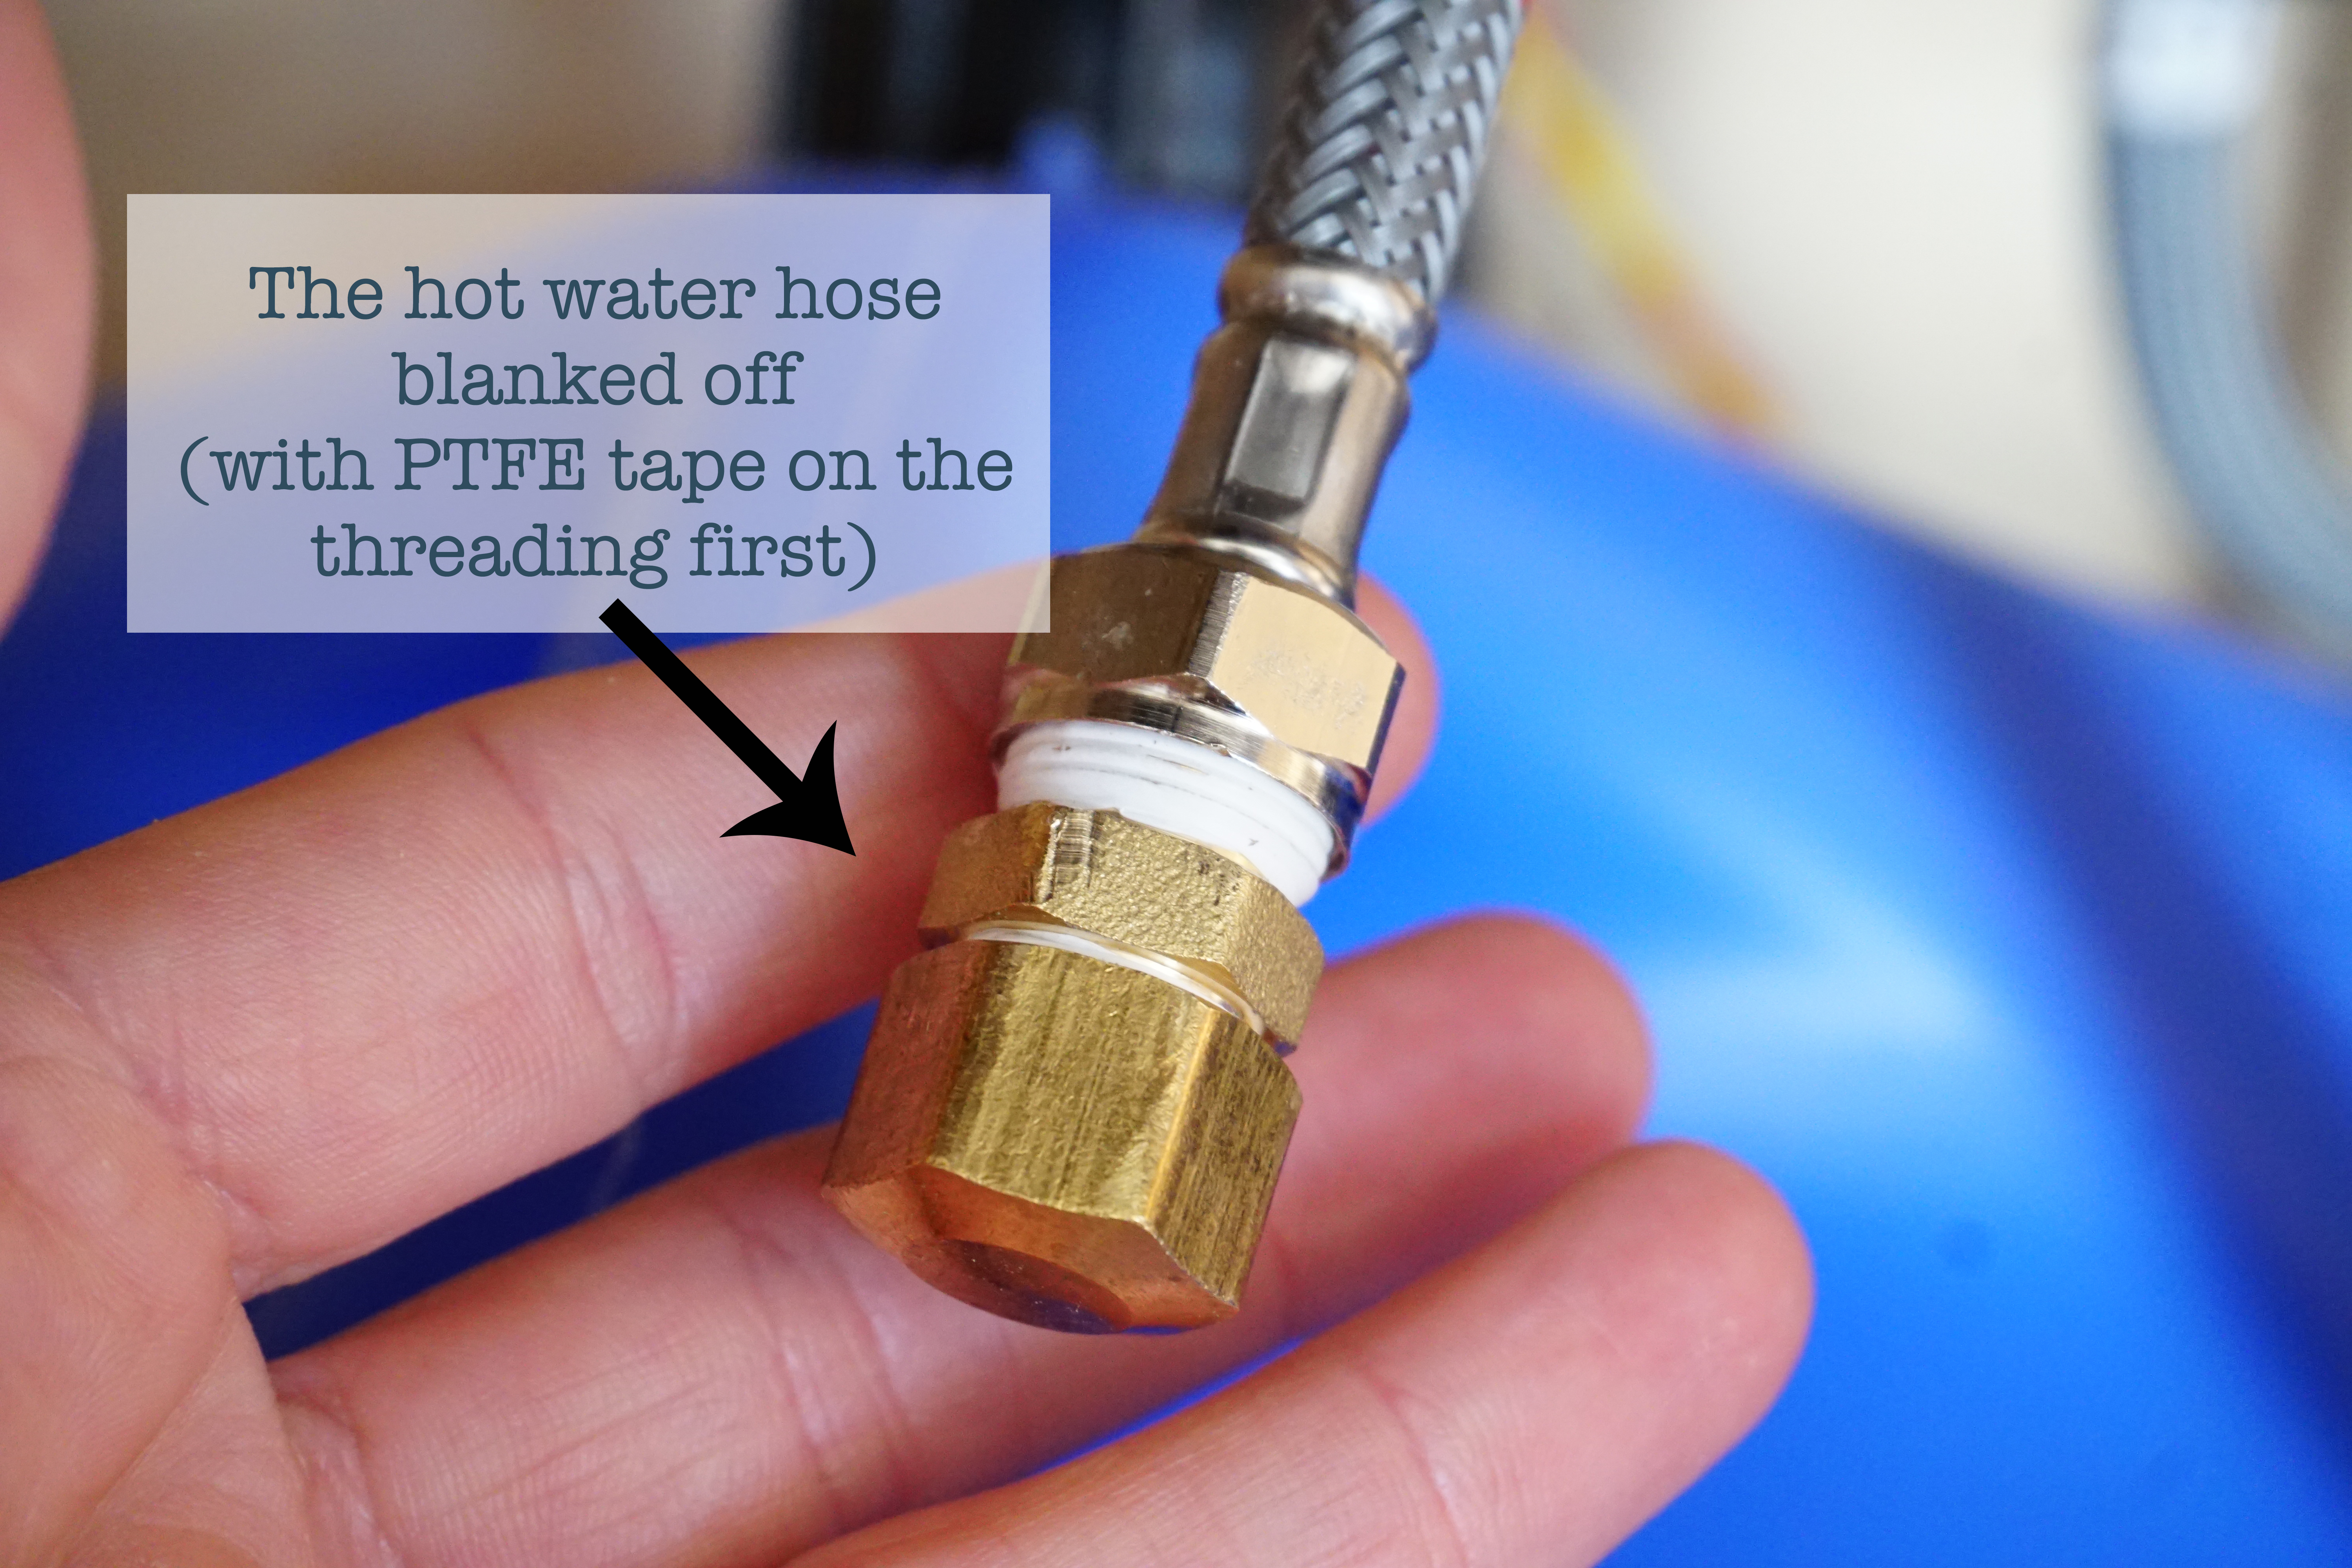
- In the van pictured we opted to not have hot water, so we blanked off the hot water hose (simply meaning close off the end of it, but still let it hang there connected to nothing). Blank off the hot water hose by connecting a threaded blank adapter to the hot water hose of the faucet. Make sure you secure in this blank SUPER tight. If it is loose, it WILL leak out water droplets. For extra security, I recommend placing some PTFE tape on the threading before attaching the 2 together.. This will add an extra seal to ensure no leakage. — This is simple to change to allow hot water if you opt to buy a water heater in the future.
- First, attach the hosing to the cold water hose on the faucet. (Each faucet is slightly different and may vary based upon the size of the hose. All of ours had a 3/8” inner diameter, and most should be similar to that). The faucet should have a threaded female on the end of it’s cold water hose. Attach a threaded male to the faucet’s female. The other side of threaded male should have a ribbed end to fit inside your water pump hose. Then secure/tighten the ribbed end inside of the hose by placing a hose clamp around the exterior of the hose. I also highly recommend I recommend placing some PTFE tape on the male threading before attaching it to the female end, as it will add an extra seal to ensure no leakage in the connection.
- Choose where the water will exit from your sink’s drain. Some people opt to have a grey water tank (plastic or steel) so the sink’s dirty water goes into that tank safely and then emptied at their discretion. Other people choose to have the drain hose empty to the outdoors on the underside of their van. There is no right and no wrong choice, as long as you are mindful about where you dump your waste water. Both ways end up being disposed somewhere. Both have pros and cons. Some people may not have room for both a fresh water and gray water tank. Others have found that their grey water tanks may cause a bad odor in the van, fill up quickly, or become too heavy to lift to empty out. The second option of draining outdoors is actually quite common, but you must be environmentally aware with this option. Any any time you are using your sink drain to the outdoors with something other than just plain water (hand soap, washing dishes, etc) you should put a bucket under your van where the drainage hose is located so the soap goes into the bucket. You can then empty the bucket in a safe place that won’t harm animals or the environment. I recommend a small bucket that folds up when not in use. Also, if you choose to have it drain outdoors, a small hole must be cut in the floor as narrow as your drainage tubing is. Use common sense with the location of this hole, making sure it is close to the side of your vehicle and not by any important auto parts on the undercarriage.
- Measure and cut your drainage tubing/hosing from the underside of your sink’s drain through to either the bottom of your grey water tank, or to the exit hole on your floor. Once the drain hose is measured and cut, it is time to attach it to the drain. To attach the top of your drainage hose to your drain, you will most likely not need a sink trap (the U-shaped pipe under your sink in a typical household) because this sink trap is used to prevent sewer gases from passing back up into your piping, and you aren’t connected to sewer lines in a van. But you will still need some sort of piping to fit around your drain, followed by a connector with a ribbed end to fit inside of your drainage tube. We used some white PVC piping to fit around the bottom of our drain. Each drain size and drain hose size varies slightly so be sure to get the correct size for a snug fit. Secure the drainage tube using an appropriate size hose clamp. You will want to make sure this clamp is very tight to prevent any leakage of gray water as it drains from the sink. If you opt to drain to the outdoors, you’ll need to use an adhesive sealant around the hole on the floor to close any cracks/gaps/air around the sides of the drainage tube. This will not only seal the vehicle, but also help keep your tubing in place.
- TURN ON YOUR SINK! You should have running water 🙂
*HOT WATER* options: Although this blog does not include hot water setup specifically, there are various ways of getting hot water into your van. Electric water heaters are an option but require a lot of power being drawn, usually through an inverter. Propane heaters are the other option, but they require proper ventilation to the outside of your vehicle. There is a propane water heater in my van build shop that comes in many various sizes and also comes with an attached shower head. There is also a mini electric water heater powered through an inverter. Click here for a mini electric water heater example. On warm days, you can also rely on the sunshine to heat up a solar bag of various sizes for hot water. You can then use this to shower right from that solar bag, or transfer it into your water storage to use for anything you desire.
Update January 2024: We have put a shower in our most recent van. If you have questions about setting up a shower’s water supply, please reach out or check out the items in my plumbing shop.
If you have ANY questions whatsoever or want more in depth details of a specific step, item, or general inquiry, please feel free to email me at KellyNicoleTravel@gmail.com or send me a message on Instagram @KellyNicoleTravel